Issue: Excel can be very useful and having a list of a trick or two can make it more useful.
Quick: Excel Tips
Visual: Learning:
Formula, =REPT(”I”,B2) Where B2 is cell with # of times to repeat. Great for Ad Hoc bar graph.
Thursday, June 30, 2011

Saturday, May 21, 2011
Thursday, April 28, 2011
Rsync Amazon Cloud Servers
Issue: Need to sync data between Amazon EC2 servers that use certificates
Quick:
Visual/Learning:
Found the following information on this website
----Copy of Notes from the website-----------
Remote ssh rsync linux backups with certificates and no passwords
by Greg on Oct.25, 2006, under Backup, Linux, Scripting, Security
Uber quick howto: (based on Debian)
1. Make sure ssh, rsync and sudo are installed and working.
2. Add a user account, on remote system.
2.a Add a certificate with openssl or ssh-keygen (look that up elsewhere)
2.b Make sure the cert is unencrypted with no password. Yes, that is a slight security concern, HOWEVER, if you are very careful to secure that private key, you are ok. In other words, don’t share it or let it out!
2.c Add your public key to your new users /home/username/.ssh/authorized_keys file. (how to’s for this stuff are on the web)
2.d Test this user’s login and make sure it logs you in from your local machine.
3. Now, this new user is unprivileged, so you need to use sudo for running the remote rsync command. Add this to your remote machine /etc/sudoers file:
nameofnewuser remotemachinename=NOPASSWD:/usr/bin/rsyncAbove, you replace with the appropriate names.
4. Copy your private key from the remote machine and save it on the local machine where you will be backing up to. For example, save it in the local user’s .ssh directory. /home/localuseraccount/.ssh/private.key
5. You need to create a script. In the example below, I have an exclude.txt file also, so I can exclude directories and files. Look that up in the rsync how-to’s.
#!/bin/bashrsync -avz --rsync-path="sudo /usr/bin/rsync"
--exclude-from=exclude.txt -e
"ssh -p 22 -i /home/localuseraccount/.ssh/private.key"
remoteuseraccount@remote.server.com:/ /backup/to/pathIn case you didn’t catch that, the section above with the rsync command is all one line!
----End of Copy of Notes from the website-----------
Quick:
rsync -avz --rsync-path="sudo /usr/bin/rsync" -e "ssh -p 22 -i /PathToKey/MyKey.pem" /LocalDirectory ubuntu@UseInternalIP:/RemoteDirectory/
Visual/Learning:
Found the following information on this website
----Copy of Notes from the website-----------
Remote ssh rsync linux backups with certificates and no passwords
by Greg on Oct.25, 2006, under Backup, Linux, Scripting, Security
Uber quick howto: (based on Debian)
1. Make sure ssh, rsync and sudo are installed and working.
2. Add a user account, on remote system.
2.a Add a certificate with openssl or ssh-keygen (look that up elsewhere)
2.b Make sure the cert is unencrypted with no password. Yes, that is a slight security concern, HOWEVER, if you are very careful to secure that private key, you are ok. In other words, don’t share it or let it out!
2.c Add your public key to your new users /home/username/.ssh/authorized_keys file. (how to’s for this stuff are on the web)
2.d Test this user’s login and make sure it logs you in from your local machine.
3. Now, this new user is unprivileged, so you need to use sudo for running the remote rsync command. Add this to your remote machine /etc/sudoers file:
nameofnewuser remotemachinename=NOPASSWD:/usr/bin/rsyncAbove, you replace with the appropriate names.
4. Copy your private key from the remote machine and save it on the local machine where you will be backing up to. For example, save it in the local user’s .ssh directory. /home/localuseraccount/.ssh/private.key
5. You need to create a script. In the example below, I have an exclude.txt file also, so I can exclude directories and files. Look that up in the rsync how-to’s.
#!/bin/bashrsync -avz --rsync-path="sudo /usr/bin/rsync"
--exclude-from=exclude.txt -e
"ssh -p 22 -i /home/localuseraccount/.ssh/private.key"
remoteuseraccount@remote.server.com:/ /backup/to/pathIn case you didn’t catch that, the section above with the rsync command is all one line!
----End of Copy of Notes from the website-----------
Monday, November 8, 2010
Add Quick Launch Tool Bar
Issue: Quick Launch tool bar is not on by default in windows 7
Quick: right click add tool bar and past in %AppData%\Microsoft\Internet Explorer\Quick Launch
Visual: Learning:
Link to details
Quick: right click add tool bar and past in %AppData%\Microsoft\Internet Explorer\Quick Launch
Visual: Learning:
Link to details
Tuesday, August 31, 2010
Realtek audio driver fails to load
Issue: Install Realtek HD Audio Driver failure !!
Quick: disable and uninstall UAA bus driver first
Visual/Learning:
Start menu
Right Click "My Computer"
Select Properties
Device manager button
You should see the realtek device with an exclamation point (!) next to it
Right Click and select disable
In the same page under System Devices right click and disable "Microsoft UAA bus driver"
now right click and uninstall UAA bus driver
Now right click "sound video and game controllers" and select "scan for hardware changes"
It should find the sound device and let you install the driver.
Quick: disable and uninstall UAA bus driver first
Visual/Learning:
Start menu
Right Click "My Computer"
Select Properties
Device manager button
You should see the realtek device with an exclamation point (!) next to it
Right Click and select disable
In the same page under System Devices right click and disable "Microsoft UAA bus driver"
now right click and uninstall UAA bus driver
Now right click "sound video and game controllers" and select "scan for hardware changes"
It should find the sound device and let you install the driver.
Wednesday, August 11, 2010
Snap Server is not accessible error
Issue: Suddenly started getting message that our snap server 4400 "is not accessible. you might not have permission to use this network resource. Contact the administrator of this server to find out if you have access permissions. The user name could not be found. Reboot fixes it but it comes back again. Getting internal fault in PID errors in the log file of the snap server.
Quick/Visual/Learning:
Windows 7 machine on the network seems to be the source of the problem. As soon as the windows 7 machine tries to get to the snap server it kills it for everybody.
Found work around on this page.
Procedure below fixed it for me:
4. Adjust the security setting on the Windows 7 computer:
1) Click the Start Button, type "gpedit.msc" (without quotation marks) and click OK.
2) In the "Group Policy" window, double click on "Windows Settings" under "Computer Configuration".
3) Double click on "Security Settings"-> "Local Policies"-> "Security Options"
4) In the right panel, double click on the "Network Security: LAN Manager authentication level", please select "Send LM & NTLM Responses".
5) Click Apply and OK.
5. Adjust sharing settings:
1) Go to “Control Panel\All Control Panel Items\Network and Sharing Center\Advanced sharing settings”.
2) Under “File sharing connections”, select “Enable File Sharing for Devices that Use 40 or 56-bit encryption”.
Did see the option and did not need to do these steps below for it to work for me.
3) Under “Password protected sharing”, select “Turn off password protected sharing”.
4) Save the changes above.
Quick/Visual/Learning:
Windows 7 machine on the network seems to be the source of the problem. As soon as the windows 7 machine tries to get to the snap server it kills it for everybody.
Found work around on this page.
Procedure below fixed it for me:
4. Adjust the security setting on the Windows 7 computer:
1) Click the Start Button, type "gpedit.msc" (without quotation marks) and click OK.
2) In the "Group Policy" window, double click on "Windows Settings" under "Computer Configuration".
3) Double click on "Security Settings"-> "Local Policies"-> "Security Options"
4) In the right panel, double click on the "Network Security: LAN Manager authentication level", please select "Send LM & NTLM Responses".
5) Click Apply and OK.
5. Adjust sharing settings:
1) Go to “Control Panel\All Control Panel Items\Network and Sharing Center\Advanced sharing settings”.
2) Under “File sharing connections”, select “Enable File Sharing for Devices that Use 40 or 56-bit encryption”.
Did see the option and did not need to do these steps below for it to work for me.
3) Under “Password protected sharing”, select “Turn off password protected sharing”.
4) Save the changes above.
Saturday, June 19, 2010
Virtual CD for CD-less computers
Issue: I recently bought a little mini computer for the kids that comes without a CD drive. Kids need to run some programs that are CD based.
Quick: Download Free Virtual CD software and run from ISO images
Visual/ Learning:
MagicISO.com has a free tool for creating a virtual software based CD drive.
Download and install the software on the CD-less computer.
Create a ISO image of your CD on another computer that has a CD drive.
I use Nero but you can use any burning software that support creation of ISO files.
I created a share on my computer with the CD rom drive so that I can copy over the network to my other computer.
Connect to the share from the CD-less computer
Copy the ISO file over to the CD-less computer hard disk (wherever is convenient)
Right click the system tray icon for the virtual CD manager
Select Virtual CD/DVD-ROM from the menu
Point it to the ISO file you created for your CD.
You can not access the CD drive and it looks just like you have your CD loaded in a physical CD drive.
Quick: Download Free Virtual CD software and run from ISO images
Visual/ Learning:
MagicISO.com has a free tool for creating a virtual software based CD drive.
Download and install the software on the CD-less computer.
Create a ISO image of your CD on another computer that has a CD drive.
I use Nero but you can use any burning software that support creation of ISO files.
I created a share on my computer with the CD rom drive so that I can copy over the network to my other computer.
Connect to the share from the CD-less computer
Copy the ISO file over to the CD-less computer hard disk (wherever is convenient)
Right click the system tray icon for the virtual CD manager
Select Virtual CD/DVD-ROM from the menu
Point it to the ISO file you created for your CD.
You can not access the CD drive and it looks just like you have your CD loaded in a physical CD drive.
Wednesday, May 19, 2010
Perl - Debugging Scripts
Issue: Using perl script and you need help finding a problem.
Quick: Use the built in debugger tools
Visual/Learning:
perl -w scriptName This will give you warnings about the script if there are any.
perl -d scriptName Will put you in debug mode
w Lists code. another w lists the next lines of code and so on
. Resets code listing to current execution point
s Steps through code
n Steps through code and treats subroutines as a single step
p $variableName Prints value of the variable
x %data Prints array data
x \%data Prints better looking array contents
b 20 Set breakpoint at 20
L List all break points
d or D Deletes breakpoints
c Continues to break point
c 12 Continues to line 12
Some links to debugger tutorials
Short Tutorial
Longer Tutorial
Quick: Use the built in debugger tools
Visual/Learning:
perl -w scriptName This will give you warnings about the script if there are any.
perl -d scriptName Will put you in debug mode
w Lists code. another w lists the next lines of code and so on
. Resets code listing to current execution point
s Steps through code
n Steps through code and treats subroutines as a single step
p $variableName Prints value of the variable
x %data Prints array data
x \%data Prints better looking array contents
b 20 Set breakpoint at 20
L List all break points
d or D Deletes breakpoints
c Continues to break point
c 12 Continues to line 12
Some links to debugger tutorials
Short Tutorial
Longer Tutorial
Thursday, May 13, 2010
Regular Expressions Searching
Issue: a "Regular Expression" is a way of building complex searches but they are also confusing to use. Below are some search expressions that I have found useful. And links to some tutorials.
Quick/Visual/Learning:
/btarget/b - will find the whole word target in a text string (works with start/end line, spaces, special char
examples -- target @target -target-
(^| +)target( +$) - will find target at start/end of line or with spaces before/after. Will not match special characters.
example -- target
Here is a tutorial on regular expression searches
Quick/Visual/Learning:
/btarget/b - will find the whole word target in a text string (works with start/end line, spaces, special char
examples -- target @target -target-
(^| +)target( +$) - will find target at start/end of line or with spaces before/after. Will not match special characters.
example -- target
Here is a tutorial on regular expression searches
Tuesday, May 11, 2010
Moved Outlook Cached Names (Autocomplete list) To Another Computer
Issue: You get a new computer (or Outlook Profile) and now Outlook no longer auto completes the frequently used names that you type into the To field.
Quick: go to drive:\Documents and Settings\user name\Application Data\Microsoft\Outlook copy profile name.nk2
Visual/Learning:
Link to Microsoft Tip
-----------text from the link ---------
On the computer with the saved AutoComplete names, go to drive:\Documents and Settings\user name\Application Data\Microsoft\Outlook.
Note Depending on your file settings, this folder might be hidden. To view the files in this folder, do one of the following:
Microsoft Windows XP
Click Start, and then click My Computer.
On the Tools menu, click Folder Options.
Click the View tab, and then, under Advanced settings, under Hidden files and folders, click Show hidden files and folders.
Microsoft Windows 2000
Double-click My Computer on your desktop.
On the Tools menu, click Folder Options.
Click the View tab, and then click Show hidden files and folders.
Right-click profile name.nk2, and then click Copy.
Tip You can copy the file to removable media, such as a floppy disk or a CD, and then copy the file to the correct location on the other computer. Or you can attach the file to an e-mail message and send the message to yourself. On the new computer, open the attachment in Outlook, and then save it to the correct location.
On the computer where you want to populate the AutoComplete feature, copy the file to drive:\Documents and Settings\user name\Application Data\Microsoft\Outlook.
If the Outlook user profile name is different on the computer where you are moving the .nk2 file, you must rename the file with the same Outlook user profile name after you copy it to the correct folder. For example, if you move Kim Akers.nk2 from the original computer with an Outlook user profile name of Kim Akers, and you copy the Kim Akers.nk2 file to the new computer, you must rename it with the Outlook profile name being used on the new computer.
When prompted about replacing the existing file, click Yes.
Open Outlook to view changes.
------------- End Text from link-------------
Quick: go to drive:\Documents and Settings\user name\Application Data\Microsoft\Outlook copy profile name.nk2
Visual/Learning:
Link to Microsoft Tip
-----------text from the link ---------
On the computer with the saved AutoComplete names, go to drive:\Documents and Settings\user name\Application Data\Microsoft\Outlook.
Note Depending on your file settings, this folder might be hidden. To view the files in this folder, do one of the following:
Microsoft Windows XP
Click Start, and then click My Computer.
On the Tools menu, click Folder Options.
Click the View tab, and then, under Advanced settings, under Hidden files and folders, click Show hidden files and folders.
Microsoft Windows 2000
Double-click My Computer on your desktop.
On the Tools menu, click Folder Options.
Click the View tab, and then click Show hidden files and folders.
Right-click profile name.nk2, and then click Copy.
Tip You can copy the file to removable media, such as a floppy disk or a CD, and then copy the file to the correct location on the other computer. Or you can attach the file to an e-mail message and send the message to yourself. On the new computer, open the attachment in Outlook, and then save it to the correct location.
On the computer where you want to populate the AutoComplete feature, copy the file to drive:\Documents and Settings\user name\Application Data\Microsoft\Outlook.
If the Outlook user profile name is different on the computer where you are moving the .nk2 file, you must rename the file with the same Outlook user profile name after you copy it to the correct folder. For example, if you move Kim Akers.nk2 from the original computer with an Outlook user profile name of Kim Akers, and you copy the Kim Akers.nk2 file to the new computer, you must rename it with the Outlook profile name being used on the new computer.
When prompted about replacing the existing file, click Yes.
Open Outlook to view changes.
------------- End Text from link-------------
Wednesday, May 5, 2010
Upadte Existing Outlook Forms
Issue: You have a bunch of Outlook forms in a folder and you want to update them to a new form layout.
Quick: Download Omsgclas.exe utility
Visual/Learning:
As an example you might have a bunch of help desk forms stored in a folder. Over time the form layout may change to make the form easier to use. The problem is that if you need to open an old form the layout is not updated automatically but is the old, harder to use version of the form.
Microsoft has a knowledge base article on how to fix this (Update existing outlook forms to a new form)
Quick: Download Omsgclas.exe utility
Visual/Learning:
As an example you might have a bunch of help desk forms stored in a folder. Over time the form layout may change to make the form easier to use. The problem is that if you need to open an old form the layout is not updated automatically but is the old, harder to use version of the form.
Microsoft has a knowledge base article on how to fix this (Update existing outlook forms to a new form)
and utility to help as well.
--------------Here is a snipit of text from the Microsoft page on how to do this with a script as well -----
Create a VBScript routine
There are three tasks to this solution.
Create a new item to store the VBScript code.
Enter the VBScript code and save the form.
Run the VBScript code.
Back to the top
Create a new item to store the VBScript code
On the File menu, point to New, and then click Mail Message.
On the Tools menu, point to Forms, and then click Design This Form to enter form design mode.
Back to the top
Enter the VBScript Code and Save the Form
On the Form menu, click View Code.
In the Script Editor, type the following code. You do not need to enter the lines that begin with an apostrophe, since these lines are comments that are ignored when executed.
Sub Item_Open
' Change the following line to your new Message Class
NewMC = "IPM.Contact.MyNewForm"
Set CurFolder = Application.ActiveExplorer.CurrentFolder
Set AllItems = CurFolder.Items
NumItems = CurFolder.Items.Count
' Loop through all of the items in the folder
For I = 1 to NumItems
Set CurItem = AllItems.Item(I)
' Test to see if the Message Class needs to be changed
If CurItem.MessageClass <> NewMC Then
' Change the Message Class
CurItem.MessageClass = NewMC
' Save the changed item
CurItem.Save
End If
Next
MsgBox "Done."
End Sub
On the File menu, click Close.
On the File menu, click Save As. Make sure the default setting for file type is Outlook Template (.oft), and then select a location to save the file. Enter a file name for the form and then click OK.
Close the item by clicking the X in the upper-right corner of the item window and then click No when prompted to save changes.
Back to the top
Run the VBScript code
Open the folder that contains the items you wish to update.
To run the VBScript code, open the item again by using Windows Explorer to locate the file and then double-click the .oft file. The code will run automatically because it was entered into an Item_Open event procedure. If you receive a macro warning, click Enable Macros.
Wait while the code changes the message class for all of the items in the currently selected folder. Depending on the number of items, this may take several minutes. When the code finishes, you should receive a message that says Done.
Note If you wish to edit the VBScript code later to change the name of the message class, hold down the SHIFT key when you open the item. This prevents the VBScript code from executing and you can go into design mode, make changes to the VBScript code, and save the form.
------ End of Snipit from Microsoft page --------------
--------------Here is a snipit of text from the Microsoft page on how to do this with a script as well -----
Create a VBScript routine
There are three tasks to this solution.
Create a new item to store the VBScript code.
Enter the VBScript code and save the form.
Run the VBScript code.
Back to the top
Create a new item to store the VBScript code
On the File menu, point to New, and then click Mail Message.
On the Tools menu, point to Forms, and then click Design This Form to enter form design mode.
Back to the top
Enter the VBScript Code and Save the Form
On the Form menu, click View Code.
In the Script Editor, type the following code. You do not need to enter the lines that begin with an apostrophe, since these lines are comments that are ignored when executed.
Sub Item_Open
' Change the following line to your new Message Class
NewMC = "IPM.Contact.MyNewForm"
Set CurFolder = Application.ActiveExplorer.CurrentFolder
Set AllItems = CurFolder.Items
NumItems = CurFolder.Items.Count
' Loop through all of the items in the folder
For I = 1 to NumItems
Set CurItem = AllItems.Item(I)
' Test to see if the Message Class needs to be changed
If CurItem.MessageClass <> NewMC Then
' Change the Message Class
CurItem.MessageClass = NewMC
' Save the changed item
CurItem.Save
End If
Next
MsgBox "Done."
End Sub
On the File menu, click Close.
On the File menu, click Save As. Make sure the default setting for file type is Outlook Template (.oft), and then select a location to save the file. Enter a file name for the form and then click OK.
Close the item by clicking the X in the upper-right corner of the item window and then click No when prompted to save changes.
Back to the top
Run the VBScript code
Open the folder that contains the items you wish to update.
To run the VBScript code, open the item again by using Windows Explorer to locate the file and then double-click the .oft file. The code will run automatically because it was entered into an Item_Open event procedure. If you receive a macro warning, click Enable Macros.
Wait while the code changes the message class for all of the items in the currently selected folder. Depending on the number of items, this may take several minutes. When the code finishes, you should receive a message that says Done.
Note If you wish to edit the VBScript code later to change the name of the message class, hold down the SHIFT key when you open the item. This prevents the VBScript code from executing and you can go into design mode, make changes to the VBScript code, and save the form.
------ End of Snipit from Microsoft page --------------
Thursday, October 29, 2009
Remote Access To Computer - Hardware Solutions
Issue: At times you need to get to the BIOS or need to be able to see the boot process remotely. Here is a review of two possible solutions.
Quick/Visual/Learning:
SecureLinx Spider from Lantronix
IOGEAR GCN1000 PCPortal
Of the two I like what I read about the Spider product. A bit more expense but more flexible in terms of connectors you can get and the setup sounds like it is more straight forward.
Quick/Visual/Learning:
SecureLinx Spider from Lantronix
IOGEAR GCN1000 PCPortal
Of the two I like what I read about the Spider product. A bit more expense but more flexible in terms of connectors you can get and the setup sounds like it is more straight forward.
Nice - Wake On Lan / Wan Tutorial.
Issue:
I discuss WOL issues in my verdiem posts but here is another page that has some detailed information.
Quick/Visual/Learning: Wake on wan post
I discuss WOL issues in my verdiem posts but here is another page that has some detailed information.
Quick/Visual/Learning: Wake on wan post
Wednesday, October 28, 2009
Outlook - Failed due to registry or installation problem
Issue:
You get the following error: The operation failed due to a registry or installation problem. Restart Outlook and try again. If the problem persists, please reinstall.
Quick:
This is usually a profile problem, you may need to kill the outlook process first.
Visual/Learning:
We got this error when doing a send/receive
This is the error message:

To solve this problem you need to create a new Outlook profile. This was not working for us at first but we needed to kill the Outlook process first.
Next go to Start / Control Panel and open the Mail configuration icon.
Select Add a new email account and click next
Select Microsoft Exchange Server and click next
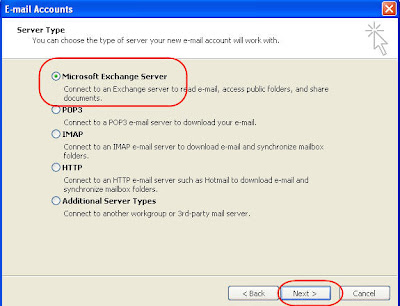
Enter your Exchange server name and you user name and click Next.

Now you see this window and you need to select the new profile as the default one form the drop down list. Click OK and you are done.

The error should be gone but you will need to configure this profile to match what you had configured in the old one.
You get the following error: The operation failed due to a registry or installation problem. Restart Outlook and try again. If the problem persists, please reinstall.
Quick:
This is usually a profile problem, you may need to kill the outlook process first.
Visual/Learning:
We got this error when doing a send/receive
This is the error message:
To solve this problem you need to create a new Outlook profile. This was not working for us at first but we needed to kill the Outlook process first.
Press ALT-CNTL-DEL keys and select Task Manager. Find Outlook and end the process if you see it in the list.

Next go to Start / Control Panel and open the Mail configuration icon.

Click on Show Profiles


Select Add a new email account and click next

Select Microsoft Exchange Server and click next
Enter your Exchange server name and you user name and click Next.

Get message that you have enter all the required information.

Now you see this window and you need to select the new profile as the default one form the drop down list. Click OK and you are done.
The error should be gone but you will need to configure this profile to match what you had configured in the old one.
Monday, October 5, 2009
XP disable simple file sharing
Issue: You want to see the access control list in an XP computer that is in a workgroup.
Quick: Click Start | My Computer | Tools | Folder Options | View
Visual/Learning:
Found good information here
Quick: Click Start | My Computer | Tools | Folder Options | View
Visual/Learning:
Found good information here
Thursday, August 27, 2009
Some Email Tricks
Issue: Convert pdf to text or get the definition of a word using just email.
Quick/Visual/Learning:
Adobe provides this tool to the impaired but you can use it to convert small pdf files to text. Just send a pdf attachment to pdf2txt@adobe.com and you will get it in your email as text.
You can also use pdf2html@adobe.com if you want it in html form.
Get any definition of a word by sending an email to wsmith@wordsmith.org with a subject, define Yourword .
Google doc will provide you a special code which will enable you to upload word, html and RTF files to your Google Doc account. This is a great way to archive your documents attachments
Quick/Visual/Learning:
Adobe provides this tool to the impaired but you can use it to convert small pdf files to text. Just send a pdf attachment to pdf2txt@adobe.com and you will get it in your email as text.
You can also use pdf2html@adobe.com if you want it in html form.
Get any definition of a word by sending an email to wsmith@wordsmith.org with a subject, define Yourword .
Google doc will provide you a special code which will enable you to upload word, html and RTF files to your Google Doc account. This is a great way to archive your documents attachments
Tuesday, August 25, 2009
Outlook Hyperlinks
Issue: You want to add a link in Outlook to external information.
Quick\Visual\Learning:
My experience is that links in Outlook are not activated until you send the message so do not be surprised if the link does not seem to work at the start.
Here is a link to how to do this and the some text from the link below:
-------------start text from link--------------------
When you type one of the following Internet protocols in the body of a message, Microsoft Outlook creates a hyperlink from the text. If recipients of the message have Internet browsers that support the protocol, they can click the hyperlink to quickly go to the destination
If the Internet address includes spaces, or Chinese, Japanese, or Korean characters, you must enclose the entire address in angle brackets (< >). For example,.
http:// Hypertext Transfer Protocol (HTTP). The protocol most commonly used for Web pages.
https:// Hypertext Transfer Protocol, Secure. Designed to provide secure communications using HTTP on the Internet.
file:// Used to open a file on an intranet
ftp:// Used to transfer files over the internet
mailto: Used to send messages to an e-mail address. When the recipient clicks this hyperlink, a new message opens with the mailto e-mail address filled in.
gopher:// A protocol making use of the gopher utility, which finds information and presents it in the form of menus, submenus, and files that can be downloaded and displayed.
news: Used to open an Internet news group
nntp:// Network News Transfer Protocol. Used to retrieve and post specific Usenet news articles on the Internet.
telnet:// Protocol that enables a user to log on from a remote computer and enter commands as if they were using a terminal directly attached to the computer.
Outlook: or Outlook:// A protocol used to open an Outlook folder or an item. Items include e-mail messages, appointments, contacts, tasks, journal entries, notes, posted items, and documents.) or file in Outlook. This protocol is supported only in Outlook.
To add a hyperlink to a location in Outlook, or to an Outlook item, use the following in the text of your message:
Inbox Outlook:Inbox
Contacts Outlook:Contacts
Any folder in your mailbox Outlook:foldername\subfolder
Calendar Outlook:Calendar
A message in your Inbox
A contact in your Contact s folder
-------------end text from link ------------------
Quick\Visual\Learning:
My experience is that links in Outlook are not activated until you send the message so do not be surprised if the link does not seem to work at the start.
Here is a link to how to do this and the some text from the link below:
-------------start text from link--------------------
When you type one of the following Internet protocols in the body of a message, Microsoft Outlook creates a hyperlink from the text. If recipients of the message have Internet browsers that support the protocol, they can click the hyperlink to quickly go to the destination
If the Internet address includes spaces, or Chinese, Japanese, or Korean characters, you must enclose the entire address in angle brackets (< >). For example,
http:// Hypertext Transfer Protocol (HTTP). The protocol most commonly used for Web pages.
https:// Hypertext Transfer Protocol, Secure. Designed to provide secure communications using HTTP on the Internet.
file:// Used to open a file on an intranet
ftp:// Used to transfer files over the internet
mailto: Used to send messages to an e-mail address. When the recipient clicks this hyperlink, a new message opens with the mailto e-mail address filled in.
gopher:// A protocol making use of the gopher utility, which finds information and presents it in the form of menus, submenus, and files that can be downloaded and displayed.
news: Used to open an Internet news group
nntp:// Network News Transfer Protocol. Used to retrieve and post specific Usenet news articles on the Internet.
telnet:// Protocol that enables a user to log on from a remote computer and enter commands as if they were using a terminal directly attached to the computer.
Outlook: or Outlook:// A protocol used to open an Outlook folder or an item. Items include e-mail messages, appointments, contacts, tasks, journal entries, notes, posted items, and documents.) or file in Outlook. This protocol is supported only in Outlook.
To add a hyperlink to a location in Outlook, or to an Outlook item, use the following in the text of your message:
Inbox Outlook:Inbox
Contacts Outlook:Contacts
Any folder in your mailbox Outlook:foldername\subfolder
Calendar Outlook:Calendar
A message in your Inbox
A contact in your Contact s folder
-------------end text from link ------------------
Monday, August 17, 2009
Detect Computer Slow Down Due to Disk Access
Issue:
Slow computer performance
Quick/Visual/Learning:
Found good information at this link on TechRepublic about detecting if the slow down is due to a particular process that is beating on the hard drive.
--------------Begin Info from Link --------------
Disk time percentage and disk queue length
IT professionals think of hard disk corruption or inadequate disk space as the cause of most system performance problems, but disk time is an equally important performance factor. Disk time is represented as a percentage of time that the hard disk is in use. If the hard disk is running 80 percent of the time, for example, you can be sure that system performance is suffering.
Another factor to consider is the average disk queue length, which refers to the number of processes that are waiting to use the hard disk. Using the disk time percentage in conjunction with the disk queue length will tell you not only how much the hard disk is being used but also if the heavy usage is a problem. For example, if the disk time is 40 percent but the average disk queue length has a factor of two or less, then the hard disk is keeping up with the demand that’s being placed on it.
On the other hand, if the percentage of disk time and average disk queue length are both high (above 80 percent disk time and a factor of two or more for the average disk queue length), it means that processes are waiting for the hard disk to become available. Anytime a process has to wait for a component to become available, a user will experience less-than-desirable performance.
Measuring hard disk performance
To accurately diagnose a system’s hard disk, you need to measure the percentage of disk time and the average disk queue length.
Begin by performing a full defragmentation on all the system’s partitions to ensure that all files are contiguous and that the hard disk can perform file reads and writes optimally. Click on the Start menu and select All Programs Accessories System Tools Disk Defragmenter.
Once you’ve defragmented all partitions, run the Performance Monitor utility by opening the Control Panel and clicking Administrative Tools Performance.
Tip
When the Performance Monitor opens, select any counters that are previously running from the bottom of the window and press Delete. Every counter that’s running has a slight, but noticeable, impact on the system’s performance. Therefore, the fewer counters you use, the more accurate your measurements will be.
In the Performance Monitor utility, follow these steps:
Click the Plus icon to open the Add Counters dialog box.
Next, select PhysicalDisk from the Performance Object dropdown list, which will bring up a list of the physical disk counters.
Now, select the %Disk Time counter from the list and click the All Instances radio button to tell the system to measure the performance of all hard drives.
Next, click the Add button to add the counter to the Performance Monitor.
Finally, select Avg. Disk Queue Length from the counter list, select the All Instances radio button, and click the Add button followed by the Close button. When you do, the performance monitor will begin analyzing the disk usage, as shown in Figure A.
Figure A
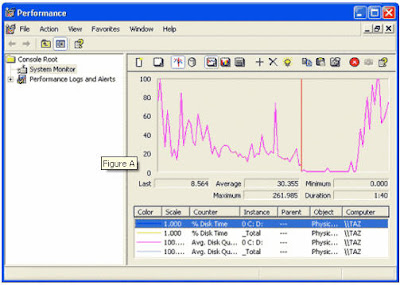
The numbers beneath the graph refer to the percent of disk time for Drive 0.
As you look at the output, you can see that the lines on the graph correspond to the counters that you’ve installed. For example, in Figure A, the pink line is predominant. You can tell by the legend that the pink line corresponds to the average disk queue length for the C: and D: partitions of Drive 0. You can also tell the exact values of any counter by selecting the counter that you want to examine. It’s best to look at the actual numbers rather than the graph, as the graph can be deceptive if the scale isn’t set correctly.
Narrowing down the suspects
Now it’s time to figure out which process is using all those disk resources. The first thing that I recommend to track down the culprit is to press [Ctrl][Alt][Delete] simultaneously to access the Windows Security dialog box. Next, click Task Manager to bring up the Task Manager utility, which reports on the resource utilization of every process running on the entire system.
While disk usage isn’t one of the factors that Task Manager normally reports, you can configure it to provide this information.
First, select the Processes tab to view the list of processes that are running on your machine.
Next, select the Select Columns command from the View menu. You’ll now see a list of all the resources that you can monitor through the Task Manager.
I recommend deselecting every resource except for I/O Read Bytes and I/O Write Bytes. When you click OK, you’ll see the number of bytes read and written by each process, as shown in
Figure B.
The trick now is to go through the list and look for rapidly changing values. It’s normal for most of the values to occasionally change, but if you see one that is constantly changing, then the process that corresponds to that value is hogging your system’s disk resources.
Figure B
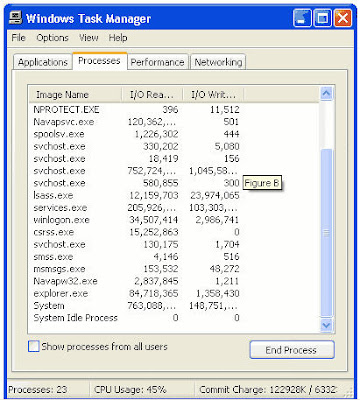
To kill a system resource hog, highlight the process and click End Process.
If the rogue system process is a part of the Windows operating system, there’s a good chance that the excessive disk usage is caused by thrashing.
Swapping vs. thrashing
The process of moving memory blocks between physical and virtual memory is called swapping. Although swapping is inefficient, it’s a perfectly normal process in a Windows environment. Virtual memory is hard disk space that is used as extra memory. Basically, any time Windows needs to read something that exists in virtual memory, it must move that memory block into the system’s physical memory. Thrashing problems are caused by excessive physical and virtual memory swapping.
However, if the disk usage is traced to a non-Windows process, then you may have problems with an individual service.
Be careful
If you eliminate a process you feel is causing excessive disk usage, processor time and memory will also be affected.
The usual suspects
We’ve focused on explaining how excessive disk time usage can degrade system performance, and you have seen some ways to track down the processes that create this problem. By using the Performance Monitor to measure both disk time and average queue length, you can get a sense of whether or not the hard disk is being taxed by the system’s processes. Analyzing the Task Manager further narrows down the possible suspects that may be causing the problem.
------------End Info from Link -----------
Slow computer performance
Quick/Visual/Learning:
Found good information at this link on TechRepublic about detecting if the slow down is due to a particular process that is beating on the hard drive.
--------------Begin Info from Link --------------
Disk time percentage and disk queue length
IT professionals think of hard disk corruption or inadequate disk space as the cause of most system performance problems, but disk time is an equally important performance factor. Disk time is represented as a percentage of time that the hard disk is in use. If the hard disk is running 80 percent of the time, for example, you can be sure that system performance is suffering.
Another factor to consider is the average disk queue length, which refers to the number of processes that are waiting to use the hard disk. Using the disk time percentage in conjunction with the disk queue length will tell you not only how much the hard disk is being used but also if the heavy usage is a problem. For example, if the disk time is 40 percent but the average disk queue length has a factor of two or less, then the hard disk is keeping up with the demand that’s being placed on it.
On the other hand, if the percentage of disk time and average disk queue length are both high (above 80 percent disk time and a factor of two or more for the average disk queue length), it means that processes are waiting for the hard disk to become available. Anytime a process has to wait for a component to become available, a user will experience less-than-desirable performance.
Measuring hard disk performance
To accurately diagnose a system’s hard disk, you need to measure the percentage of disk time and the average disk queue length.
Begin by performing a full defragmentation on all the system’s partitions to ensure that all files are contiguous and that the hard disk can perform file reads and writes optimally. Click on the Start menu and select All Programs Accessories System Tools Disk Defragmenter.
Once you’ve defragmented all partitions, run the Performance Monitor utility by opening the Control Panel and clicking Administrative Tools Performance.
Tip
When the Performance Monitor opens, select any counters that are previously running from the bottom of the window and press Delete. Every counter that’s running has a slight, but noticeable, impact on the system’s performance. Therefore, the fewer counters you use, the more accurate your measurements will be.
In the Performance Monitor utility, follow these steps:
Click the Plus icon to open the Add Counters dialog box.
Next, select PhysicalDisk from the Performance Object dropdown list, which will bring up a list of the physical disk counters.
Now, select the %Disk Time counter from the list and click the All Instances radio button to tell the system to measure the performance of all hard drives.
Next, click the Add button to add the counter to the Performance Monitor.
Finally, select Avg. Disk Queue Length from the counter list, select the All Instances radio button, and click the Add button followed by the Close button. When you do, the performance monitor will begin analyzing the disk usage, as shown in Figure A.
Figure A
The numbers beneath the graph refer to the percent of disk time for Drive 0.
As you look at the output, you can see that the lines on the graph correspond to the counters that you’ve installed. For example, in Figure A, the pink line is predominant. You can tell by the legend that the pink line corresponds to the average disk queue length for the C: and D: partitions of Drive 0. You can also tell the exact values of any counter by selecting the counter that you want to examine. It’s best to look at the actual numbers rather than the graph, as the graph can be deceptive if the scale isn’t set correctly.
Narrowing down the suspects
Now it’s time to figure out which process is using all those disk resources. The first thing that I recommend to track down the culprit is to press [Ctrl][Alt][Delete] simultaneously to access the Windows Security dialog box. Next, click Task Manager to bring up the Task Manager utility, which reports on the resource utilization of every process running on the entire system.
While disk usage isn’t one of the factors that Task Manager normally reports, you can configure it to provide this information.
First, select the Processes tab to view the list of processes that are running on your machine.
Next, select the Select Columns command from the View menu. You’ll now see a list of all the resources that you can monitor through the Task Manager.
I recommend deselecting every resource except for I/O Read Bytes and I/O Write Bytes. When you click OK, you’ll see the number of bytes read and written by each process, as shown in
Figure B.
The trick now is to go through the list and look for rapidly changing values. It’s normal for most of the values to occasionally change, but if you see one that is constantly changing, then the process that corresponds to that value is hogging your system’s disk resources.
Figure B
To kill a system resource hog, highlight the process and click End Process.
If the rogue system process is a part of the Windows operating system, there’s a good chance that the excessive disk usage is caused by thrashing.
Swapping vs. thrashing
The process of moving memory blocks between physical and virtual memory is called swapping. Although swapping is inefficient, it’s a perfectly normal process in a Windows environment. Virtual memory is hard disk space that is used as extra memory. Basically, any time Windows needs to read something that exists in virtual memory, it must move that memory block into the system’s physical memory. Thrashing problems are caused by excessive physical and virtual memory swapping.
However, if the disk usage is traced to a non-Windows process, then you may have problems with an individual service.
Be careful
If you eliminate a process you feel is causing excessive disk usage, processor time and memory will also be affected.
The usual suspects
We’ve focused on explaining how excessive disk time usage can degrade system performance, and you have seen some ways to track down the processes that create this problem. By using the Performance Monitor to measure both disk time and average queue length, you can get a sense of whether or not the hard disk is being taxed by the system’s processes. Analyzing the Task Manager further narrows down the possible suspects that may be causing the problem.
------------End Info from Link -----------
Friday, August 14, 2009
Get Directory Listing In LINUX
Issue: You want to just see the directories in the listing
Quick: ls -p PipeSymbol grep "/"
Quick: ls -p PipeSymbol grep "/"
Subscribe to:
Posts (Atom)