Issue: Install Realtek HD Audio Driver failure !!
Quick: disable and uninstall UAA bus driver first
Visual/Learning:
Start menu
Right Click "My Computer"
Select Properties
Device manager button
You should see the realtek device with an exclamation point (!) next to it
Right Click and select disable
In the same page under System Devices right click and disable "Microsoft UAA bus driver"
now right click and uninstall UAA bus driver
Now right click "sound video and game controllers" and select "scan for hardware changes"
It should find the sound device and let you install the driver.
Showing posts with label Malicious Software. Show all posts
Showing posts with label Malicious Software. Show all posts
Tuesday, August 31, 2010

Monday, August 17, 2009
Detect Computer Slow Down Due to Disk Access
Issue:
Slow computer performance
Quick/Visual/Learning:
Found good information at this link on TechRepublic about detecting if the slow down is due to a particular process that is beating on the hard drive.
--------------Begin Info from Link --------------
Disk time percentage and disk queue length
IT professionals think of hard disk corruption or inadequate disk space as the cause of most system performance problems, but disk time is an equally important performance factor. Disk time is represented as a percentage of time that the hard disk is in use. If the hard disk is running 80 percent of the time, for example, you can be sure that system performance is suffering.
Another factor to consider is the average disk queue length, which refers to the number of processes that are waiting to use the hard disk. Using the disk time percentage in conjunction with the disk queue length will tell you not only how much the hard disk is being used but also if the heavy usage is a problem. For example, if the disk time is 40 percent but the average disk queue length has a factor of two or less, then the hard disk is keeping up with the demand that’s being placed on it.
On the other hand, if the percentage of disk time and average disk queue length are both high (above 80 percent disk time and a factor of two or more for the average disk queue length), it means that processes are waiting for the hard disk to become available. Anytime a process has to wait for a component to become available, a user will experience less-than-desirable performance.
Measuring hard disk performance
To accurately diagnose a system’s hard disk, you need to measure the percentage of disk time and the average disk queue length.
Begin by performing a full defragmentation on all the system’s partitions to ensure that all files are contiguous and that the hard disk can perform file reads and writes optimally. Click on the Start menu and select All Programs Accessories System Tools Disk Defragmenter.
Once you’ve defragmented all partitions, run the Performance Monitor utility by opening the Control Panel and clicking Administrative Tools Performance.
Tip
When the Performance Monitor opens, select any counters that are previously running from the bottom of the window and press Delete. Every counter that’s running has a slight, but noticeable, impact on the system’s performance. Therefore, the fewer counters you use, the more accurate your measurements will be.
In the Performance Monitor utility, follow these steps:
Click the Plus icon to open the Add Counters dialog box.
Next, select PhysicalDisk from the Performance Object dropdown list, which will bring up a list of the physical disk counters.
Now, select the %Disk Time counter from the list and click the All Instances radio button to tell the system to measure the performance of all hard drives.
Next, click the Add button to add the counter to the Performance Monitor.
Finally, select Avg. Disk Queue Length from the counter list, select the All Instances radio button, and click the Add button followed by the Close button. When you do, the performance monitor will begin analyzing the disk usage, as shown in Figure A.
Figure A
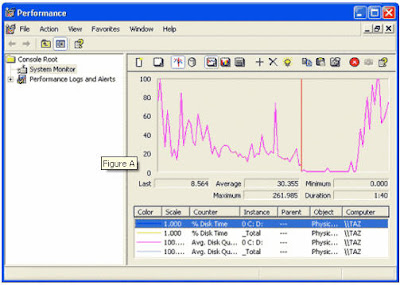
The numbers beneath the graph refer to the percent of disk time for Drive 0.
As you look at the output, you can see that the lines on the graph correspond to the counters that you’ve installed. For example, in Figure A, the pink line is predominant. You can tell by the legend that the pink line corresponds to the average disk queue length for the C: and D: partitions of Drive 0. You can also tell the exact values of any counter by selecting the counter that you want to examine. It’s best to look at the actual numbers rather than the graph, as the graph can be deceptive if the scale isn’t set correctly.
Narrowing down the suspects
Now it’s time to figure out which process is using all those disk resources. The first thing that I recommend to track down the culprit is to press [Ctrl][Alt][Delete] simultaneously to access the Windows Security dialog box. Next, click Task Manager to bring up the Task Manager utility, which reports on the resource utilization of every process running on the entire system.
While disk usage isn’t one of the factors that Task Manager normally reports, you can configure it to provide this information.
First, select the Processes tab to view the list of processes that are running on your machine.
Next, select the Select Columns command from the View menu. You’ll now see a list of all the resources that you can monitor through the Task Manager.
I recommend deselecting every resource except for I/O Read Bytes and I/O Write Bytes. When you click OK, you’ll see the number of bytes read and written by each process, as shown in
Figure B.
The trick now is to go through the list and look for rapidly changing values. It’s normal for most of the values to occasionally change, but if you see one that is constantly changing, then the process that corresponds to that value is hogging your system’s disk resources.
Figure B
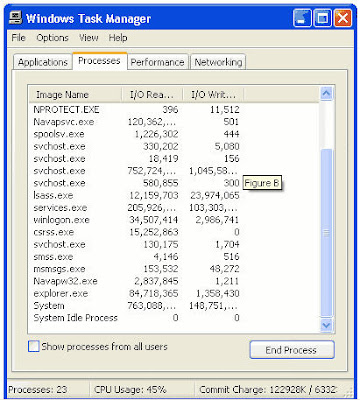
To kill a system resource hog, highlight the process and click End Process.
If the rogue system process is a part of the Windows operating system, there’s a good chance that the excessive disk usage is caused by thrashing.
Swapping vs. thrashing
The process of moving memory blocks between physical and virtual memory is called swapping. Although swapping is inefficient, it’s a perfectly normal process in a Windows environment. Virtual memory is hard disk space that is used as extra memory. Basically, any time Windows needs to read something that exists in virtual memory, it must move that memory block into the system’s physical memory. Thrashing problems are caused by excessive physical and virtual memory swapping.
However, if the disk usage is traced to a non-Windows process, then you may have problems with an individual service.
Be careful
If you eliminate a process you feel is causing excessive disk usage, processor time and memory will also be affected.
The usual suspects
We’ve focused on explaining how excessive disk time usage can degrade system performance, and you have seen some ways to track down the processes that create this problem. By using the Performance Monitor to measure both disk time and average queue length, you can get a sense of whether or not the hard disk is being taxed by the system’s processes. Analyzing the Task Manager further narrows down the possible suspects that may be causing the problem.
------------End Info from Link -----------
Slow computer performance
Quick/Visual/Learning:
Found good information at this link on TechRepublic about detecting if the slow down is due to a particular process that is beating on the hard drive.
--------------Begin Info from Link --------------
Disk time percentage and disk queue length
IT professionals think of hard disk corruption or inadequate disk space as the cause of most system performance problems, but disk time is an equally important performance factor. Disk time is represented as a percentage of time that the hard disk is in use. If the hard disk is running 80 percent of the time, for example, you can be sure that system performance is suffering.
Another factor to consider is the average disk queue length, which refers to the number of processes that are waiting to use the hard disk. Using the disk time percentage in conjunction with the disk queue length will tell you not only how much the hard disk is being used but also if the heavy usage is a problem. For example, if the disk time is 40 percent but the average disk queue length has a factor of two or less, then the hard disk is keeping up with the demand that’s being placed on it.
On the other hand, if the percentage of disk time and average disk queue length are both high (above 80 percent disk time and a factor of two or more for the average disk queue length), it means that processes are waiting for the hard disk to become available. Anytime a process has to wait for a component to become available, a user will experience less-than-desirable performance.
Measuring hard disk performance
To accurately diagnose a system’s hard disk, you need to measure the percentage of disk time and the average disk queue length.
Begin by performing a full defragmentation on all the system’s partitions to ensure that all files are contiguous and that the hard disk can perform file reads and writes optimally. Click on the Start menu and select All Programs Accessories System Tools Disk Defragmenter.
Once you’ve defragmented all partitions, run the Performance Monitor utility by opening the Control Panel and clicking Administrative Tools Performance.
Tip
When the Performance Monitor opens, select any counters that are previously running from the bottom of the window and press Delete. Every counter that’s running has a slight, but noticeable, impact on the system’s performance. Therefore, the fewer counters you use, the more accurate your measurements will be.
In the Performance Monitor utility, follow these steps:
Click the Plus icon to open the Add Counters dialog box.
Next, select PhysicalDisk from the Performance Object dropdown list, which will bring up a list of the physical disk counters.
Now, select the %Disk Time counter from the list and click the All Instances radio button to tell the system to measure the performance of all hard drives.
Next, click the Add button to add the counter to the Performance Monitor.
Finally, select Avg. Disk Queue Length from the counter list, select the All Instances radio button, and click the Add button followed by the Close button. When you do, the performance monitor will begin analyzing the disk usage, as shown in Figure A.
Figure A
The numbers beneath the graph refer to the percent of disk time for Drive 0.
As you look at the output, you can see that the lines on the graph correspond to the counters that you’ve installed. For example, in Figure A, the pink line is predominant. You can tell by the legend that the pink line corresponds to the average disk queue length for the C: and D: partitions of Drive 0. You can also tell the exact values of any counter by selecting the counter that you want to examine. It’s best to look at the actual numbers rather than the graph, as the graph can be deceptive if the scale isn’t set correctly.
Narrowing down the suspects
Now it’s time to figure out which process is using all those disk resources. The first thing that I recommend to track down the culprit is to press [Ctrl][Alt][Delete] simultaneously to access the Windows Security dialog box. Next, click Task Manager to bring up the Task Manager utility, which reports on the resource utilization of every process running on the entire system.
While disk usage isn’t one of the factors that Task Manager normally reports, you can configure it to provide this information.
First, select the Processes tab to view the list of processes that are running on your machine.
Next, select the Select Columns command from the View menu. You’ll now see a list of all the resources that you can monitor through the Task Manager.
I recommend deselecting every resource except for I/O Read Bytes and I/O Write Bytes. When you click OK, you’ll see the number of bytes read and written by each process, as shown in
Figure B.
The trick now is to go through the list and look for rapidly changing values. It’s normal for most of the values to occasionally change, but if you see one that is constantly changing, then the process that corresponds to that value is hogging your system’s disk resources.
Figure B
To kill a system resource hog, highlight the process and click End Process.
If the rogue system process is a part of the Windows operating system, there’s a good chance that the excessive disk usage is caused by thrashing.
Swapping vs. thrashing
The process of moving memory blocks between physical and virtual memory is called swapping. Although swapping is inefficient, it’s a perfectly normal process in a Windows environment. Virtual memory is hard disk space that is used as extra memory. Basically, any time Windows needs to read something that exists in virtual memory, it must move that memory block into the system’s physical memory. Thrashing problems are caused by excessive physical and virtual memory swapping.
However, if the disk usage is traced to a non-Windows process, then you may have problems with an individual service.
Be careful
If you eliminate a process you feel is causing excessive disk usage, processor time and memory will also be affected.
The usual suspects
We’ve focused on explaining how excessive disk time usage can degrade system performance, and you have seen some ways to track down the processes that create this problem. By using the Performance Monitor to measure both disk time and average queue length, you can get a sense of whether or not the hard disk is being taxed by the system’s processes. Analyzing the Task Manager further narrows down the possible suspects that may be causing the problem.
------------End Info from Link -----------
Saturday, September 20, 2008
Speed Up A Slow Computer 3 - Remove Temp Files
Issue:
Remove temporary files and defragment the hard drive.
Quick:
Delete temporary files, Empty Recycle bin, Defragment the hard drive, click on my computer, right click on hard drive (c:) => Properties, Tools, Defragment Now...
Visual/Learning:
Defragmenting the hard drive can help a lot to speed up your computer. Fragmenting occurs when files are written to the hard drive. The computer looks for an empty place on the hard drive to store your data, but perhaps the first empty spot can't hold all the data. Only part of the data gets written here and the rest of the file gets written somewhere else.
Over time, as files grow and change, your word document (or whatever) can end up being broken up in small pieces all over your hard drive. To retrieve that data you computer has to pull all of those pieces together.
The defragment tool speeds things up by reorganizing all the data on your hard drive and putting all the pieces of your file in the same place. Going one place for the data saves time.
One thing that I like to do before organizing either my computer data is to get rid of the junk. Why spend time organizing stuff you plan to toss anyway?
In the last post I did a lot of cleanup but I can still delete temporary files. Temporary files get placed on your computer when you browse the Internet or install programs. You might think that temporary files would get removed all by themselves but that is not the case.
Windows comes with a cleanup tool to help you flush these out. Open the properties on you hard drive to get to the Windows clean up tool.
When the cleaning is done click on the tools tab select Defragment Now.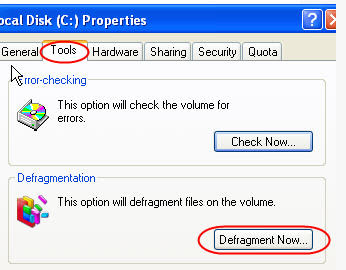
Click on Analyze and you will get a color bar that represents how badly your files are fragmented. Red represents fragmented files. You also get pop up window saying if you need to defragement or not. It can take time to run, maybe hours, but if you don't need the computer right now let it run and it will save you time later. Note that you can pause and resume the tool at anytime if you need to.
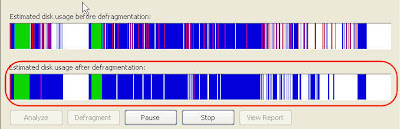 You may also want to perform a "Check Now..." (on the same window as the defragment option). This can check for and fix errors on the local hard drive.
Remove temporary files and defragment the hard drive.
Quick:
Delete temporary files, Empty Recycle bin, Defragment the hard drive, click on my computer, right click on hard drive (c:) => Properties, Tools, Defragment Now...
Visual/Learning:
Defragmenting the hard drive can help a lot to speed up your computer. Fragmenting occurs when files are written to the hard drive. The computer looks for an empty place on the hard drive to store your data, but perhaps the first empty spot can't hold all the data. Only part of the data gets written here and the rest of the file gets written somewhere else.
Over time, as files grow and change, your word document (or whatever) can end up being broken up in small pieces all over your hard drive. To retrieve that data you computer has to pull all of those pieces together.
The defragment tool speeds things up by reorganizing all the data on your hard drive and putting all the pieces of your file in the same place. Going one place for the data saves time.
One thing that I like to do before organizing either my computer data is to get rid of the junk. Why spend time organizing stuff you plan to toss anyway?
In the last post I did a lot of cleanup but I can still delete temporary files. Temporary files get placed on your computer when you browse the Internet or install programs. You might think that temporary files would get removed all by themselves but that is not the case.
Windows comes with a cleanup tool to help you flush these out. Open the properties on you hard drive to get to the Windows clean up tool.
 Click on the "Disk Cleanup" button
Select the files to delete and click on OK
There is also a good free cleaner tool that I like called ccleaner. You can get here.
When the cleaning is done click on the tools tab select Defragment Now.
Click on Analyze and you will get a color bar that represents how badly your files are fragmented. Red represents fragmented files. You also get pop up window saying if you need to defragement or not. It can take time to run, maybe hours, but if you don't need the computer right now let it run and it will save you time later. Note that you can pause and resume the tool at anytime if you need to.

When the defragment is done you should see that most if not all of the red is gone and things should run a little faster.
The tools has not quite finished yet but you can see that most of the red is gone.
You may also want to perform a "Check Now..." (on the same window as the defragment option). This can check for and fix errors on the local hard drive.
Wednesday, September 17, 2008
Speed Up A Slow Computer 2 - Clean Off The Junk
Issue:
Speed up a slow computer, remove unused and junk software
Quick:
Start => Control Panel => Add/Remove Programs
Visual/Learning:
Go to the Start menu and select Control panel.
Select Add/Remove Programs.
Look through the list for any programs that you no longer need.
Uninstall these programs and write down the names of the programs as you uninstall them. When you are done reboot the computer.
Sometimes these programs leave behind folders even after they are uninstalled. After the reboot go into the c:\Program Files folder and using your list of deleted programs look for any folders associated with these programs and delete the folders as well.
I have seen some tools that can help with the cleanup of crapware. If you buy an new computer there is usually a bunch of junk on the computer that you will never use and just takes up space.
There is a free program called "PC Decrapifier", catchy name. Anyway it can help to cleanup the trialware stuff that comes on new computers. You can get it at: http://www.pcdecrapifier.com/download
Speed Up A Slow Computer 3 - Remove Temp Files
Speed up a slow computer, remove unused and junk software
Quick:
Start => Control Panel => Add/Remove Programs
Visual/Learning:
Go to the Start menu and select Control panel.
Select Add/Remove Programs.
Look through the list for any programs that you no longer need.
Uninstall these programs and write down the names of the programs as you uninstall them. When you are done reboot the computer.
Sometimes these programs leave behind folders even after they are uninstalled. After the reboot go into the c:\Program Files folder and using your list of deleted programs look for any folders associated with these programs and delete the folders as well.
I have seen some tools that can help with the cleanup of crapware. If you buy an new computer there is usually a bunch of junk on the computer that you will never use and just takes up space.
There is a free program called "PC Decrapifier", catchy name. Anyway it can help to cleanup the trialware stuff that comes on new computers. You can get it at: http://www.pcdecrapifier.com/download
Speed Up A Slow Computer 3 - Remove Temp Files
Tuesday, September 16, 2008
Speed Up A Slow Computer 1 - Free Virus Spyware Scan
Issue:
Your computer was faster and now it is running slow.
Quick:
First scan the computer for malware. Boot safe mode with networking using f8, download scanner and updates, scan for problems.
Visual/Learning:
Bad software seems to sneak onto computers if you are not very careful (sometimes even if you are careful). One of the first things I do is to check for malware. Reboot the computer. As the computer is booting up tap the f8 key. At some point you should see a screen like this one:
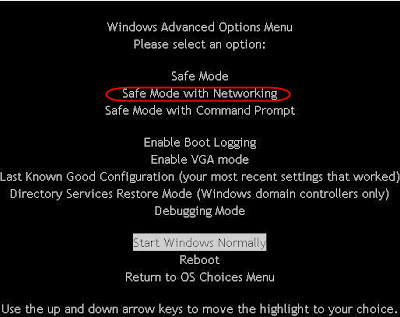
Your computer was faster and now it is running slow.
Quick:
First scan the computer for malware. Boot safe mode with networking using f8, download scanner and updates, scan for problems.
Visual/Learning:
Bad software seems to sneak onto computers if you are not very careful (sometimes even if you are careful). One of the first things I do is to check for malware. Reboot the computer. As the computer is booting up tap the f8 key. At some point you should see a screen like this one:
If you try it a few times and can't seem to hit the f8 key at the right time you can turn off the computer while it is booting Windows. Windows should see that it failed to boot the last time and offer you the choice to boot into safe mode.
I suggest selecting safe mode with networking that way you can download a scanning tool or get updates.
Lately I have been using the free scanner from here: http://download.bleepingcomputer.com/malwarebytes/mbam-setup.exe
Download, get updates, and run a scan.
For more information about using the scanner you can go to my previous post: http://qvlweb.blogspot.com/2008/06/fake-virus-scanner-cleaning.html
Once you are sure the computer is free of malicious software go to the next step.
Tuesday, June 10, 2008
Fake Virus Scanner Cleaning - Antivirus 2008
Issue:
Fake virus scanner called Antivirus 2008 trys to scare users into buying software.
Quick:
Download Anti-Malware, Reboot into Safe Mode with Networking, Install Anti-Malware, Run quick scan, remove malware and reboot to normal Windows.
Visual:
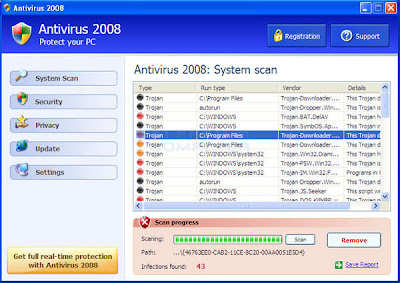
This is what the fake scanner looks like
Learning:
Had a user that somehow got a fake virus scanner on his computer. "Antivirus 2008" (fake scanner) kept poping up warning messages that he had lots of virus when he tried to go to websites and that he needed to purchase software to remove them. This is all a scam to try and trick (extort) unsuspecting users into buying fake software.
I was able to remove it using information from the following site:
http://www.bleepingcomputer.com/malware-removal/antivirus-2008
and Anti-Malware software from download: http://download.bleepingcomputer.com/malwarebytes/mbam-setup.exe
Restarted the machine in safe mode (with network connection enabled) and downloaded and installed Malwarebytes' Anti-Malware. Doing a "Quick Scan" detected and removed the fake scanner.
-------- Partial Text from link ---------
1. Print out these instructions as we will need to close every window that is open later in the fix.
2. Download Malwarebytes' Anti-Malware, or MBAM, from the following location and save it to your desktop: http://download.bleepingcomputer.com/malwarebytes/mbam-setup.exe
3. Once downloaded, close all programs and Windows on your computer, including this one.
4. Double-click on the icon on your desktop named Download_mbam-setup.exe. This will start the installation of MBAM onto your computer.
5.When the installation begins, keep following the prompts in order to continue with the installation process. Do not make any changes to default settings and when the program has finished installing, make sure you leave both the Update Malwarebytes' Anti-Malware and Launch Malwarebytes' Anti-Malware checked. Then click on the Finish button.
6.MBAM will now automatically start and you will see a message stating that you should update the program before performing a scan. As MBAM will automatically update itself after the install, you can press the OK button to close that box and you will now be at the main program ...
7. On the Scanner tab, make sure the the Perform quick scan option is selected and then click on the Scan button to start scanning your computer for Antivirus 2008 related files.
8. MBAM will now start scanning your computer for malware. This process can take quite a while, so we suggest you go and do something else and periodically check on the status of the scan.
9. When the scan is finished a message box will appear... click OK.
10.You will now be back at the main Scanner screen. At this point you should click on the Show Results button.
11.A screen displaying all the malware that the program found will be shown... You should now click on the Remove Selected button to remove all the listed malware. MBAM will now delete all of the files and registry keys and add them to the programs quarantine.
--------End Text from link------
Fake virus scanner called Antivirus 2008 trys to scare users into buying software.
Quick:
Download Anti-Malware, Reboot into Safe Mode with Networking, Install Anti-Malware, Run quick scan, remove malware and reboot to normal Windows.
Visual:
This is what the fake scanner looks like

Learning:
Had a user that somehow got a fake virus scanner on his computer. "Antivirus 2008" (fake scanner) kept poping up warning messages that he had lots of virus when he tried to go to websites and that he needed to purchase software to remove them. This is all a scam to try and trick (extort) unsuspecting users into buying fake software.
I was able to remove it using information from the following site:
http://www.bleepingcomputer.com/malware-removal/antivirus-2008
and Anti-Malware software from download: http://download.bleepingcomputer.com/malwarebytes/mbam-setup.exe
Restarted the machine in safe mode (with network connection enabled) and downloaded and installed Malwarebytes' Anti-Malware. Doing a "Quick Scan" detected and removed the fake scanner.
-------- Partial Text from link ---------
1. Print out these instructions as we will need to close every window that is open later in the fix.
2. Download Malwarebytes' Anti-Malware, or MBAM, from the following location and save it to your desktop: http://download.bleepingcomputer.com/malwarebytes/mbam-setup.exe
3. Once downloaded, close all programs and Windows on your computer, including this one.
4. Double-click on the icon on your desktop named Download_mbam-setup.exe. This will start the installation of MBAM onto your computer.
5.When the installation begins, keep following the prompts in order to continue with the installation process. Do not make any changes to default settings and when the program has finished installing, make sure you leave both the Update Malwarebytes' Anti-Malware and Launch Malwarebytes' Anti-Malware checked. Then click on the Finish button.
6.MBAM will now automatically start and you will see a message stating that you should update the program before performing a scan. As MBAM will automatically update itself after the install, you can press the OK button to close that box and you will now be at the main program ...
7. On the Scanner tab, make sure the the Perform quick scan option is selected and then click on the Scan button to start scanning your computer for Antivirus 2008 related files.
8. MBAM will now start scanning your computer for malware. This process can take quite a while, so we suggest you go and do something else and periodically check on the status of the scan.
9. When the scan is finished a message box will appear... click OK.
10.You will now be back at the main Scanner screen. At this point you should click on the Show Results button.
11.A screen displaying all the malware that the program found will be shown... You should now click on the Remove Selected button to remove all the listed malware. MBAM will now delete all of the files and registry keys and add them to the programs quarantine.
--------End Text from link------
Monday, June 9, 2008
Prevent crapware from slowing down your computer
Fix your slow boot issues.
Below is a link to a PDF. This is a great How To for disabling and removing system crippling junk software from your computer. If you have some weird behavior going on, this is a good place to start troubleshooting. Uses a free software tool (autoruns) to identify and disable add-on software that may be the problem. You can also re-enable it with these tool so you do not need to go through the hassle of uninstalling and reinstalling software that you want.
Another free tool CCleaner is used to clean off the junk.
http://i.i.com.com/cnwk.1d/i/tr/downloads/home/degunk_crapwarev2.pdf
Below is a link to a PDF. This is a great How To for disabling and removing system crippling junk software from your computer. If you have some weird behavior going on, this is a good place to start troubleshooting. Uses a free software tool (autoruns) to identify and disable add-on software that may be the problem. You can also re-enable it with these tool so you do not need to go through the hassle of uninstalling and reinstalling software that you want.
Another free tool CCleaner is used to clean off the junk.
http://i.i.com.com/cnwk.1d/i/tr/downloads/home/degunk_crapwarev2.pdf
Friday, June 6, 2008
Non Delivery Report - NDR Spammer filter
Some spammers have been using a built-in feature of email to get around spam filters. This Outlook rule can help to filter them out.
Normally if you send mail to a person and it does not reach them you get a return notification message that your email did not get delivered. This type of email notification is called a Non Delivery Report or NDR for short. It is important that users get these NDR messages or else they assume that they have communicated information when in fact it never reached the intended person.
The problem now is that some spammers spoof the return mail address. You are probably being spoofed if you find that you are getting NDRs for messages that you never sent.
The spammer trick is to send the message to a known bad address on purpose so that it will bounce back to the spoofed return address (which is your address). Now you open the email to figure out what got return and... Congratulations you have just become the recipient of spam mail.
The problem is how to filter out fake NDRs and not the valid ones.
I found the following post that has helped to filter these out at least at the client:
http://forums.msexchange.org/m_1800471565/mpage_1/key_/tm.htm#1800471565
Here is the text from the post:
===start copied text===
After some additional research and experimentation we think we've found an acceptable solution that relies on the following 3 premises,
1. Most NDRs can be filtered using a small set of subject phrases.
2. Most legitimate NDRs will reference the IP address or Postmaster account of our mailserver somewhere in the message header or body.
3. Spoof generated NDRs will reference the FQDN of our mailserver (as configured in the advanced Virtual SMTP properties) in the message header as the final recipient, but never the IP address or Postmaster account.
Using these premises we crafted a simple Outlook rule, exported it to a file and distributed it to our affected users along with import instructions. The rule runs server-side so once it's entered there's no further reliance on the Outlook client. We would have preferred a centralized solution but none of our current products gave us the level of filtering control found in the Outlook client rules. Here's an example of what we're using,
Apply this rule after the message arrives with 'undeliverable' or 'undelivered mail' or 'delivery failed' or 'delivery failure' or 'failure notice' or 'returned mail' or 'notification (failure)' in the subject move it to the Junk E-mail folder except if the body contains 'our mailserver IP address' or except if the message header contains 'our mailserver IP address' or 'postmaster@ourdomain'
===end copied text===
Normally if you send mail to a person and it does not reach them you get a return notification message that your email did not get delivered. This type of email notification is called a Non Delivery Report or NDR for short. It is important that users get these NDR messages or else they assume that they have communicated information when in fact it never reached the intended person.
The problem now is that some spammers spoof the return mail address. You are probably being spoofed if you find that you are getting NDRs for messages that you never sent.
The spammer trick is to send the message to a known bad address on purpose so that it will bounce back to the spoofed return address (which is your address). Now you open the email to figure out what got return and... Congratulations you have just become the recipient of spam mail.
The problem is how to filter out fake NDRs and not the valid ones.
I found the following post that has helped to filter these out at least at the client:
http://forums.msexchange.org/m_1800471565/mpage_1/key_/tm.htm#1800471565
Here is the text from the post:
===start copied text===
After some additional research and experimentation we think we've found an acceptable solution that relies on the following 3 premises,
1. Most NDRs can be filtered using a small set of subject phrases.
2. Most legitimate NDRs will reference the IP address or Postmaster account of our mailserver somewhere in the message header or body.
3. Spoof generated NDRs will reference the FQDN of our mailserver (as configured in the advanced Virtual SMTP properties) in the message header as the final recipient, but never the IP address or Postmaster account.
Using these premises we crafted a simple Outlook rule, exported it to a file and distributed it to our affected users along with import instructions. The rule runs server-side so once it's entered there's no further reliance on the Outlook client. We would have preferred a centralized solution but none of our current products gave us the level of filtering control found in the Outlook client rules. Here's an example of what we're using,
Apply this rule after the message arrives with 'undeliverable' or 'undelivered mail' or 'delivery failed' or 'delivery failure' or 'failure notice' or 'returned mail' or 'notification (failure)' in the subject move it to the Junk E-mail folder except if the body contains 'our mailserver IP address' or except if the message header contains 'our mailserver IP address' or 'postmaster@ourdomain'
===end copied text===
Subscribe to:
Posts (Atom)