Friday, December 26, 2008

Outlook Contacts Vcard SMTP Address

Issue:
You want to create a Vcard from your personal information contact entry to send in your signature but your Exchange server keeps validating and replacing your email address with your name underlined. Clicking the name shows your active directory Information.


Quick:
Type a bogus email address, click off the field, edit the field.

Visual/Learning:
Here is the problem.
You open a contact entry for yourself in outlook so you can create a Vcard.
You type your valid email address in the email field.

Because you have a Microsoft Exchange server your name get authenticated by active directory and your email address changes to your user account name. If you click on it you see you active directory information and the email information is in the exchange format EX. If you send this out as a Vcard the email address will be invalid.
To fix this edit the email field and put some non-existing bogas email address in that field.
Now click off of the field and that bogas address will get underlined. See below.


If you double click on this bogus address you get a properties box and you can edit it with the correct address.
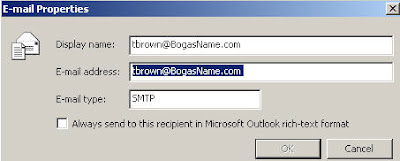
Now with the correct information click on OK
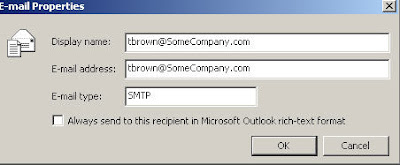

Your contact email field now has the correct information that you can now use to create a Vcard.


Link on How To Use The Vcard Feature In Outlook
---Text from Link---
How to create a vCard
Use the following steps to create a vCard:
-In a Contact folder, click to select the contact for which you want a vCard.
-On the File menu, click Save As.
-In the Save file as type box, click to select VCARD Files (*.vcf).
-In the Save In box, select the folder where you want to save the vCard file, and then click Save.
-This creates a vCard file with the same name as that of the Contact.

How to distribute a vCard
You can distribute a vCard file as you distribute any other computer file.
To do this:
-Open a new message and address it to the recipient.
-On the Insert menu, click File.
-Click to select a vCard (.vcf) file, and then click OK.
NOTE: If you want to include Notes with your vCard, you must insert the .vcf file. If the .vcf is attached to your signature, the Notes field (and other fields) are removed prior from the vCard.

How to automatically process a vCard
With Outlook, you can automatically convert a vCard that was received from an external source to an Outlook Contact record. If the vCard arrives as an e-mail attachment, you can double-click the vCard attachment and then click Save And Close to add it to your default Contact folder. Alternatively, you can create a Contact from a vCard by dragging it to the Contacts folder.

NOTE: If the vCard icon appears as a generic Windows icon, it does not open when you double-click the icon, or you may receive an Open With prompt because the vCard File program is not associated with the .vcf file type.

If you receive the vCard in the form of a file on a disk, you can import it into your default Contact folder by using the Outlook "Import and Export Wizard." To do this, follow these steps:
-On the File menu, click Import And Export.
-Click to select the Import a vCard file (*.vcf) check box, and then click Next.
-Click to select the vCard file, and then click Open.
The vCard data is used to create a Contact record in your default Contacts folder.

How to store a vCard in a secondary contacts folder
If you import a vCard file, or if you open and then save a vCard file, it is placed directly into your default Contacts folder in the default message store.

To store the vCard in a Contacts folder other than the default, you can drag the vCard file to the secondary folder or first import it into the default Contacts folder, and copy it to the secondary folder.

How to include a vCard with your automatic signature
To do this, follow these steps:
-On the Tools menu, click Options.
-On the Mail Format tab, click Signatures.
-Click New to add a new signature.
-Enter a name for your signature, and then click Next.
-Type the desired signature information in the text window.
-In Microsoft Office Outlook 2003 and in earlier versions of Outlook, click New vCard from Contact.

In Microsoft Office Outlook 2007, click Business Card, select the contact that you want to add, and then click OK three times.
In the Show Names from the box, select Contacts or another address list.
Click to select the entry for which you want to create a vCard, click OK, click Finish, and then click OK to complete the signature entry.
Note If your vCard contains Notes, UserDefined fields, or Outlook-specific fields, these values are stripped from the vCard that is included with the signature. The Signature Picker specifically includes only those fields in a Contact that are essential to the definition of a vCard.
---End Text From Link

Monday, December 22, 2008

Cisco Router Backup and Restore

Issue: How to backup and restore Cisco router configuration.

Quick/Visual/Learning:
You need to be able to connect to a TFTP server. If you don’t have one you can download and install SolarWinds free TFTP server. http://www.solarwinds.com/downloads

You can run this on your workstation or laptop.

You can also get information at a link here about these commands.

With your TFTP server running, telnet into the router you want to backup.
Type enable and enter the password

Enter the following command to backup the running configuration
copy system:running-config tftp:

Next you are prompted for the IP address of the TFTP server
Enter the IP and press enter

Next you are prompted to enter the name of the backup file
Make up a name or use the default and press enter
The file gets copied and you see information regarding bytes copied.

To copy the Startup configuration from non-volitle memory enter this command:
copy nvram:startup-config tftp:
And complete using the same steps as noted above.

You can copy a saved configuration back to the router by reversing the order of the command.
copy tftp: system:running-config (copies from the TFTP server to the router)

You can backup the IOS with:
copy flash tftp

Friday, December 19, 2008

Avoid Email Scams

Issue:

Watch out for and avoid Scam Mail.


Quick/Visual/Learning:


Friendly warning to be suspicious of any email that you get requesting that you either send in information or that you log on to a website to update information. The bad guys use tricks like this to try and get your passwords and logon information so they can steal money from your account.


Below is an example of a fake message from Fidelity asking to update your records so that your account is not suspended. These guys always use language like this to try and scare people into taking action right away. By clicking on the link you go to a fake but very real looking Fidelity web page. When you try to log on to the page they capture your user name and password and now they have what they need to access your account.


Don't be fooled by this kind of stuff. If you are unsure it is best to get the phone number from a reliable source and call the company. If you get stuff in email that you did not request don't trust it even if it appears to come from a friend.
If someone calls me at home asking for personal information I say "No thank you" and hang up. Do the same with this kind of email, delete it.

Wednesday, December 17, 2008

Make Vista More Like XP

Issue:
You hate the Vista interface and want it to be more like XP. Here is how to do it.

Quick/Visual/Learning:
The text below is just the meat from this Post from the TechRepublic site.
Note to be careful as always with any registry edits.

---Text from link---

Disable User Access Control (UAC)
1. Access the Control Panel and select Classic View.
2. Locate and click User Accounts.
3. Select the Turn User Account Control on or off and respond appropriately to the UAC.
4. Clear the Use User Account Control (UAC) to help protect your computer.
5. Click OK.
6. Restart Windows

Disable Notificatin Ballons
1. Access the Run dialog box, type Regedit in the Open text box, and click OK.
2. Locate the following key: HKEY_CURRENT_USER\Software\Microsoft\Windows\CurrentVersion\Explorer\Advanced Click on the right-hand pane.
3. Pull down the Edit menu and select the New DWORD (32-bit) Value command
4. Name the new key EnableBalloonTips.
5. Make sure the value is set to 0.
6. Click OK.
7. Log off and then back on.

Disable Windows Defender
1. Access Windows Defender on the Start All Programs menu.
2. Click the Tools button.
3. Click Options in the Settings section.
4. Clear the following check boxes:
a. Automatically scan my computer.
b. Use real-time protection.
c. Scan the contents of archived files and folders for potential threats
d. Use heuristics to detect potentially harmful or unwanted behavior by software that hasn’t been analyzed for risks.
e. Create a restore point before applying actions to detected items.
f. Use Windows Defender.
5. Click Save.
6. Access the Run dialog box, type Services.msc in the Open text box, and click OK.
7. Locate and click the Windows Defender service.
8. Select Disabled in the Startup type drop down, click the Stop button, and then click OK.

Disable TCP/IPv6 and Topology Discovery Mapper
1. Access the Control Panel.
2. Click Network and Sharing Center.
3. Select Manage network connections in the Tasks pane.
4. Right click on Local Area Connection/Wireless Network Connection and select Properties.
5. Clear the Internet Protocol Version 6 (TCP/IPv6) check box.
6. Clear the Link Layer Topology Discovery Mapper I/O Driver check box.
7. Clear the Link Layer Topology Discovery Mapper Responder check box.
8. Click OK.
9. Access the Run dialog box, type Services.msc in the Open text box, and click OK.
10. Locate and click the Link Layer Topology Discovery Mapper service.
11. Select Disabled in the Startup type drop down, and if it is started, click the Stop button.
12. Click OK

Turn off special Vista features
1. Access the Control Panel.
2. Click Programs and Features.
3. Select Turn Windows Features on or off in the Tasks pane.
4. Clear the check boxes adjacent to any Vista options in your version that are turned on. For example:
a. Expand the Games branch and clear the check boxes next to all of the Vista games such as Chess Titans, Ink Ball, Mahjong Titans, or Purble Place.
b. Expand the Microsoft .NET Framework 3.0 branch and clear the check box next to XPS Viewer.
c. Expand the Print Services branch and clear Internet Printing Client check box.
d. Clear the Remote Differential Compression check box.
e. Clear the Tablet PC Optional Components check box.
f. Clear the Windows DFS Replication Service check box.
g. Clear the Windows Meeting Space check box.
h. Clear the Windows Ultimate Extras check box.
5. Click OK and wait for the features to be turned off.
6. Restart Windows


Disable Automatic Defragging
1. Access Disk Defragmenter (StartAll ProgramsAccessoriesSystem Tools)
2. Clear the Run on a schedule check box.
3. Click OK.


Enable the Explorer menu bar
1. Access the Control Panel.
2. Click Folder Options.
3. Select the View tab.
4. Select the Always show menus check box.
5. Click OK.


Disable the new Start menu
1. Right-click the Start button and choose Properties.
2. Select the Classic Start menu option
3. Click OK.


Disable the Taskbar thumbnails
1. Right click the Taskbar and choose Properties.
2. Clear the Show window previews check box.
3. Click OK.


Disable the Sidebar
1. Right-click in the Sidebar and choose Properties.
2. Clear the Start Sidebar when Windows starts check box.
3. Click OK.
4. Right-click in the Sidebar again and choose Close Sidebar.


Disable Visual Effects
1. Access the Control Panel.
2. Locate and click System.
3. Select Advanced System Settings in the Tasks pane.
4. Click the Settings button in the Performance panel.
5. On the Visual Effects tab, select the Custom option, and clear every check box in the list.
6. Click OK.


Disable Aero
1. Access the Run dialog box, type Services.msc in the Open text box, and click OK.
2. Locate and click the Desktop Window Manager Session Manager service.
3. Select Disabled in the Startup type drop down, click the Stop button, and then click OK.
---End Text from link---

Another link on restoring the XP backup utility on Vista Restore a lost feature and install XP's Backup Utility into Windows Vista

Sunday, December 14, 2008

Cisco VOIP - Remote Functions

Issue:
How to access administrative features of our Cisco IP phone system from an external phone.

We wanted to be able to access the building overhead intercom system from an outside phone so that security personnel could make contact with people coming in after hours.


Normally we can make announcements to people inside our building by picking up our Cisco IP phone and entering *60 to access the building intercom system.

We were able to do this remotely by setting up a phone extension that forwards all calls to a Cisco Telephone Interface Route Point. The route point in turn accesses the *60 feature.


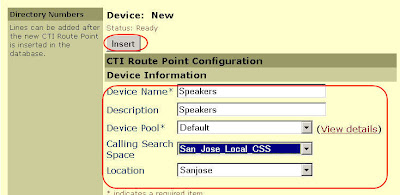
First lets add the CTI Route Point in Call Manager.
Under Device select “CTI Route Point “


Click on “Add a New CTI Route Point”


Enter the name of the Device and calling search space and location
Click on Insert to add it.


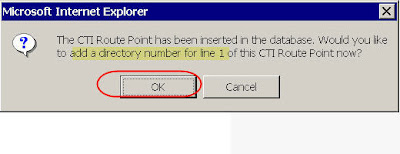
Click on OK in the pop up window to add a directory number for this device


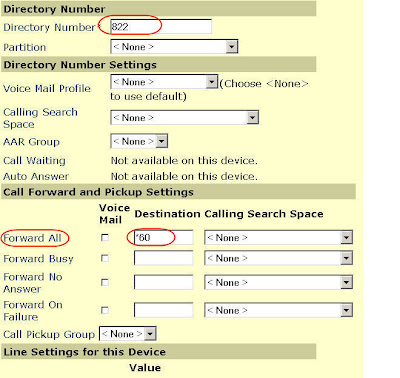
Here I have given the device the number 822.
This device will forward all calls to *60. Remember this is the code we use to get to the intercom system.


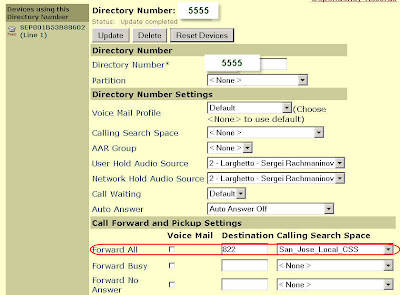
Now all I have to do is create a phone extension that forwards all calls to 822.
Now when I call from outside I connect to extension 5555 (number changed a bit) which transfers me straight to the intercom system.

Friday, December 12, 2008

Install Using Logon Script

Issue:
Automation of software install or upgrade using a logon batch file.

Quick:
Logon script calls batch file to remove old application and install new one.

Visual/Learning:
Looking at one of the user accounts you can see that the Logon script is pointed to a file called patches.bat

Patches.bat is located in the NETLOGON directory of the domain controller.


Patches.bat calls other modules to install and update software. In this case we will look at the module_mapcad.bat


This batch file is also in the NETLOGON directory


Below bat file listing in small text with comments in large text.
------------------

@echo off
rem remove, install or upgrade MapCAD for Land Desktop

This application depends on AutoCAD so the scripts checks to see if the acad.exe file exists. If it does the program jump to the start label otherwise it goes to the end label.

if exist "C:\Program Files\AutoCAD Civil 3D Land Desktop Companion 2008\acad.exe" goto start
goto end

Here is the start label. We next check for the existence of a text file. This file gets written to the drive if a previous install was successful. If it exists we jump to the end, otherwise we continue with the install.

:start
if exist "C:\Program Files\MapCAD\MapCAD-2008v12.05.txt" goto end

This uninstalls a previous version of the software. You can find the right key to uninstall by searching the registry at HKEY_LOCAL_MACHINE\SOFTWARE\Microsoft\Windows\CurrentVersion\Uninstall for the name of the application you want to remove. Uninstall using the key name (long hexidecimal number). The -quite part of this does a silent uninstall

rem uninstall the previous version
msiexec.exe /Uninstall {B4AB209A-0493-4E11-BB16-72418BBFA9BF} -quiet


Here the new version is installed. The install files need to be place somewhere where then can be installed. In this case on the logon server.

rem install the new version
call "%logonserver%/netlogon/Mapcad/MapCAD_2008v12.05/MapCAD Suite 2008-LD v12.05 Setup.msi" /quiet /passive

After the install a text file is written as an indication to the script that it has already completed and does not need to run again on the current workstation. Also a tracking file is updated to monitor which workstations have run the script.

echo %computername% %date% %time% "2008v12.05 update" > "C:\Program Files\MapCAD\MapCAD-2008v12.05.txt"
echo 2008v12.05 update %computername% %date% %time% %username% >> \\FileSvr1\Batch-tracking\MapCAD.txt

:end

Monday, December 8, 2008

AutoCAD Drawing Opens Slow

Issue:
AutoCAD 2008 and 2009 drawings open slow

Quick: Files and xrefs can contain excess scales that slow open to 5 minutes or more.
Use the command "-scalelistedit" ? to see the list, use r to reset to basic list.

Visual/Learning:
Explination and free tool at this site to clean multiple files at once.