Issue: I recently bought a little mini computer for the kids that comes without a CD drive. Kids need to run some programs that are CD based.
Quick: Download Free Virtual CD software and run from ISO images
Visual/ Learning:
MagicISO.com has a free tool for creating a virtual software based CD drive.
Download and install the software on the CD-less computer.
Create a ISO image of your CD on another computer that has a CD drive.
I use Nero but you can use any burning software that support creation of ISO files.
I created a share on my computer with the CD rom drive so that I can copy over the network to my other computer.
Connect to the share from the CD-less computer
Copy the ISO file over to the CD-less computer hard disk (wherever is convenient)
Right click the system tray icon for the virtual CD manager
Select Virtual CD/DVD-ROM from the menu
Point it to the ISO file you created for your CD.
You can not access the CD drive and it looks just like you have your CD loaded in a physical CD drive.
Showing posts with label Windows. Show all posts
Showing posts with label Windows. Show all posts
Saturday, June 19, 2010

Monday, August 17, 2009
Detect Computer Slow Down Due to Disk Access
Issue:
Slow computer performance
Quick/Visual/Learning:
Found good information at this link on TechRepublic about detecting if the slow down is due to a particular process that is beating on the hard drive.
--------------Begin Info from Link --------------
Disk time percentage and disk queue length
IT professionals think of hard disk corruption or inadequate disk space as the cause of most system performance problems, but disk time is an equally important performance factor. Disk time is represented as a percentage of time that the hard disk is in use. If the hard disk is running 80 percent of the time, for example, you can be sure that system performance is suffering.
Another factor to consider is the average disk queue length, which refers to the number of processes that are waiting to use the hard disk. Using the disk time percentage in conjunction with the disk queue length will tell you not only how much the hard disk is being used but also if the heavy usage is a problem. For example, if the disk time is 40 percent but the average disk queue length has a factor of two or less, then the hard disk is keeping up with the demand that’s being placed on it.
On the other hand, if the percentage of disk time and average disk queue length are both high (above 80 percent disk time and a factor of two or more for the average disk queue length), it means that processes are waiting for the hard disk to become available. Anytime a process has to wait for a component to become available, a user will experience less-than-desirable performance.
Measuring hard disk performance
To accurately diagnose a system’s hard disk, you need to measure the percentage of disk time and the average disk queue length.
Begin by performing a full defragmentation on all the system’s partitions to ensure that all files are contiguous and that the hard disk can perform file reads and writes optimally. Click on the Start menu and select All Programs Accessories System Tools Disk Defragmenter.
Once you’ve defragmented all partitions, run the Performance Monitor utility by opening the Control Panel and clicking Administrative Tools Performance.
Tip
When the Performance Monitor opens, select any counters that are previously running from the bottom of the window and press Delete. Every counter that’s running has a slight, but noticeable, impact on the system’s performance. Therefore, the fewer counters you use, the more accurate your measurements will be.
In the Performance Monitor utility, follow these steps:
Click the Plus icon to open the Add Counters dialog box.
Next, select PhysicalDisk from the Performance Object dropdown list, which will bring up a list of the physical disk counters.
Now, select the %Disk Time counter from the list and click the All Instances radio button to tell the system to measure the performance of all hard drives.
Next, click the Add button to add the counter to the Performance Monitor.
Finally, select Avg. Disk Queue Length from the counter list, select the All Instances radio button, and click the Add button followed by the Close button. When you do, the performance monitor will begin analyzing the disk usage, as shown in Figure A.
Figure A
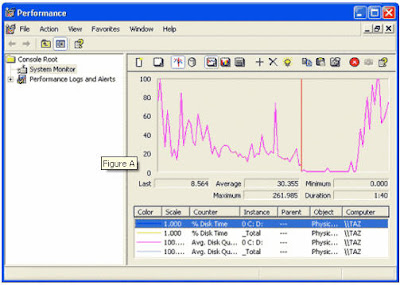
The numbers beneath the graph refer to the percent of disk time for Drive 0.
As you look at the output, you can see that the lines on the graph correspond to the counters that you’ve installed. For example, in Figure A, the pink line is predominant. You can tell by the legend that the pink line corresponds to the average disk queue length for the C: and D: partitions of Drive 0. You can also tell the exact values of any counter by selecting the counter that you want to examine. It’s best to look at the actual numbers rather than the graph, as the graph can be deceptive if the scale isn’t set correctly.
Narrowing down the suspects
Now it’s time to figure out which process is using all those disk resources. The first thing that I recommend to track down the culprit is to press [Ctrl][Alt][Delete] simultaneously to access the Windows Security dialog box. Next, click Task Manager to bring up the Task Manager utility, which reports on the resource utilization of every process running on the entire system.
While disk usage isn’t one of the factors that Task Manager normally reports, you can configure it to provide this information.
First, select the Processes tab to view the list of processes that are running on your machine.
Next, select the Select Columns command from the View menu. You’ll now see a list of all the resources that you can monitor through the Task Manager.
I recommend deselecting every resource except for I/O Read Bytes and I/O Write Bytes. When you click OK, you’ll see the number of bytes read and written by each process, as shown in
Figure B.
The trick now is to go through the list and look for rapidly changing values. It’s normal for most of the values to occasionally change, but if you see one that is constantly changing, then the process that corresponds to that value is hogging your system’s disk resources.
Figure B
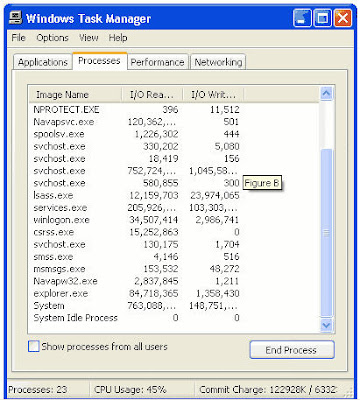
To kill a system resource hog, highlight the process and click End Process.
If the rogue system process is a part of the Windows operating system, there’s a good chance that the excessive disk usage is caused by thrashing.
Swapping vs. thrashing
The process of moving memory blocks between physical and virtual memory is called swapping. Although swapping is inefficient, it’s a perfectly normal process in a Windows environment. Virtual memory is hard disk space that is used as extra memory. Basically, any time Windows needs to read something that exists in virtual memory, it must move that memory block into the system’s physical memory. Thrashing problems are caused by excessive physical and virtual memory swapping.
However, if the disk usage is traced to a non-Windows process, then you may have problems with an individual service.
Be careful
If you eliminate a process you feel is causing excessive disk usage, processor time and memory will also be affected.
The usual suspects
We’ve focused on explaining how excessive disk time usage can degrade system performance, and you have seen some ways to track down the processes that create this problem. By using the Performance Monitor to measure both disk time and average queue length, you can get a sense of whether or not the hard disk is being taxed by the system’s processes. Analyzing the Task Manager further narrows down the possible suspects that may be causing the problem.
------------End Info from Link -----------
Slow computer performance
Quick/Visual/Learning:
Found good information at this link on TechRepublic about detecting if the slow down is due to a particular process that is beating on the hard drive.
--------------Begin Info from Link --------------
Disk time percentage and disk queue length
IT professionals think of hard disk corruption or inadequate disk space as the cause of most system performance problems, but disk time is an equally important performance factor. Disk time is represented as a percentage of time that the hard disk is in use. If the hard disk is running 80 percent of the time, for example, you can be sure that system performance is suffering.
Another factor to consider is the average disk queue length, which refers to the number of processes that are waiting to use the hard disk. Using the disk time percentage in conjunction with the disk queue length will tell you not only how much the hard disk is being used but also if the heavy usage is a problem. For example, if the disk time is 40 percent but the average disk queue length has a factor of two or less, then the hard disk is keeping up with the demand that’s being placed on it.
On the other hand, if the percentage of disk time and average disk queue length are both high (above 80 percent disk time and a factor of two or more for the average disk queue length), it means that processes are waiting for the hard disk to become available. Anytime a process has to wait for a component to become available, a user will experience less-than-desirable performance.
Measuring hard disk performance
To accurately diagnose a system’s hard disk, you need to measure the percentage of disk time and the average disk queue length.
Begin by performing a full defragmentation on all the system’s partitions to ensure that all files are contiguous and that the hard disk can perform file reads and writes optimally. Click on the Start menu and select All Programs Accessories System Tools Disk Defragmenter.
Once you’ve defragmented all partitions, run the Performance Monitor utility by opening the Control Panel and clicking Administrative Tools Performance.
Tip
When the Performance Monitor opens, select any counters that are previously running from the bottom of the window and press Delete. Every counter that’s running has a slight, but noticeable, impact on the system’s performance. Therefore, the fewer counters you use, the more accurate your measurements will be.
In the Performance Monitor utility, follow these steps:
Click the Plus icon to open the Add Counters dialog box.
Next, select PhysicalDisk from the Performance Object dropdown list, which will bring up a list of the physical disk counters.
Now, select the %Disk Time counter from the list and click the All Instances radio button to tell the system to measure the performance of all hard drives.
Next, click the Add button to add the counter to the Performance Monitor.
Finally, select Avg. Disk Queue Length from the counter list, select the All Instances radio button, and click the Add button followed by the Close button. When you do, the performance monitor will begin analyzing the disk usage, as shown in Figure A.
Figure A
The numbers beneath the graph refer to the percent of disk time for Drive 0.
As you look at the output, you can see that the lines on the graph correspond to the counters that you’ve installed. For example, in Figure A, the pink line is predominant. You can tell by the legend that the pink line corresponds to the average disk queue length for the C: and D: partitions of Drive 0. You can also tell the exact values of any counter by selecting the counter that you want to examine. It’s best to look at the actual numbers rather than the graph, as the graph can be deceptive if the scale isn’t set correctly.
Narrowing down the suspects
Now it’s time to figure out which process is using all those disk resources. The first thing that I recommend to track down the culprit is to press [Ctrl][Alt][Delete] simultaneously to access the Windows Security dialog box. Next, click Task Manager to bring up the Task Manager utility, which reports on the resource utilization of every process running on the entire system.
While disk usage isn’t one of the factors that Task Manager normally reports, you can configure it to provide this information.
First, select the Processes tab to view the list of processes that are running on your machine.
Next, select the Select Columns command from the View menu. You’ll now see a list of all the resources that you can monitor through the Task Manager.
I recommend deselecting every resource except for I/O Read Bytes and I/O Write Bytes. When you click OK, you’ll see the number of bytes read and written by each process, as shown in
Figure B.
The trick now is to go through the list and look for rapidly changing values. It’s normal for most of the values to occasionally change, but if you see one that is constantly changing, then the process that corresponds to that value is hogging your system’s disk resources.
Figure B
To kill a system resource hog, highlight the process and click End Process.
If the rogue system process is a part of the Windows operating system, there’s a good chance that the excessive disk usage is caused by thrashing.
Swapping vs. thrashing
The process of moving memory blocks between physical and virtual memory is called swapping. Although swapping is inefficient, it’s a perfectly normal process in a Windows environment. Virtual memory is hard disk space that is used as extra memory. Basically, any time Windows needs to read something that exists in virtual memory, it must move that memory block into the system’s physical memory. Thrashing problems are caused by excessive physical and virtual memory swapping.
However, if the disk usage is traced to a non-Windows process, then you may have problems with an individual service.
Be careful
If you eliminate a process you feel is causing excessive disk usage, processor time and memory will also be affected.
The usual suspects
We’ve focused on explaining how excessive disk time usage can degrade system performance, and you have seen some ways to track down the processes that create this problem. By using the Performance Monitor to measure both disk time and average queue length, you can get a sense of whether or not the hard disk is being taxed by the system’s processes. Analyzing the Task Manager further narrows down the possible suspects that may be causing the problem.
------------End Info from Link -----------
Friday, July 10, 2009
Windows 2003 Prevent Users From Seeing Objects They Can't Access
Issue: Hide files and folders when users do not have access to open those objects.
Quick: download Windows Server 2003 Access-based Enumeration.
Visual/Learning:
Windows Server 2008 has the ability to prevent users from seeing files to which they have no access. You can also download a file to add this ability to 2003 server. This is called Access-based Enumeration. Click on the link below to download the file.
Windows Server 2003 Access-based Enumeration
Quick: download Windows Server 2003 Access-based Enumeration.
Visual/Learning:
Windows Server 2008 has the ability to prevent users from seeing files to which they have no access. You can also download a file to add this ability to 2003 server. This is called Access-based Enumeration. Click on the link below to download the file.
Windows Server 2003 Access-based Enumeration
Monday, June 22, 2009
Show Hidden Windows Drivers
Issue: Old hidden drivers can cause a problem. Here is how to expose them in XP and Vista
Quick/Visual/Learning:
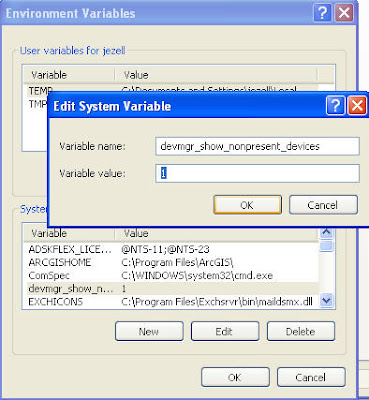
Add an environment variable:
Start/MyComputer/RightClick/Properties/Advanced/Environment Variables button
Add a system variable called:
devmgr_show_nonpresent_devices
Set the value to 1
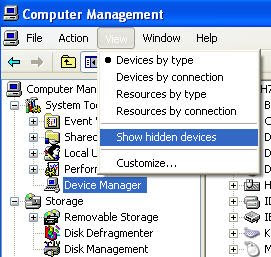
Go to the Device Manager
Start/MyComputer/RightClick/Manage/Device Manager
Select the View menu/Show Hidden Devices
You can now see and delete hidden device drivers.
Quick/Visual/Learning:
Add an environment variable:
Start/MyComputer/RightClick/Properties/Advanced/Environment Variables button
Add a system variable called:
devmgr_show_nonpresent_devices
Set the value to 1
Go to the Device Manager
Start/MyComputer/RightClick/Manage/Device Manager
Select the View menu/Show Hidden Devices
You can now see and delete hidden device drivers.
Saturday, June 20, 2009
Hard Disk Recovery
Issue: Your hard drive has crashed and you are looking for some help.
Quick/Visual/Learning:
Here is a link to shareware at Zero Assumption Recovery ZAR and a HowTo.
Quick/Visual/Learning:
Here is a link to shareware at Zero Assumption Recovery ZAR and a HowTo.
Wednesday, May 27, 2009
XP - Troubleshoot Boot Problems
Issue: Need a good one stop diagnostic tool for fixing boot problems.
Quick: MSCONFIG
Visual/Learning:
The link below has a lot of good information about this tool.
TechRepulic Link
------ Overview of Info from Link -------------
Start - Run - msconfig to start the tool.
GENERAL TAB
- Diagnostic Startup (Loads only what it needs to run Windows)
- Selective Startup (Deselect startup items to isolate problem)
- Launch System Restore (To go back to restore point)
- Expand file (get a new copy of windows file from cab files)
SYSTEMS.INI AND WIN.INI TABS
Enable and disable sections of code using a check box.
Rearange code sections with 'Move Up' and 'Move Down'
BOOT.INI TAB
Can select boot modes (Safe Mode, Safe Mode with Networking, AlternateShell for cmd prompt)
-Noguiboot (no VGA video driver for boot display)
-Bootlog (enable boot logging)
-Basevideo (forces standard VGA driver)
-Sos (shows driver names as they are loaded)
-Advanced Options Button
--Maxmem (limit memory XP can use to check for bad memory module)
--Numproc (limit number of processors)
--Pcilock (stop XP form assigning sys resources to PCI devices)
--Debug (debugging mode)
---Debugport (port for debuging)
---Baudrate (baud rate for debuging)
---Channel (1394 channel for debug)
SERVICES TAB
-Enable and disable services with check box
-Hide all Windows services with check box (So you just see software added services)
STARTUP TAB
- Prevent items in startup folder from starting with a check box.
------ End Overview of Info from Link -------------
Quick: MSCONFIG
Visual/Learning:
The link below has a lot of good information about this tool.
TechRepulic Link
------ Overview of Info from Link -------------
Start - Run - msconfig to start the tool.
GENERAL TAB
- Diagnostic Startup (Loads only what it needs to run Windows)
- Selective Startup (Deselect startup items to isolate problem)
- Launch System Restore (To go back to restore point)
- Expand file (get a new copy of windows file from cab files)
SYSTEMS.INI AND WIN.INI TABS
Enable and disable sections of code using a check box.
Rearange code sections with 'Move Up' and 'Move Down'
BOOT.INI TAB
Can select boot modes (Safe Mode, Safe Mode with Networking, AlternateShell for cmd prompt)
-Noguiboot (no VGA video driver for boot display)
-Bootlog (enable boot logging)
-Basevideo (forces standard VGA driver)
-Sos (shows driver names as they are loaded)
-Advanced Options Button
--Maxmem (limit memory XP can use to check for bad memory module)
--Numproc (limit number of processors)
--Pcilock (stop XP form assigning sys resources to PCI devices)
--Debug (debugging mode)
---Debugport (port for debuging)
---Baudrate (baud rate for debuging)
---Channel (1394 channel for debug)
SERVICES TAB
-Enable and disable services with check box
-Hide all Windows services with check box (So you just see software added services)
STARTUP TAB
- Prevent items in startup folder from starting with a check box.
------ End Overview of Info from Link -------------
Saturday, February 28, 2009
Uninstall Problems With AutoCAD Civil3D
Issue: After uninstalling AutoCAD Civil 3D 2008 we were unable to re-install because the installer thought that the application was already loaded.
Quick/Visual/Learning:
After using add/remove programs to uninstall AutoCAD Civil 3D we had a issue trying to re-install. The box for installing Civil 3d was grayed out. The text under the option said that it was already installed.
After searching for and deleting files from the hard drive and Autodesk registry entries the problem still persisted. In the end the fix turned out to be that we needed to rename or delete the installer directory for the application.

Quick/Visual/Learning:
After using add/remove programs to uninstall AutoCAD Civil 3D we had a issue trying to re-install. The box for installing Civil 3d was grayed out. The text under the option said that it was already installed.
After searching for and deleting files from the hard drive and Autodesk registry entries the problem still persisted. In the end the fix turned out to be that we needed to rename or delete the installer directory for the application.
The directory for Civil 3D is the one in the picture above. Look for it in either:
C:\WINNT\Installer\{2CD6BBA0-17C8-4789-9B9B-B36F7E815F6A}
OR C:\Windows\Installer\{2CD6BBA0-17C8-4789-9B9B-B36F7E815F6A}
After renaming the diretory the installer no longer saw the application as already loaded and allowed to check the installation box.
Found this tool "Window installer Cleanup Utility" that is supose to do the cleanup for you.
Tuesday, February 10, 2009
Force Windows Safe Boot
Issue: Need to reboot a remote machine into safe mode with networking support. Or if just want to force your local machine without having to hit the F8 key.
Quick: Add to the boot.ini file - /safeboot:minimal /sos /bootlog /noguiboot
Visual/Learning:
Warning!!! This help shows you how to edit the boot.ini file. Be careful when working with this file. This file tells the computer where to go to boot windows and if you mess that up it wont start windows anymore till it is fixed. So be careful!
The example below shows XP. In XP and later you can run msconfig on the start run line to edit the boot.ini with a gui interface, but it works for windows 2000 as well you just have to edit the boot.ini file manually.
Note: You may have to unhide system files for the boot.ini file to show up. You can show hidden files by opening a windows explorer window and select tools menu - folder options - view tab - uncheck "hide protected operating system files". You may also need to right click in the boot.ini file and uncheck the box for "read only"
Just take out the added boot.ini switches to boot normal again.
This link shows you all the switches
---Text from the link ------
The Safe-mode boot modes and corresponding switches include:
Mode: Safe Mode
Switch: /safeboot:minimal /sos /bootlog /noguiboot
Mode: Safe Mode with Networking
Switch: /safeboot:network /sos /bootlog /noguiboot
Mode: Safe Mode with Command Prompt
Switch: /safeboot:minimal(alternateshell) /sos /bootlog /noguiboot
Mode: Enable Boot Logging
Switch: /bootlog
Mode: Enable VGA Mode
Switch: /basevideo
Mode: Directory Services Restore Mode (Domain Controllers Only)
Switch: /safeboot:dsrepair /sos
Mode: Debugging Mode
Switch: /debug
NOTE: The /sos /bootlog /noguiboot switches are not required with any of the above settings, but they are useful to help with troubleshooting. These switches are included if you press F8 and choose one of the modes.
---End Text from link----
Quick: Add to the boot.ini file - /safeboot:minimal /sos /bootlog /noguiboot
Visual/Learning:
Warning!!! This help shows you how to edit the boot.ini file. Be careful when working with this file. This file tells the computer where to go to boot windows and if you mess that up it wont start windows anymore till it is fixed. So be careful!
The example below shows XP. In XP and later you can run msconfig on the start run line to edit the boot.ini with a gui interface, but it works for windows 2000 as well you just have to edit the boot.ini file manually.

Note: You may have to unhide system files for the boot.ini file to show up. You can show hidden files by opening a windows explorer window and select tools menu - folder options - view tab - uncheck "hide protected operating system files". You may also need to right click in the boot.ini file and uncheck the box for "read only"
Just take out the added boot.ini switches to boot normal again.
This link shows you all the switches
---Text from the link ------
The Safe-mode boot modes and corresponding switches include:
Mode: Safe Mode
Switch: /safeboot:minimal /sos /bootlog /noguiboot
Mode: Safe Mode with Networking
Switch: /safeboot:network /sos /bootlog /noguiboot
Mode: Safe Mode with Command Prompt
Switch: /safeboot:minimal(alternateshell) /sos /bootlog /noguiboot
Mode: Enable Boot Logging
Switch: /bootlog
Mode: Enable VGA Mode
Switch: /basevideo
Mode: Directory Services Restore Mode (Domain Controllers Only)
Switch: /safeboot:dsrepair /sos
Mode: Debugging Mode
Switch: /debug
NOTE: The /sos /bootlog /noguiboot switches are not required with any of the above settings, but they are useful to help with troubleshooting. These switches are included if you press F8 and choose one of the modes.
---End Text from link----
Thursday, February 5, 2009
VM Ware Bios
Issue: Need to change the boot setting for Virtual Machine running on Windows Host.
Quick: Select the virtual machine console window. Press alt-cntl-del esc-f2
Visual/Learning:
The boot may happen too quickly to hit theand get into the virtual machine bios settings. The following method has worked for me.
Start the virtual machine and select the console window. Press the Alt+Cntl+Del buttons at the same time.
This will cause the Guest machine to reboot but it also causes the Windows Host machine to switch to the Windows Security window.
Quickly presskey to get out of the Security window followed by to get into the bios of the guest machine.
You can also add the following line to the small .vmx text file:
bios.bootDelay = "5000"
Quick: Select the virtual machine console window. Press alt-cntl-del esc-f2
Visual/Learning:
The boot may happen too quickly to hit the
Start the virtual machine and select the console window. Press the Alt+Cntl+Del buttons at the same time.
This will cause the Guest machine to reboot but it also causes the Windows Host machine to switch to the Windows Security window.
Quickly press
You can also add the following line to the small .vmx text file:
bios.bootDelay = "5000"
Saturday, January 31, 2009
Perl Script To Identify If Office 2003 SP3 Is Installed
Issue:
Need to identify which machines have Office 2003 SP3 installed.
Quick: Microsoft Notes indicate files that have changed. Check size of one of the updated files.
Visual/Learning:
Pick one of the updated files to use an indicator that SP3 is loaded. Search for the file to see where it is located on one of the workstations.
The following line of Perl code executes the dos dir command to list one of the files updated by SP3. If I know what the new file size should be, I can do a comparison to check for the service pack. In this case the file size should be 103,256 bytes for the SP3 version of the MCPS.DLL file.
my @results = ( `dir \\\\$workstation\\"c\$\\Program Files\\Microsoft Office\\OFFICE11\\MCPS.DLL"` );
Need to identify which machines have Office 2003 SP3 installed.
Quick: Microsoft Notes indicate files that have changed. Check size of one of the updated files.
Visual/Learning:
Pick one of the updated files to use an indicator that SP3 is loaded. Search for the file to see where it is located on one of the workstations.
The following line of Perl code executes the dos dir command to list one of the files updated by SP3. If I know what the new file size should be, I can do a comparison to check for the service pack. In this case the file size should be 103,256 bytes for the SP3 version of the MCPS.DLL file.
my @results = ( `dir \\\\$workstation\\"c\$\\Program Files\\Microsoft Office\\OFFICE11\\MCPS.DLL"` );
Wednesday, January 28, 2009
Download Software To A Safe Area
Issue:
You are looking for a free program to do a task, like convert a sound file, but you want to avoid downloading some nasty malware in the process.
Quick/Visual/Learning:
http://sandboxie.com/ Get a free program here that will allow you to capture and download information into a temporary sandbox. When you are done you close the sandbox and nothing gets written to your hard drive or registry. A pay version of the program allows you to do some extra stuff like automatically launch a sandbox each time you open a browser.
You are looking for a free program to do a task, like convert a sound file, but you want to avoid downloading some nasty malware in the process.
Quick/Visual/Learning:
http://sandboxie.com/ Get a free program here that will allow you to capture and download information into a temporary sandbox. When you are done you close the sandbox and nothing gets written to your hard drive or registry. A pay version of the program allows you to do some extra stuff like automatically launch a sandbox each time you open a browser.
Monday, January 19, 2009
Windows MMC Customization
Issue:
Create a custom Microsfot Management Console with all of your favorite tools or customize one with restricted function for task delegation.
Quick/Visual/Learning:
Here is a link to Step-By-Step Guide
Custom consoles are saved as .msc files that can be shared via email, public file folder, or even through a policy.
Basically:
run mmc
Add your snapins
You can customize access with:
-multiple windows
-Extensions Tab allows you to remove functions
-Create Console Taskpads (with limited function)
--Right click on item in tree and select "New Taskpad"
---Wizard steps through creation of Taskpad
Create a custom Microsfot Management Console with all of your favorite tools or customize one with restricted function for task delegation.
Quick/Visual/Learning:
Here is a link to Step-By-Step Guide
Custom consoles are saved as .msc files that can be shared via email, public file folder, or even through a policy.
Basically:
run mmc
Add your snapins
You can customize access with:
-multiple windows
-Extensions Tab allows you to remove functions
-Create Console Taskpads (with limited function)
--Right click on item in tree and select "New Taskpad"
---Wizard steps through creation of Taskpad
Wednesday, December 17, 2008
Make Vista More Like XP
Issue:
You hate the Vista interface and want it to be more like XP. Here is how to do it.
Quick/Visual/Learning:
The text below is just the meat from this Post from the TechRepublic site.
Note to be careful as always with any registry edits.
---Text from link---
Disable User Access Control (UAC)
1. Access the Control Panel and select Classic View.
2. Locate and click User Accounts.
3. Select the Turn User Account Control on or off and respond appropriately to the UAC.
4. Clear the Use User Account Control (UAC) to help protect your computer.
5. Click OK.
6. Restart Windows
Disable Notificatin Ballons
1. Access the Run dialog box, type Regedit in the Open text box, and click OK.
2. Locate the following key: HKEY_CURRENT_USER\Software\Microsoft\Windows\CurrentVersion\Explorer\Advanced Click on the right-hand pane.
3. Pull down the Edit menu and select the New DWORD (32-bit) Value command
4. Name the new key EnableBalloonTips.
5. Make sure the value is set to 0.
6. Click OK.
7. Log off and then back on.
Disable Windows Defender
1. Access Windows Defender on the Start All Programs menu.
2. Click the Tools button.
3. Click Options in the Settings section.
4. Clear the following check boxes:
a. Automatically scan my computer.
b. Use real-time protection.
c. Scan the contents of archived files and folders for potential threats
d. Use heuristics to detect potentially harmful or unwanted behavior by software that hasn’t been analyzed for risks.
e. Create a restore point before applying actions to detected items.
f. Use Windows Defender.
5. Click Save.
6. Access the Run dialog box, type Services.msc in the Open text box, and click OK.
7. Locate and click the Windows Defender service.
8. Select Disabled in the Startup type drop down, click the Stop button, and then click OK.
Disable TCP/IPv6 and Topology Discovery Mapper
1. Access the Control Panel.
2. Click Network and Sharing Center.
3. Select Manage network connections in the Tasks pane.
4. Right click on Local Area Connection/Wireless Network Connection and select Properties.
5. Clear the Internet Protocol Version 6 (TCP/IPv6) check box.
6. Clear the Link Layer Topology Discovery Mapper I/O Driver check box.
7. Clear the Link Layer Topology Discovery Mapper Responder check box.
8. Click OK.
9. Access the Run dialog box, type Services.msc in the Open text box, and click OK.
10. Locate and click the Link Layer Topology Discovery Mapper service.
11. Select Disabled in the Startup type drop down, and if it is started, click the Stop button.
12. Click OK
Turn off special Vista features
1. Access the Control Panel.
2. Click Programs and Features.
3. Select Turn Windows Features on or off in the Tasks pane.
4. Clear the check boxes adjacent to any Vista options in your version that are turned on. For example:
a. Expand the Games branch and clear the check boxes next to all of the Vista games such as Chess Titans, Ink Ball, Mahjong Titans, or Purble Place.
b. Expand the Microsoft .NET Framework 3.0 branch and clear the check box next to XPS Viewer.
c. Expand the Print Services branch and clear Internet Printing Client check box.
d. Clear the Remote Differential Compression check box.
e. Clear the Tablet PC Optional Components check box.
f. Clear the Windows DFS Replication Service check box.
g. Clear the Windows Meeting Space check box.
h. Clear the Windows Ultimate Extras check box.
5. Click OK and wait for the features to be turned off.
6. Restart Windows
Disable Automatic Defragging
1. Access Disk Defragmenter (StartAll ProgramsAccessoriesSystem Tools)
2. Clear the Run on a schedule check box.
3. Click OK.
Enable the Explorer menu bar
1. Access the Control Panel.
2. Click Folder Options.
3. Select the View tab.
4. Select the Always show menus check box.
5. Click OK.
Disable the new Start menu
1. Right-click the Start button and choose Properties.
2. Select the Classic Start menu option
3. Click OK.
Disable the Taskbar thumbnails
1. Right click the Taskbar and choose Properties.
2. Clear the Show window previews check box.
3. Click OK.
Disable the Sidebar
1. Right-click in the Sidebar and choose Properties.
2. Clear the Start Sidebar when Windows starts check box.
3. Click OK.
4. Right-click in the Sidebar again and choose Close Sidebar.
Disable Visual Effects
1. Access the Control Panel.
2. Locate and click System.
3. Select Advanced System Settings in the Tasks pane.
4. Click the Settings button in the Performance panel.
5. On the Visual Effects tab, select the Custom option, and clear every check box in the list.
6. Click OK.
Disable Aero
1. Access the Run dialog box, type Services.msc in the Open text box, and click OK.
2. Locate and click the Desktop Window Manager Session Manager service.
3. Select Disabled in the Startup type drop down, click the Stop button, and then click OK.
---End Text from link---
Another link on restoring the XP backup utility on Vista Restore a lost feature and install XP's Backup Utility into Windows Vista
You hate the Vista interface and want it to be more like XP. Here is how to do it.
Quick/Visual/Learning:
The text below is just the meat from this Post from the TechRepublic site.
Note to be careful as always with any registry edits.
---Text from link---
Disable User Access Control (UAC)
1. Access the Control Panel and select Classic View.
2. Locate and click User Accounts.
3. Select the Turn User Account Control on or off and respond appropriately to the UAC.
4. Clear the Use User Account Control (UAC) to help protect your computer.
5. Click OK.
6. Restart Windows
Disable Notificatin Ballons
1. Access the Run dialog box, type Regedit in the Open text box, and click OK.
2. Locate the following key: HKEY_CURRENT_USER\Software\Microsoft\Windows\CurrentVersion\Explorer\Advanced Click on the right-hand pane.
3. Pull down the Edit menu and select the New DWORD (32-bit) Value command
4. Name the new key EnableBalloonTips.
5. Make sure the value is set to 0.
6. Click OK.
7. Log off and then back on.
Disable Windows Defender
1. Access Windows Defender on the Start All Programs menu.
2. Click the Tools button.
3. Click Options in the Settings section.
4. Clear the following check boxes:
a. Automatically scan my computer.
b. Use real-time protection.
c. Scan the contents of archived files and folders for potential threats
d. Use heuristics to detect potentially harmful or unwanted behavior by software that hasn’t been analyzed for risks.
e. Create a restore point before applying actions to detected items.
f. Use Windows Defender.
5. Click Save.
6. Access the Run dialog box, type Services.msc in the Open text box, and click OK.
7. Locate and click the Windows Defender service.
8. Select Disabled in the Startup type drop down, click the Stop button, and then click OK.
Disable TCP/IPv6 and Topology Discovery Mapper
1. Access the Control Panel.
2. Click Network and Sharing Center.
3. Select Manage network connections in the Tasks pane.
4. Right click on Local Area Connection/Wireless Network Connection and select Properties.
5. Clear the Internet Protocol Version 6 (TCP/IPv6) check box.
6. Clear the Link Layer Topology Discovery Mapper I/O Driver check box.
7. Clear the Link Layer Topology Discovery Mapper Responder check box.
8. Click OK.
9. Access the Run dialog box, type Services.msc in the Open text box, and click OK.
10. Locate and click the Link Layer Topology Discovery Mapper service.
11. Select Disabled in the Startup type drop down, and if it is started, click the Stop button.
12. Click OK
Turn off special Vista features
1. Access the Control Panel.
2. Click Programs and Features.
3. Select Turn Windows Features on or off in the Tasks pane.
4. Clear the check boxes adjacent to any Vista options in your version that are turned on. For example:
a. Expand the Games branch and clear the check boxes next to all of the Vista games such as Chess Titans, Ink Ball, Mahjong Titans, or Purble Place.
b. Expand the Microsoft .NET Framework 3.0 branch and clear the check box next to XPS Viewer.
c. Expand the Print Services branch and clear Internet Printing Client check box.
d. Clear the Remote Differential Compression check box.
e. Clear the Tablet PC Optional Components check box.
f. Clear the Windows DFS Replication Service check box.
g. Clear the Windows Meeting Space check box.
h. Clear the Windows Ultimate Extras check box.
5. Click OK and wait for the features to be turned off.
6. Restart Windows
Disable Automatic Defragging
1. Access Disk Defragmenter (StartAll ProgramsAccessoriesSystem Tools)
2. Clear the Run on a schedule check box.
3. Click OK.
Enable the Explorer menu bar
1. Access the Control Panel.
2. Click Folder Options.
3. Select the View tab.
4. Select the Always show menus check box.
5. Click OK.
Disable the new Start menu
1. Right-click the Start button and choose Properties.
2. Select the Classic Start menu option
3. Click OK.
Disable the Taskbar thumbnails
1. Right click the Taskbar and choose Properties.
2. Clear the Show window previews check box.
3. Click OK.
Disable the Sidebar
1. Right-click in the Sidebar and choose Properties.
2. Clear the Start Sidebar when Windows starts check box.
3. Click OK.
4. Right-click in the Sidebar again and choose Close Sidebar.
Disable Visual Effects
1. Access the Control Panel.
2. Locate and click System.
3. Select Advanced System Settings in the Tasks pane.
4. Click the Settings button in the Performance panel.
5. On the Visual Effects tab, select the Custom option, and clear every check box in the list.
6. Click OK.
Disable Aero
1. Access the Run dialog box, type Services.msc in the Open text box, and click OK.
2. Locate and click the Desktop Window Manager Session Manager service.
3. Select Disabled in the Startup type drop down, click the Stop button, and then click OK.
---End Text from link---
Another link on restoring the XP backup utility on Vista Restore a lost feature and install XP's Backup Utility into Windows Vista
Sunday, November 30, 2008
Sycronize Windows Files to External Drive
Issue:
You want to have the same files at home and at work and keep them in Sync
Quick/Visual/Learning:
I have not been very happy with the speed of the synchronization programs I have tried in the past. There are probably some good ones out there somewhere.
As of right now I am using some free utilities to do the job. Robocopy is a fast command-line copy utility from the Windows Resource Kit that you can download here. There are a lot of options and you can get some instructions for those here.
Typically what I do is copy my work files to an external disk to take home and my home files to an external disk to take to work. (I am sure someone has figured out a secure over the Internet windows to windows sync but I have not taken the time yet to find it).
So I use robocopy in a bat file like this:
robocopy "C:\Sync" F:\Sync /mir /z /R:0 /W:0 /v /np /log:Sync2Home.txt
This is fast and works great. Only newer files get updated. The /mir will remove old things from the F drive that I have deleted from my master file copy on the C drive.
The problem is that if I forget and make a change on my F drive those changes get deleted the next time I run the robocopy command. This happens because the /mir trys to make the target look just like the source and extra stuff on the F drive is deleted.
As a workaround for this I decided to use the /xo /xx switches. The /xo command says to not backup files where the source is older. The /xx says not to delete extra files and directories on the destination.
Now changes on the destination do not get wiped out but I need to reconcile any differences. I need to quickly find the problem areas (these get logged to the log file). I use another tool called baregrep to search for destination files marked as Newer or Extra. This tool can be found at baremetalsoft here.
So what I have now in my bat file is this:
robocopy "C:\Sync" F:\Sync /mir /z /R:0 /W:0 /v /xo /xx /np /log:Sync2Home.txt
baregrep "Newer(vertical bar pipe symbol goes here)EXTRA" robologhmhsync.txt
This shows me a list of things I need to fix. If there were a lot of changes this would be too much work but for now my changes are few.
Extra stuff is easy just copy it over to the source drive.
If the file is newer on the destination drive I could just copy it over as well as long as the source file has not changed too since the last backup. Any file that I might change is either going to be a Word, Excel, or a text file.
For text files I can use the dos FC command to find differences.
> fc C:\Sync\File F:\Sync\File /N
Here is a test I did:
C:\>fc t.txt c:/test/t.txt /n
Both of these files had the letter a through p, on letter to a line.
I added a line of text to the source and another line to the destination file.
Comparing files t.txt and C:/TEST/T.TXT
***** t.txt (YOU SEE TEXT WAS INSERTED ON LINE 3)
2: b
3: Text added to Source File
4: c
***** C:/TEST/T.TXT
2: b
3: c
*****
***** t.txt (YOU SEE THAT TEXT WAS INSERTED ON LINE 9)
9: h
10: i
***** C:/TEST/T.TXT
8: h
9: Text added to Destination File
10: i
*****
For Word and Excel file I can use the merge command to merge any changes.
In Excel
For each workbook, Go to Tools>Share Workbook..
On the Edit tab select the check box that says:
"Allow changes by more than one user at a time to enable workbook merging."
Go to Tools and do Merge command and pick the other file.
Cells get updated with note about changes when done.
Tools / Track Changes / "Accept or Reject Changes"
Lets you approve or reject each change.
In Word (Here is a good page for this)
Open source document
Go to Tools menu / Compare and Merge Documents
Merge (legal blackline unchecked)
Changes are updated and you can accept or reject changes.
You want to have the same files at home and at work and keep them in Sync
Quick/Visual/Learning:
I have not been very happy with the speed of the synchronization programs I have tried in the past. There are probably some good ones out there somewhere.
As of right now I am using some free utilities to do the job. Robocopy is a fast command-line copy utility from the Windows Resource Kit that you can download here. There are a lot of options and you can get some instructions for those here.
Typically what I do is copy my work files to an external disk to take home and my home files to an external disk to take to work. (I am sure someone has figured out a secure over the Internet windows to windows sync but I have not taken the time yet to find it).
So I use robocopy in a bat file like this:
robocopy "C:\Sync" F:\Sync /mir /z /R:0 /W:0 /v /np /log:Sync2Home.txt
This is fast and works great. Only newer files get updated. The /mir will remove old things from the F drive that I have deleted from my master file copy on the C drive.
The problem is that if I forget and make a change on my F drive those changes get deleted the next time I run the robocopy command. This happens because the /mir trys to make the target look just like the source and extra stuff on the F drive is deleted.
As a workaround for this I decided to use the /xo /xx switches. The /xo command says to not backup files where the source is older. The /xx says not to delete extra files and directories on the destination.
Now changes on the destination do not get wiped out but I need to reconcile any differences. I need to quickly find the problem areas (these get logged to the log file). I use another tool called baregrep to search for destination files marked as Newer or Extra. This tool can be found at baremetalsoft here.
So what I have now in my bat file is this:
robocopy "C:\Sync" F:\Sync /mir /z /R:0 /W:0 /v /xo /xx /np /log:Sync2Home.txt
baregrep "Newer(vertical bar pipe symbol goes here)EXTRA" robologhmhsync.txt
This shows me a list of things I need to fix. If there were a lot of changes this would be too much work but for now my changes are few.
Extra stuff is easy just copy it over to the source drive.
If the file is newer on the destination drive I could just copy it over as well as long as the source file has not changed too since the last backup. Any file that I might change is either going to be a Word, Excel, or a text file.
For text files I can use the dos FC command to find differences.
> fc C:\Sync\File F:\Sync\File /N
Here is a test I did:
C:\>fc t.txt c:/test/t.txt /n
Both of these files had the letter a through p, on letter to a line.
I added a line of text to the source and another line to the destination file.
Comparing files t.txt and C:/TEST/T.TXT
***** t.txt (YOU SEE TEXT WAS INSERTED ON LINE 3)
2: b
3: Text added to Source File
4: c
***** C:/TEST/T.TXT
2: b
3: c
*****
***** t.txt (YOU SEE THAT TEXT WAS INSERTED ON LINE 9)
9: h
10: i
***** C:/TEST/T.TXT
8: h
9: Text added to Destination File
10: i
*****
For Word and Excel file I can use the merge command to merge any changes.
In Excel
For each workbook, Go to Tools>Share Workbook..
On the Edit tab select the check box that says:
"Allow changes by more than one user at a time to enable workbook merging."
Go to Tools and do Merge command and pick the other file.
Cells get updated with note about changes when done.
Tools / Track Changes / "Accept or Reject Changes"
Lets you approve or reject each change.
In Word (Here is a good page for this)
Open source document
Go to Tools menu / Compare and Merge Documents
Merge (legal blackline unchecked)
Changes are updated and you can accept or reject changes.
Wednesday, November 26, 2008
Configuring FTP server
Issue:
References for configuring FTP servers
Quick: Windows components install IIS, Details check box for FTP
Visual/Learning:
Links with information about FTP configuration.
Windows Server 2003
http://www.windowsnetworking.com/articles_tutorials/Creating-Configuring-FTP.html
http://msdn.microsoft.com/en-us/library/6ws081sa.aspx
http://www.simongibson.com/intranet/ftp2003/ isolation mode
References for configuring FTP servers
Quick: Windows components install IIS, Details check box for FTP
Visual/Learning:
Links with information about FTP configuration.
Windows Server 2003
http://www.windowsnetworking.com/articles_tutorials/Creating-Configuring-FTP.html
http://msdn.microsoft.com/en-us/library/6ws081sa.aspx
http://www.simongibson.com/intranet/ftp2003/ isolation mode
Friday, November 7, 2008
Blank Or Gap In Add/Remove Programs Window
Issue:
You notice that when you go to the add remove programs window there is a huge gap. Also may have just a blank window.
Quick:
Gap - Autocad issue- Search registry Data only for this acad.exe,-1 or this aclt.exe,-1 and change the negative 1 to just a positive 1
Blank Window - start =>run=> - Regsvr32 appwiz.cpl
Visual:
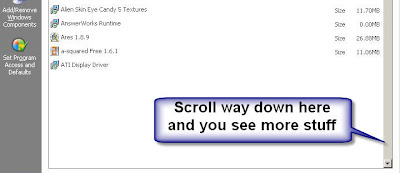
Learning:
Found link here that has the answer:
---text from link---
The problem, believe it or not, is simply that the entry in the Registry for the AutoCAD uninstaller specifies its icon incorrectly. There's a simple fix. (If there's some other underlying problem such as updates installed in the wrong order, as you've deduced, that won't be corrected; but it will get rid of the huge gap in Add/Remove Programs.)
Using regedit or some other registry editor, search the Data fields for the string aclt.exe . (You do not need to search the Key or Value fields, just Data).
Step through ( in regedit) the entries in which aclt.exe appears watching for one where aclt.exe is followed by a comma and -1 .
When you find such an entry, it should be the data field for a DisplayIcon key. The aclt.exe will be preceded by the full path to that file in your installation, so it will look something like "C:\Program Files\AutoCAD 2002\aclt.exe,-1".
Edit the data string, changing the -1 to 1.
That's it! I've never found more than one of these entries in a registry at one time, but I won't swear that couldn't happen, so you might want to continue searching to make sure.
---end text from link---
You notice that when you go to the add remove programs window there is a huge gap. Also may have just a blank window.
Quick:
Gap - Autocad issue- Search registry Data only for this acad.exe,-1 or this aclt.exe,-1 and change the negative 1 to just a positive 1
Blank Window - start =>run=> - Regsvr32 appwiz.cpl
Visual:
Learning:
Found link here that has the answer:
---text from link---
The problem, believe it or not, is simply that the entry in the Registry for the AutoCAD uninstaller specifies its icon incorrectly. There's a simple fix. (If there's some other underlying problem such as updates installed in the wrong order, as you've deduced, that won't be corrected; but it will get rid of the huge gap in Add/Remove Programs.)
Using regedit or some other registry editor, search the Data fields for the string aclt.exe . (You do not need to search the Key or Value fields, just Data).
Step through ( in regedit) the entries in which aclt.exe appears watching for one where aclt.exe is followed by a comma and -1 .
When you find such an entry, it should be the data field for a DisplayIcon key. The aclt.exe will be preceded by the full path to that file in your installation, so it will look something like "C:\Program Files\AutoCAD 2002\aclt.exe,-1".
Edit the data string, changing the -1 to 1.
That's it! I've never found more than one of these entries in a registry at one time, but I won't swear that couldn't happen, so you might want to continue searching to make sure.
---end text from link---
Monday, November 3, 2008
Windows - Using Non-Admin Account
Issue:
Avoid some security risk by using windows without adminstrator rights and still get stuff done.
Quick/Visual:/Learning:]
Found this helpful blog posting => site. I add the text below as well
--- Text from David Wang Blog site ---
HOWTO: Run as normal user (non-admin) on Windows
Sometimes, I wonder and worry about the vast majority of Windows users that run with administrative privileges. Most of them probably do this blindly because it is the default auto-login for Windows XP and do not know any better. This tells a lot about the power of having secure defaults...
However, such unnecessary privilege comes at a great price: spyware / malware / virus / trojan / worm freely misuse such privileges to infect and proliferate. And in knee-jerk response, a whole security industry dedicated to corraling these miscreants spring up and some even enter the Microsoft product line and Windows Update.
But, no one seems to be tackling the fundament security problem:
Users running with more privileges than necessary
Social Engineering and poor computing habits
As I had discussed earlier, the effective computer system security is simply the weakest link amongst Software, Configuration, and Policy. Simply focusing on using Software to compensate for a lack of secure computing practices (Policy) does not improve security. I mean, we can come up with perfectly written Software with no bugs nor security vulnerabilities and Configure the system securely yet functionally, but if the user runs as administrator because "things work better" or blindly follow instructions to get themselves rooted, all the effort is for nothing. This is why I think that such actions do wonders for PR and user perspection (and sometimes, changing perceptions is "the goal"), but it really does not raise the bar.
I do not know about you, but I like making real progress, not perceived progress. So, I am going to show one approach that I use to not run as administrator to safely compute on Windows - both at home and work.
I mean, I really hate personal security software from McAfee, Symnatec, etc because they assume how you want to work (so many people fail to install IIS on Windows XP due to these software packages "breaking" IIS in subtle ways to prevent installation/functionality), and they do not do much more than common sense... so I consider them unnecessary bloatware that gets in my way. Yes, I do not run security software on all of my machines; no virus scan, no email scanner, nada. I just run as normal User with Windows Firewall sealing off all ports and common sense against social engineering. :-)
Securing the Computing Environment
No, I am not going to wait for Windows Vista, LUA, and various other security advancements to help run as non-administrator and secure my computing environment... not when I can do it all right now from Windows 2000 on up.
What I do is basically:
Run as the normal User, with no privileges changes from the default
Run a special "root" console window (that is a different color) as a user with administrative privilege
Leave the Firewall on and do my job as the normal User, and on the special occassions where I need elevated privileges, I launch commands out of the special "root" console window
That is it. It is functionally similar to how LUA will work in Windows Vista, except with GUI dialog boxes instead of console commands. And this is how I create the desktop shortcut to launch my special "root" console window (I actually just copy the same shortcut on all my machines to %ALLUSERSPROFILE%\Desktop):
Right Click on the desktop and create a shortcut
Paste in the following as target for the shortcut (in my case, I rename the Administrator to "root"):
%windir% \system32\runas.exe /u:%COMPUTERNAME%\root "cmd /T:3E /k @title root && start /min %windir%\system32\taskmgr.exe"
Choose your shortcut title - I use "root"
Change the icon to something obvious. I use the icon in SHELL32.dll that contains a key with two people.
I change the screen buffer size to 50 Width and 2 Height - so that the shortcut just shows a small window containing:
Enter the password for %COMPUTERNAME%\root:
I also change the shortcut's text and background color to Yellow on Cyan so that it matches the color scheme of the root console window - just so that the window is very obviously different than the white on black of normal console windows.
Now, what are some of the "inconveniences" that I incur by doing this? Well:
I lose the ability to install/uninstall programs as myself. But, I just run "appwiz.cpl" or the program's setup EXE from the root console window and things usually work. If they do not, I consider it a product bug.
I lose the ability to run Windows Update for patches. This is something that I cannot do from the root console window, so I have to login as an administrator and let Windows Update client run every six months or so. Yes, I do this infrequently because I run my computers securely, and I only login once every six months or so, so this is no bother.
I cannot kill any process that I want. But, that is what the TASKMGR.EXE run as root (from my shortcut), or TASKKILL.EXE in the root console window is for.
I cannot Remote Desktop into that machine by default. On Windows XP and later, I just add my User to "Remote Desktop Users" group. On Windows 2000, I have to use the root console window to launch MMC with the "Terminal Services Configuration" snapin, select Properties on the RDP-TCP connection, and add my user to the "Permissions" tab of that connect (Windows XP and later pre-create and populate the "Remote Desktop Users" group into this Permissions list).
I cannot configure networking or Windows Firewall. But, NETSH.EXE on Windows XP/Windows Server 2003 works wonders inside a root console window.
I lose the ability to change the system date/time. But, I just use the DATE or TIME commands in the root console window as necessary.
I can no longer start/stop services. Well, that is what NET START, NET STOP, and SC QUERY commands in the root console window are for...
I cannot change file ACLs to grant myself privileges. But CACLS does that nicely from the root console window.
Overall, I find that the "inconveniences" happen very rarely in my day-to-day activities. You rarely install programs, patch, reconfigure networking, stop/start services, and change system date/time and file ACLs on a daily basis... so it makes sense to not run with administrative privileges
Now, I know that there are cases where you may want to run a program but that program only works when run as administrator... such as games or other older software... but I tend to leave them alone. The way I think about it, until the users revolt with their pocket books, application providers have ZERO incentive to fix/improve their code. So, I do not buy such software and if I do, I bug the heck out of their support staff and complain that their product is insecure because it requires me to run with administrative privileges. Hey, some have listened and changed. :-)
Well, I know that this does not solve all your problems on Windows, but hopefully it can help you solve a good chunk of your security concerns. I am interested in hearing some of your stories regarding this topic...
--- end text from site ---
Avoid some security risk by using windows without adminstrator rights and still get stuff done.
Quick/Visual:/Learning:]
Found this helpful blog posting => site. I add the text below as well
--- Text from David Wang Blog site ---
HOWTO: Run as normal user (non-admin) on Windows
Sometimes, I wonder and worry about the vast majority of Windows users that run with administrative privileges. Most of them probably do this blindly because it is the default auto-login for Windows XP and do not know any better. This tells a lot about the power of having secure defaults...
However, such unnecessary privilege comes at a great price: spyware / malware / virus / trojan / worm freely misuse such privileges to infect and proliferate. And in knee-jerk response, a whole security industry dedicated to corraling these miscreants spring up and some even enter the Microsoft product line and Windows Update.
But, no one seems to be tackling the fundament security problem:
Users running with more privileges than necessary
Social Engineering and poor computing habits
As I had discussed earlier, the effective computer system security is simply the weakest link amongst Software, Configuration, and Policy. Simply focusing on using Software to compensate for a lack of secure computing practices (Policy) does not improve security. I mean, we can come up with perfectly written Software with no bugs nor security vulnerabilities and Configure the system securely yet functionally, but if the user runs as administrator because "things work better" or blindly follow instructions to get themselves rooted, all the effort is for nothing. This is why I think that such actions do wonders for PR and user perspection (and sometimes, changing perceptions is "the goal"), but it really does not raise the bar.
I do not know about you, but I like making real progress, not perceived progress. So, I am going to show one approach that I use to not run as administrator to safely compute on Windows - both at home and work.
I mean, I really hate personal security software from McAfee, Symnatec, etc because they assume how you want to work (so many people fail to install IIS on Windows XP due to these software packages "breaking" IIS in subtle ways to prevent installation/functionality), and they do not do much more than common sense... so I consider them unnecessary bloatware that gets in my way. Yes, I do not run security software on all of my machines; no virus scan, no email scanner, nada. I just run as normal User with Windows Firewall sealing off all ports and common sense against social engineering. :-)
Securing the Computing Environment
No, I am not going to wait for Windows Vista, LUA, and various other security advancements to help run as non-administrator and secure my computing environment... not when I can do it all right now from Windows 2000 on up.
What I do is basically:
Run as the normal User, with no privileges changes from the default
Run a special "root" console window (that is a different color) as a user with administrative privilege
Leave the Firewall on and do my job as the normal User, and on the special occassions where I need elevated privileges, I launch commands out of the special "root" console window
That is it. It is functionally similar to how LUA will work in Windows Vista, except with GUI dialog boxes instead of console commands. And this is how I create the desktop shortcut to launch my special "root" console window (I actually just copy the same shortcut on all my machines to %ALLUSERSPROFILE%\Desktop):
Right Click on the desktop and create a shortcut
Paste in the following as target for the shortcut (in my case, I rename the Administrator to "root"):
%windir% \system32\runas.exe /u:%COMPUTERNAME%\root "cmd /T:3E /k @title root && start /min %windir%\system32\taskmgr.exe"
Choose your shortcut title - I use "root"
Change the icon to something obvious. I use the icon in SHELL32.dll that contains a key with two people.
I change the screen buffer size to 50 Width and 2 Height - so that the shortcut just shows a small window containing:
Enter the password for %COMPUTERNAME%\root:
I also change the shortcut's text and background color to Yellow on Cyan so that it matches the color scheme of the root console window - just so that the window is very obviously different than the white on black of normal console windows.
Now, what are some of the "inconveniences" that I incur by doing this? Well:
I lose the ability to install/uninstall programs as myself. But, I just run "appwiz.cpl" or the program's setup EXE from the root console window and things usually work. If they do not, I consider it a product bug.
I lose the ability to run Windows Update for patches. This is something that I cannot do from the root console window, so I have to login as an administrator and let Windows Update client run every six months or so. Yes, I do this infrequently because I run my computers securely, and I only login once every six months or so, so this is no bother.
I cannot kill any process that I want. But, that is what the TASKMGR.EXE run as root (from my shortcut), or TASKKILL.EXE in the root console window is for.
I cannot Remote Desktop into that machine by default. On Windows XP and later, I just add my User to "Remote Desktop Users" group. On Windows 2000, I have to use the root console window to launch MMC with the "Terminal Services Configuration" snapin, select Properties on the RDP-TCP connection, and add my user to the "Permissions" tab of that connect (Windows XP and later pre-create and populate the "Remote Desktop Users" group into this Permissions list).
I cannot configure networking or Windows Firewall. But, NETSH.EXE on Windows XP/Windows Server 2003 works wonders inside a root console window.
I lose the ability to change the system date/time. But, I just use the DATE or TIME commands in the root console window as necessary.
I can no longer start/stop services. Well, that is what NET START, NET STOP, and SC QUERY commands in the root console window are for...
I cannot change file ACLs to grant myself privileges. But CACLS does that nicely from the root console window.
Overall, I find that the "inconveniences" happen very rarely in my day-to-day activities. You rarely install programs, patch, reconfigure networking, stop/start services, and change system date/time and file ACLs on a daily basis... so it makes sense to not run with administrative privileges
Now, I know that there are cases where you may want to run a program but that program only works when run as administrator... such as games or other older software... but I tend to leave them alone. The way I think about it, until the users revolt with their pocket books, application providers have ZERO incentive to fix/improve their code. So, I do not buy such software and if I do, I bug the heck out of their support staff and complain that their product is insecure because it requires me to run with administrative privileges. Hey, some have listened and changed. :-)
Well, I know that this does not solve all your problems on Windows, but hopefully it can help you solve a good chunk of your security concerns. I am interested in hearing some of your stories regarding this topic...
--- end text from site ---
Saturday, October 11, 2008
Vista - Check Disk Problems
Issue:
Problems with Check Disk in Vista running all the time or not at all.
Quick:
Set registry BootExecute value to => autocheck autochk *
Visual/Learning:
Saw this tip on the TechRepublic site byGreg Shultz :
-----Text from site-----
To fix the problem requires that you modify the registry. Since editing the registry can be a dangerous operation, it is important that you back it up before you begin.
To launch the Registry Editor, press [Windows]+R to open the Run dialog box. Then type regedit.exe in the Open text box and click OK. You’ll then encounter a UAC and will need to respond appropriately.
When you see the Registry Editor, navigate to the following folder:
HKEY_LOCAL_MACHINESystemCurrentControlSetControlSession Manager
When you get there, locate the BootExecute value... the default value data of BootExecute value should be
autocheck autochk *
If it reads anything else, simply overwrite the entry with the default value data.
To complete the operation, click OK to close the Edit Multi-String dialog box, close the Registry Editor, and restart your system. Once your system restarts, you can return to the Check Disk GUI, select both the Automatically Fix File System Errors check box and the Scan For And Attempt Recovery Of Bad Sectors check box and click Start. When the system restarts, Check Disk should run normally.
...if resetting the BootExecute value to its default value doesn’t solve the problem and Check Disk runs again at startup, it is possible that the Dirty Bit is stuck. To check the status of the Dirty Bit, you’ll use the Fsutil command.
To begin, right-click on the Command Prompt shortcut and select the Run As Administrator command. When you encounter a UAC, you will need to respond appropriately. Then type:
Fsutil dirty query Y:
Where Y: is the drive letter on your system. The result should tell you that the drive is dirty.
At this point, you’ll use the Chkntfs command to disable the Check Disk operation for the next startup. Type:
Chkntfs /x Y:
Where Y: is the drive letter on your system. The result should tell you that the file system is NTFS.
To continue, close the Command Prompt and restart your system. When your system restarts, it should boot right into Windows — you should not see Check Disk attempt to run. However, if it does, you should open a Command Prompt window and launch Check Disk in full repair mode. Type:
Chkdsk /f /r Y:
Where Y: is the drive letter on your system.
You’ll then be prompted to schedule Check Disk to run at startup. To continue, type Y and press [Enter]. Then, restart Windows and allow Check Disk to run at startup. When it does, it should properly reset the Dirty Bit and Windows should start normally from this point forward.
-----End Text from site-----
Problems with Check Disk in Vista running all the time or not at all.
Quick:
Set registry BootExecute value to => autocheck autochk *
Visual/Learning:
Saw this tip on the TechRepublic site byGreg Shultz :
-----Text from site-----
To fix the problem requires that you modify the registry. Since editing the registry can be a dangerous operation, it is important that you back it up before you begin.
To launch the Registry Editor, press [Windows]+R to open the Run dialog box. Then type regedit.exe in the Open text box and click OK. You’ll then encounter a UAC and will need to respond appropriately.
When you see the Registry Editor, navigate to the following folder:
HKEY_LOCAL_MACHINESystemCurrentControlSetControlSession Manager
When you get there, locate the BootExecute value... the default value data of BootExecute value should be
autocheck autochk *
If it reads anything else, simply overwrite the entry with the default value data.
To complete the operation, click OK to close the Edit Multi-String dialog box, close the Registry Editor, and restart your system. Once your system restarts, you can return to the Check Disk GUI, select both the Automatically Fix File System Errors check box and the Scan For And Attempt Recovery Of Bad Sectors check box and click Start. When the system restarts, Check Disk should run normally.
...if resetting the BootExecute value to its default value doesn’t solve the problem and Check Disk runs again at startup, it is possible that the Dirty Bit is stuck. To check the status of the Dirty Bit, you’ll use the Fsutil command.
To begin, right-click on the Command Prompt shortcut and select the Run As Administrator command. When you encounter a UAC, you will need to respond appropriately. Then type:
Fsutil dirty query Y:
Where Y: is the drive letter on your system. The result should tell you that the drive is dirty.
At this point, you’ll use the Chkntfs command to disable the Check Disk operation for the next startup. Type:
Chkntfs /x Y:
Where Y: is the drive letter on your system. The result should tell you that the file system is NTFS.
To continue, close the Command Prompt and restart your system. When your system restarts, it should boot right into Windows — you should not see Check Disk attempt to run. However, if it does, you should open a Command Prompt window and launch Check Disk in full repair mode. Type:
Chkdsk /f /r Y:
Where Y: is the drive letter on your system.
You’ll then be prompted to schedule Check Disk to run at startup. To continue, type Y and press [Enter]. Then, restart Windows and allow Check Disk to run at startup. When it does, it should properly reset the Dirty Bit and Windows should start normally from this point forward.
-----End Text from site-----
Saturday, September 27, 2008
Windows Auto Logon
Issue:
In a home setting you may want to just have Windows login without prompting for a password.
Quick:
See below for OS specific procedures for Windows 2000, XP, and Vista
Visual/Learning:
Windows 2000 Auto Logon
http://support.microsoft.com/kb/234562
--------Text from link-----------
Preventing the Password Prompt in a Non-Domain System
1. In Control Panel, double-click Users and Passwords.
2. Click to clear the Users must enter a user name and password to use this computer check box.
NOTE: This option does not appear on a system that is a member of a domain.
3. Click the Advanced tab.
4. Click to clear the Require users to press Ctrl-Alt-Del before logging on check box.
Automatic logon is not supported when you are logging on to a domain. You will need to join a workgroup if you want to use the automatic logon feature.
--------End Text from link-----------
Windows XP Auto Logon
http://support.microsoft.com/kb/315231
--------Text from link-----------
You can use Registry Editor to add your log on information. To do this, follow these steps:
1. Click Start, click Run, type regedit, and then click OK.
2. Locate the following registry key:
HKEY_LOCAL_MACHINE\SOFTWARE\Microsoft\Windows NT\CurrentVersion\Winlogon
3. Using your account name and password, double-click the DefaultUserName entry, type your user name, and then click OK.
4. Double-click the DefaultPassword entry, type your password under the value data box, and then click OK.
If there is no DefaultPassword value, create the value. To do this, follow these steps:
a. In Registry Editor, click Edit, click New, and then click String Value.
b. Type DefaultPassword as the value name, and then press ENTER.
c. Double-click the newly created key, and then type your password in the Value Data box.
If no DefaultPassword string is specified, Windows XP automatically changes the value of the AutoAdminLogon registry key from 1 (true) to 0 (false) to turn off the AutoAdminLogon feature.
5. Double-click the AutoAdminLogon entry, type 1 in the Value Data box, and then click OK.
If there is no AutoAdminLogon entry, create the entry. To do this, follow these steps:
. In Registry Editor, click Edit, click New, and then click String Value.
a. Type AutoAdminLogon as the value name, and then press ENTER.
b. Double-click the newly created key, and then type 1 in the Value Data box.
6. Quit Registry Editor.
7. Click Start, click Restart, and then click OK.
After your computer restarts and Windows XP starts, you can log on automatically.
If you want to bypass the automatic logon to log on as a different user, hold down the SHIFT key after you log off or after Windows XP restarts. Note that this procedure applies only to the first logon. To enforce this setting for future logoffs, the administrator must set the following registry key:
HKEY_LOCAL_MACHINE\SOFTWARE\Microsoft\Windows NT\CurrentVersion\Winlogon
Value:ForceAutoLogon
Type: REG_SZ
Data: 1
You can also use turn on automatic logon without editing the registry in Microsoft Windows XP Home Edition and in Microsoft Windows XP Professional on a computer that is not joined to a domain. To do this, follow these steps: 1. Click Start, and then click Run.
2. In the Open box, type control userpasswords2, and then click OK.
Note When users try to display help information in the User Accounts window in Windows XP Home Edition, the help information is not displayed. Additionally, users receive the following error message:
Cannot find the Drive:\Windows\System32\users.hlp Help file. Check to see that the file exists on your hard disk drive. If it does not exist, you must reinstall it.
3. Clear the "Users must enter a user name and password to use this computer" check box, and then click Apply.
4. In the Automatically Log On window, type the password in the Password box, and then retype the password in the Confirm Password box.
5. Click OK to close the Automatically Log On window, and then click OK to close the User Accounts window.
--------End Text from link-----------
Windows Vista Auto Logon
http://www.lockergnome.com/windows/2007/02/20/configure-vista-for-automatic-logon/
--------Text from link-----------
If you do not share your computer with any other users and no one else has access to it, you can configure Vista to log you on automatically.
To do so, click Start and type netplwiz in the Search field and then press Enter. Click Continue when the User Account Control window appears. From the User Accounts window that appears, verify that your own user account is selected. Clear the Users must enter a username and password to use this computer option and click OK. Provide the password for your user account when prompted and restart your computer. Vista will automatically log on with your user account.
[tags]vista, automatic logon, automatic login, configure windows[/tags]
--------End Text from link-----------
In a home setting you may want to just have Windows login without prompting for a password.
Quick:
See below for OS specific procedures for Windows 2000, XP, and Vista
Visual/Learning:
Windows 2000 Auto Logon
http://support.microsoft.com/kb/234562
--------Text from link-----------
Preventing the Password Prompt in a Non-Domain System
1. In Control Panel, double-click Users and Passwords.
2. Click to clear the Users must enter a user name and password to use this computer check box.
NOTE: This option does not appear on a system that is a member of a domain.
3. Click the Advanced tab.
4. Click to clear the Require users to press Ctrl-Alt-Del before logging on check box.
Automatic logon is not supported when you are logging on to a domain. You will need to join a workgroup if you want to use the automatic logon feature.
--------End Text from link-----------
Windows XP Auto Logon
http://support.microsoft.com/kb/315231
--------Text from link-----------
You can use Registry Editor to add your log on information. To do this, follow these steps:
1. Click Start, click Run, type regedit, and then click OK.
2. Locate the following registry key:
HKEY_LOCAL_MACHINE\SOFTWARE\Microsoft\Windows NT\CurrentVersion\Winlogon
3. Using your account name and password, double-click the DefaultUserName entry, type your user name, and then click OK.
4. Double-click the DefaultPassword entry, type your password under the value data box, and then click OK.
If there is no DefaultPassword value, create the value. To do this, follow these steps:
a. In Registry Editor, click Edit, click New, and then click String Value.
b. Type DefaultPassword as the value name, and then press ENTER.
c. Double-click the newly created key, and then type your password in the Value Data box.
If no DefaultPassword string is specified, Windows XP automatically changes the value of the AutoAdminLogon registry key from 1 (true) to 0 (false) to turn off the AutoAdminLogon feature.
5. Double-click the AutoAdminLogon entry, type 1 in the Value Data box, and then click OK.
If there is no AutoAdminLogon entry, create the entry. To do this, follow these steps:
. In Registry Editor, click Edit, click New, and then click String Value.
a. Type AutoAdminLogon as the value name, and then press ENTER.
b. Double-click the newly created key, and then type 1 in the Value Data box.
6. Quit Registry Editor.
7. Click Start, click Restart, and then click OK.
After your computer restarts and Windows XP starts, you can log on automatically.
If you want to bypass the automatic logon to log on as a different user, hold down the SHIFT key after you log off or after Windows XP restarts. Note that this procedure applies only to the first logon. To enforce this setting for future logoffs, the administrator must set the following registry key:
HKEY_LOCAL_MACHINE\SOFTWARE\Microsoft\Windows NT\CurrentVersion\Winlogon
Value:ForceAutoLogon
Type: REG_SZ
Data: 1
You can also use turn on automatic logon without editing the registry in Microsoft Windows XP Home Edition and in Microsoft Windows XP Professional on a computer that is not joined to a domain. To do this, follow these steps: 1. Click Start, and then click Run.
2. In the Open box, type control userpasswords2, and then click OK.
Note When users try to display help information in the User Accounts window in Windows XP Home Edition, the help information is not displayed. Additionally, users receive the following error message:
Cannot find the Drive:\Windows\System32\users.hlp Help file. Check to see that the file exists on your hard disk drive. If it does not exist, you must reinstall it.
3. Clear the "Users must enter a user name and password to use this computer" check box, and then click Apply.
4. In the Automatically Log On window, type the password in the Password box, and then retype the password in the Confirm Password box.
5. Click OK to close the Automatically Log On window, and then click OK to close the User Accounts window.
--------End Text from link-----------
Windows Vista Auto Logon
http://www.lockergnome.com/windows/2007/02/20/configure-vista-for-automatic-logon/
--------Text from link-----------
If you do not share your computer with any other users and no one else has access to it, you can configure Vista to log you on automatically.
To do so, click Start and type netplwiz in the Search field and then press Enter. Click Continue when the User Account Control window appears. From the User Accounts window that appears, verify that your own user account is selected. Clear the Users must enter a username and password to use this computer option and click OK. Provide the password for your user account when prompted and restart your computer. Vista will automatically log on with your user account.
[tags]vista, automatic logon, automatic login, configure windows[/tags]
--------End Text from link-----------
Monday, September 22, 2008
Remote Connection To Server 2003 Console - Session Zero
Issue:
Connect to a windows 2003 machine and see what the user at the console sees
Quick:
mstsc /v:servername /console
Visual/Learning:
In Windows Server 2003 administrators can redirect the server’s console to a remote desktop session. This session is called session zero.
You can connect using seesion zero with the following command:
mstsc /v:servername /console
The down side is that the screen is visible at only one location at a time. A person standing at the computer console will be logged out when the remote connection is made. They will need to log in again to see the screen which disconnects the remote user. Not as convenient for collaborative work as other products but possible.
Connect to a windows 2003 machine and see what the user at the console sees
Quick:
mstsc /v:servername /console
Visual/Learning:
In Windows Server 2003 administrators can redirect the server’s console to a remote desktop session. This session is called session zero.
You can connect using seesion zero with the following command:
mstsc /v:servername /console
The down side is that the screen is visible at only one location at a time. A person standing at the computer console will be logged out when the remote connection is made. They will need to log in again to see the screen which disconnects the remote user. Not as convenient for collaborative work as other products but possible.
Subscribe to:
Posts (Atom)