Showing posts with label Administration. Show all posts

Monday, August 17, 2009

Detect Computer Slow Down Due to Disk Access

Issue:
Slow computer performance

Quick/Visual/Learning:

Found good information at this link on TechRepublic about detecting if the slow down is due to a particular process that is beating on the hard drive.

--------------Begin Info from Link --------------
Disk time percentage and disk queue length
IT professionals think of hard disk corruption or inadequate disk space as the cause of most system performance problems, but disk time is an equally important performance factor. Disk time is represented as a percentage of time that the hard disk is in use. If the hard disk is running 80 percent of the time, for example, you can be sure that system performance is suffering.

Another factor to consider is the average disk queue length, which refers to the number of processes that are waiting to use the hard disk. Using the disk time percentage in conjunction with the disk queue length will tell you not only how much the hard disk is being used but also if the heavy usage is a problem. For example, if the disk time is 40 percent but the average disk queue length has a factor of two or less, then the hard disk is keeping up with the demand that’s being placed on it.

On the other hand, if the percentage of disk time and average disk queue length are both high (above 80 percent disk time and a factor of two or more for the average disk queue length), it means that processes are waiting for the hard disk to become available. Anytime a process has to wait for a component to become available, a user will experience less-than-desirable performance.

Measuring hard disk performance
To accurately diagnose a system’s hard disk, you need to measure the percentage of disk time and the average disk queue length.

Begin by performing a full defragmentation on all the system’s partitions to ensure that all files are contiguous and that the hard disk can perform file reads and writes optimally. Click on the Start menu and select All Programs Accessories System Tools Disk Defragmenter.

Once you’ve defragmented all partitions, run the Performance Monitor utility by opening the Control Panel and clicking Administrative Tools Performance.

Tip
When the Performance Monitor opens, select any counters that are previously running from the bottom of the window and press Delete. Every counter that’s running has a slight, but noticeable, impact on the system’s performance. Therefore, the fewer counters you use, the more accurate your measurements will be.

In the Performance Monitor utility, follow these steps:

Click the Plus icon to open the Add Counters dialog box.
Next, select PhysicalDisk from the Performance Object dropdown list, which will bring up a list of the physical disk counters.
Now, select the %Disk Time counter from the list and click the All Instances radio button to tell the system to measure the performance of all hard drives.
Next, click the Add button to add the counter to the Performance Monitor.
Finally, select Avg. Disk Queue Length from the counter list, select the All Instances radio button, and click the Add button followed by the Close button. When you do, the performance monitor will begin analyzing the disk usage, as shown in Figure A.

Figure A
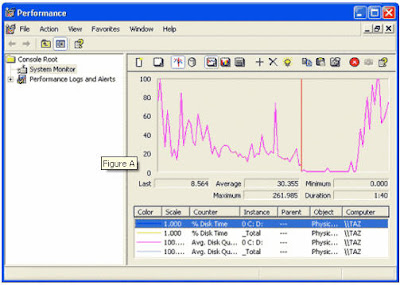


The numbers beneath the graph refer to the percent of disk time for Drive 0.
As you look at the output, you can see that the lines on the graph correspond to the counters that you’ve installed. For example, in Figure A, the pink line is predominant. You can tell by the legend that the pink line corresponds to the average disk queue length for the C: and D: partitions of Drive 0. You can also tell the exact values of any counter by selecting the counter that you want to examine. It’s best to look at the actual numbers rather than the graph, as the graph can be deceptive if the scale isn’t set correctly.

Narrowing down the suspects

Now it’s time to figure out which process is using all those disk resources. The first thing that I recommend to track down the culprit is to press [Ctrl][Alt][Delete] simultaneously to access the Windows Security dialog box. Next, click Task Manager to bring up the Task Manager utility, which reports on the resource utilization of every process running on the entire system.

While disk usage isn’t one of the factors that Task Manager normally reports, you can configure it to provide this information.

First, select the Processes tab to view the list of processes that are running on your machine.
Next, select the Select Columns command from the View menu. You’ll now see a list of all the resources that you can monitor through the Task Manager.
I recommend deselecting every resource except for I/O Read Bytes and I/O Write Bytes. When you click OK, you’ll see the number of bytes read and written by each process, as shown in
Figure B.

The trick now is to go through the list and look for rapidly changing values. It’s normal for most of the values to occasionally change, but if you see one that is constantly changing, then the process that corresponds to that value is hogging your system’s disk resources.

Figure B
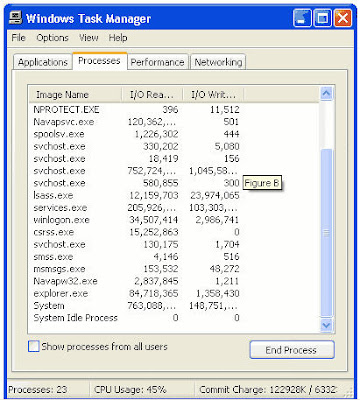


To kill a system resource hog, highlight the process and click End Process.

If the rogue system process is a part of the Windows operating system, there’s a good chance that the excessive disk usage is caused by thrashing.

Swapping vs. thrashing

The process of moving memory blocks between physical and virtual memory is called swapping. Although swapping is inefficient, it’s a perfectly normal process in a Windows environment. Virtual memory is hard disk space that is used as extra memory. Basically, any time Windows needs to read something that exists in virtual memory, it must move that memory block into the system’s physical memory. Thrashing problems are caused by excessive physical and virtual memory swapping.

However, if the disk usage is traced to a non-Windows process, then you may have problems with an individual service.

Be careful
If you eliminate a process you feel is causing excessive disk usage, processor time and memory will also be affected.

The usual suspects
We’ve focused on explaining how excessive disk time usage can degrade system performance, and you have seen some ways to track down the processes that create this problem. By using the Performance Monitor to measure both disk time and average queue length, you can get a sense of whether or not the hard disk is being taxed by the system’s processes. Analyzing the Task Manager further narrows down the possible suspects that may be causing the problem.

------------End Info from Link -----------

Friday, December 12, 2008

Install Using Logon Script

Issue:
Automation of software install or upgrade using a logon batch file.

Quick:
Logon script calls batch file to remove old application and install new one.

Visual/Learning:
Looking at one of the user accounts you can see that the Logon script is pointed to a file called patches.bat

Patches.bat is located in the NETLOGON directory of the domain controller.


Patches.bat calls other modules to install and update software. In this case we will look at the module_mapcad.bat


This batch file is also in the NETLOGON directory


Below bat file listing in small text with comments in large text.
------------------

@echo off
rem remove, install or upgrade MapCAD for Land Desktop

This application depends on AutoCAD so the scripts checks to see if the acad.exe file exists. If it does the program jump to the start label otherwise it goes to the end label.

if exist "C:\Program Files\AutoCAD Civil 3D Land Desktop Companion 2008\acad.exe" goto start
goto end

Here is the start label. We next check for the existence of a text file. This file gets written to the drive if a previous install was successful. If it exists we jump to the end, otherwise we continue with the install.

:start
if exist "C:\Program Files\MapCAD\MapCAD-2008v12.05.txt" goto end

This uninstalls a previous version of the software. You can find the right key to uninstall by searching the registry at HKEY_LOCAL_MACHINE\SOFTWARE\Microsoft\Windows\CurrentVersion\Uninstall for the name of the application you want to remove. Uninstall using the key name (long hexidecimal number). The -quite part of this does a silent uninstall

rem uninstall the previous version
msiexec.exe /Uninstall {B4AB209A-0493-4E11-BB16-72418BBFA9BF} -quiet


Here the new version is installed. The install files need to be place somewhere where then can be installed. In this case on the logon server.

rem install the new version
call "%logonserver%/netlogon/Mapcad/MapCAD_2008v12.05/MapCAD Suite 2008-LD v12.05 Setup.msi" /quiet /passive

After the install a text file is written as an indication to the script that it has already completed and does not need to run again on the current workstation. Also a tracking file is updated to monitor which workstations have run the script.

echo %computername% %date% %time% "2008v12.05 update" > "C:\Program Files\MapCAD\MapCAD-2008v12.05.txt"
echo 2008v12.05 update %computername% %date% %time% %username% >> \\FileSvr1\Batch-tracking\MapCAD.txt

:end

Monday, September 22, 2008

Remote Connection To Server 2003 Console - Session Zero

Issue:
Connect to a windows 2003 machine and see what the user at the console sees

Quick:
mstsc /v:servername /console

Visual/Learning:
In Windows Server 2003 administrators can redirect the server’s console to a remote desktop session. This session is called session zero.

You can connect using seesion zero with the following command:

mstsc /v:servername /console

The down side is that the screen is visible at only one location at a time. A person standing at the computer console will be logged out when the remote connection is made. They will need to log in again to see the screen which disconnects the remote user. Not as convenient for collaborative work as other products but possible.

Saturday, September 13, 2008

Sync Exchange Mail on BlackJack Phone

Issue:
You want to syncronize your mail from your corporate Exchange server onto your BlackJack phone.

Quick:
Point BlackJack at Outlook Web Access (OWA) server if you have a commercial SSL certificate. Otherwise export your SSL certificate using Certificates Snap-in (local computer) from the OWA Exchange server and manually put it on the phone.

Visual:
Pointing BlackJack to OWA Server (Just an example please use your real OWA address)


Learning:
Seems like this is pretty stright forward on the BlackJack but a bit more work if you have a self generated Secure Sockets Layer (SSL) Certificate.

I was able to use our external name for Outlook Web Access to point the phone to the server. If you have a commercial SSL certificate this should take care of it. See the picture above.

Because our SSL certificate is self generated, not a commercial one, I had to export the public certificate from the Exchange server and send the certificate to the user. I was able to send the certificate to his phone via email since he had a webmail account that was already working on the phone. Once he got the certificate on the phone he just had to click on it and it installs. Now he can synchronize with the Exchange 2003 server.

To export the certificate get your systems administrator to do the following:
Exporting Certificate using MMC Snap-in.
Logon to the server where the OWA SSL certificates are installed. Add Certificates snap-in to the MMC. Select to manage certificates for the "Computer Account".

Under the folder in Certificates(Local Computer), Personal, Certificates; Select the certificate to export, right click, all tasks, export, "do not export the private key", DER encoded binary, give it a file name, click finished to export.

Now this exported file needs to be loaded on the phone. Again this should only be needed for self generated SSL certificates.

Wednesday, September 10, 2008

Surveyor PC Power Management 9 - Tracking Savings

Issue:
After doing the configuration you want to see some results.

Quick:
Use the Verdiem reporting tool, Track your daily power usage from bills.

Visual/Learning:
Verdiem comes with a nice reporting tool and has a number of reports that can be run. The report that I am using here is the Baseline Energy Comparison. Since we kept our workstation on 24x7 My baseline is easy to figure so we did not run Serveyor in baseline mode to gather data.


I am asking the reporting tool here to generate a report based my 60 computers that I have currently installed with the Verdiem Surveyor client. The server database knows when computers were on and off. I am asking Surveyor to look at the data between July 1 and Aug 21 and compare that data with my Pre-Surveyor power usage.

My measured power usage for a workstation was 140Watts or .14Kilowatts x 24 hours a day x 365 days = 1226 Kwh per year per computer. I plug that number in to the report tool. Our power rate seems to vary by season between 12 and 16 cents per KWh. Right now I am using 13 cents but that may be lower then our average rate. We discovered that our workstations use about 7 watts whether they are in standby mode or turned off, this is just want the power supply draws when it is plugged in. The report tool has a place to enter those numbers as well.
Now the report tool generates several charts. The one below shows that we are saving 62.5 %. Over one year that adds up to about $100 per computer or about $6000 for all 60 computers. Image what the dollar and energy savings might be for a large company year after year.


Now the reporting tool is great but I want to see the results on the actual electric bill. I went to finance and got our bill for the company site where I have deployed the software. Form the bills I learned our cost, days billed, and total bill fluctuates a fair amount, but our daily average power usage is pretty flat. I believe that daily average may be a good indicator of our savings.


My prediction is that the daily average will drop but by how much. If I take the yearly power savings from the report for all 60 machines, 45,992 KWh and divide that by the days in a year (365) I get 126 KWh. I expect that by saving 62% on our workstations, our average daily usage on our bill will drop by 120 KWhs which is 15% of the 800 KWhs that we currently use.

The next bill should come in a few weeks and I will post the results when they do.


---September 16th update ---
We got the bill and it is hard to see what we are saving because our daily usage is not as flat as I first suspected. Looking at last years average usage, the bill normally goes up in the Summer. But here is how the average is tracking compared to last years average. The dark blue line is this year. Our average usage is down considerably from last year. I also checked the average temperatures for each month this year and last year and they are about the same according to records at http://www.westerndisastercenter.org. So this drop has nothing to do with a cooler Summer. We have also been replacing our old monitors with flat screens and I suspect that has added a bit to the power savings as well. Here you can see the difference is about 200KWh per day in September.

Tuesday, September 9, 2008

Surveyor PC Power Management 8 - Wake-On-Wan

Issue:
Wake computers in order to perform nightly backup of local pst mail files.

Quick:
Gather MAC address using ping and arp via day script, Use backup script and mc-wol.exe program to wake computers at night.

Visual/Learning:
Since currently Verdiem server can't take commands via script, I have to find a way to do add wake-up code to my backup script.

At the following link http://www.matcode.com/wol.htm I found a small program that works quite well (mc-wol.exe ) to wake the computers using wake-on-lan magic packets. This program requires me to pass it the Media Access Control Address (MAC Address) for the network card of the computer I want to wake.

I do not have a list of MAC addresses for all my computers and MAC information changes as computers and network cards are replaced. I can't pull the MAC from the computers at backup run-time because they will have all suspended. So I need a script to run in the day-time that can generate and maintain an updated history list ('MacHist.txt').

I created a script to do this and I have it run on a schedule during the day when machines are be used. I ping the machine to get the IP address and then "arp -a" brings up the ARP table so I can find the MAC Address associated with that IP.


The script is pretty long so I am not going to try and post it here (plus the formating gets all messed up when I do) but these are the basic steps:

-For each computer name in Active Directory
-Try to ping computer
--If it pings get the IP address from the ping return
--Check ARP table for the IP address and get MAC Address
---If the computer name is in MacHist.txt update the IP and MAC data in that record
---else add a new record to MacHist.txt
-Check all computers from AD listing
-Save the updated MacHist.txt file

The data in my MacHist.txt file looks like this:

ComputerName:IpAddress:MacAddress
ComputerName1:192.168.1.1:00-11-f3-2f-2b-a1
ComputerName2:192.168.1.2:00-15-f2-e5-18-23
ComputerName3... AND SO ON


I run this script from a computer on the same subnet as my workstations because the ARP table only shows data for machines on the local subnet.

Then my backup script reads the MacHist.txt file at night and wakes the workstations one at a time for backup (using the mc-wol.exe program). Then the script tries to ping the workstation using the IP address from the MacHist.txt file. If the script sees pings return from the computer it starts the backup process or else moves on to the next computer. When the backup is done, the computer network and disk activity stops, and the computer goes back to sleep. They go back to sleep because my night power profile is set to suspend after 15 minutes of idle time.

So all the machines sleep till it is their turn to backup, and sleep again when done.

Some questions have come up about how to allow for Windows updates which usually happen at 3 AM on Patch Tuesday (second Tuesday of the month). This can be fixed in Verdiem by scheduling an action to Wake all clients at 2:59 AM on Tuesday. If there are any updates the disk activity will keep the machines awake until the updates are done.

Surveyer PC Power Management 9

Monday, September 8, 2008

Surveyor PC Power Management 7 - Issues

Issue:

Problems and fixes using Verdiem Surveyor software.

Quick:

Prevent shutdown during backup- SmartProfile idletime manager ", Autocad prevented shutdown - "Power State Transition Rules", profile updates did not happen on short wait periods - use longer wait times.

Visual/Learning:

There were not many issues. For the most part the software worked as expected. I knew that I might have issues with machines trying to power down part way into a nightly backup. To prevent this I discovered that the newest version of Surveyor (5.0.0.274) has an option to check for disk activity.

Under the SmartProfile Scheme on the "Sruveyor Idletime Manager" You can set a threshold for idle time. During the backup, the disk usage and network activity is high, so the workstation does not suspend. Once the backup is done and the disk usage drops, the workstation goes back into suspend.
Another issue was with Autocad. Autocad puts up a warning box that prevents suspend if there is an open and unsaved drawing on a network share. Company policy is that all drawing should be saved and closed out before leaving work, but not everyone is good about doing it. Surveyor has a feature that allowed me to kill the acad application before going into suspend. Right click on Surveyor and select "Power State Transition Rules...".I created a rule called Kill AutoCAD and had it look for the acad.exe program. I set the action to "Terminate Application" and now all the systems shutdown.


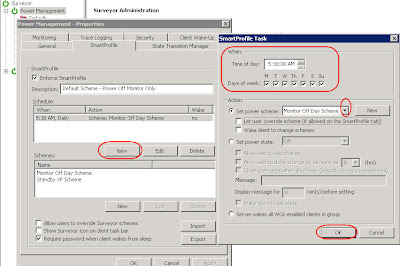
Other choices for Action: on this page are:

The only other issue was that clients did not always update the new profile right away. Verdiem's seems to try to limit the network traffic as much as possible but in some cases the software did not update before it was time to shutdown.


For example, I first set the computers to suspend after 5 minutes at night. In the morning the schedule should change to always on, but people would come in, turn on their computers and after 5 minutes they would suspend again. Five minutes was apparently not enough time for the client to get the profile updates from the server. I changed the night profile to suspend after 15 minutes and everything works fine.


As I said everything seems to work pretty well though Verdiem may have gone a bit overboard on keeping network traffic low. Also someway to script commands to the server would be nice but apparently they do not exist as of September 2008.


Saturday, September 6, 2008

Surveyor PC Power Management 6 - Set Schedules

Issue:
Configuring and scheduling power profiles.

Quick:
Right click on the various groups, SmartProfile tab, create schemes, schedlue the schemes.

Visual/Learning:
First I configured the Default profile for the server.
Right click "Power Management", Select the SmartProfile tab.
Here I have already set mine up but these are the steps.
First create the Schemes. Click on New to configure a new scheme.


That will bring up a window like you see below. I give it the name "Monitor Off Day Scheme" and I set it to turn the monitor off after 20 minutes. Since this is my default I do not want this one to be very aggressive. Be careful with Battery settings as these will remain in effect whether on or off the LAN and this can result in dead batteries and perhaps upset users. Now I set the schedule for the scheme. Click on New under schedule. Set the start time for the scheme and the days of the week to run it. This scheme goes into effect at 5:30 AM Monday through Sunday. This is the only scheme I have set in the default profile so it never changes.


Now I can right click on one of my child folders, select properties, and go to the SmartProfile tab. Here I see that it is set to use the inherited profile. I unchecked this box so that I can change the settings.
Now the box is unchecked and I have created the standby scheme and scheduled 3 events for the XP machines. At 5:30 the Monitor off scheme is set just like in the default, but I have also added at 5:30 pm a wake action in addition to the 6 pm the standby scheme.
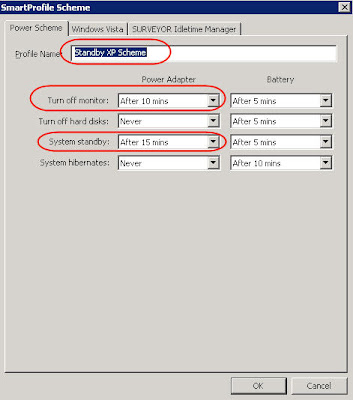
First I created the Standby scheme which looks like what you see below. Monitor goes off after 10 minutes and the systems goes into standby mode after 15 minutes of idle time. Because I have set the clients to go to S3 standby (in the BIOS) this is pretty much the equivalent of being powered off. The nice thing is that the machines come out of standby in about 15 seconds but a complete power up requires a much slower 90 seconds. Next I added an event to the schedule so that this scheme happens everyday at 6 PM.


OK, what about that third event that is scheduled for 5:30 PM. Since machines wake faster from standby, I am going to wake all the machines in the group and then 30 minutes later I set the scheme so that the machines go to standby. So if someone powers off their machine before going home, I wake it and put it into standby before my backup script runs. Since I only do backups M-F, I only run the wake action on those days. This is not a scheme it is just an action so I do not have to create a scheme.



Now create SmartProfiles for each of the groups you want to control differently. For my windows 2000 machines I set the group so that they just turn off the monitors during the week but I do a full shutdown on Friday night.
I had one person who was an exception to my other groups and so I was able to create a separate group for this one person. I configured the auto-group rule to look for this persons machine name and put it in this separate group. I then configured the power setting on that group per the users requirements.

Friday, September 5, 2008

Surveyor PC Power Management 5 - End Baseline, Add License

Issue:
In Verdiem you can't setup power schedule till you get out of "Baseline Mode".

Quick:
Stop baseline - Right click Surveyor, Manage Licenses, Add String "stop baseline"

Visual/Learning:
Scheduling of power configurations is grayed out until you exit "Baseline Mode". Right click on Surveyor and select "Manage Licenses...". Click on "Add String", and enter the following text "stop baseline" (without quotes), and click OK.


Note you can go back into base line mode by entering "start baseline" in the same spot.

I get a message that Baseline mode has been disabled. Click OK.


I mentioned this in the previous post but if you have not done so you need to add you license key here as well.

You can contact a Verdiem sales representative at 1-866-VERDIEM or by e-mail at sales@verdiem.com, if you do not have a license yet. As stated before, they do not sell direct but they will point you to a vendor.

Surveyor PC Power Management 6

Thursday, September 4, 2008

Surveyor PC Power Management 4 - Baseline, WOW, Groups

Issue:
Capture baseline data and then configure server to move computers to groups and setup administrator accounts.

Quick:
Run Surveyor for 2 weeks, right click on "Power Management" to configure groups, right click on Surveyor to configure Administration, and Wake-on-Wan, AutoGroup rules.

Visual/Learning:
With the server running and the clients installed you should be able to just let it go for a couple of weeks to gather baseline information to be used for comparison reports. You can then use this information to show management how much money you are saving the company.

The rest of the stuff in this post you could probably do before or after the data collection period.

After installing the clients all my machines now show up in the server Default group. I will change that later. First I am going to enable wake-on-wan on the server. Go to Surveyor right click and select Properties... Select the "Wake on WAN" tab. Select IP Network Number Clustering and click on OK.

When you turn on wake-on-wan 2 random workstations get designated as wake-on-wan proxies. The icon for the proxy servers changes and looks like what you see below:
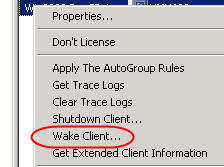
You can manually set which computers serve this function by right clicking a particular machine and setting it to be a wake client.


Next I want to setup groups. I want to be more aggressive with my XP machines and more conservative with my older Windows 2000 machines. First I am going to create 2 separate containers for these machines. Right click on "Power Management" and select "New Group"

Here you see the first New Group. Now just create one more.Right click on the new groups and select rename. Here is how I named my groups.
Right click on Surveyor and select "AutoGroup settings..."


Should be set so that enforcements happen each time client connects. Click on Insert just below the upper window. To create a new Rule.

After inserting the rule click on the button at the right to select the target group for this rule. Here you can see that the top rule puts machines into the win2000 group and the rule I am configuring now will put machines into the WinXP group.
Now rename these rules by clicking on the names and editing them right in this window. I just name the rule for what it is doing, moving machines by OS to a particular group.


Now with my Win XP rule selected I click "Insert" on the bottom half of the window. I select the property to look at from the drop down box. In this case it is "OS Platform". The Relation is "contains" and I type in what I am looking for which in this case is :"xp".
For the other rule I do the same thing but instead of "xp" I use "2000" as the value to look for. Click on OK to finish.


By the way, here is a list of the properties you can select for filtering.


Now right click on Power Management and select "Apply The AutoGroup Rules"
All of the machines that were in the Default Group get automatically moved to the correct group. In order to see this you will probably have to refresh the screen. Verdiem is very concerned about performance hits so they do not automatically refresh the screen. So right click each group and select Refresh.
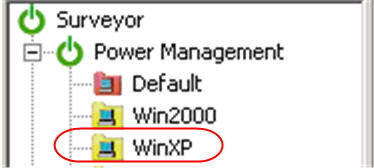
Here under WinXP I see all my xp machines that have the Verdiem client loaded.

One more thing I am going to do is configure who can administer the server.
Right click Surveyor and select Properties. Select the Security tab and you should see the default administrator account. Click on Add to add other accounts from active directory.
Here I have added one name (Changed to protect the Innocent). And I have given this account the Administrator right.

Go To Purveyor PC Power Mangement 5

Wednesday, September 3, 2008

Surveyor PC Power Management 3 - Client

Issue:
Install power management client on workstations and configure them to wake-up using magic network packets.

Quick:
Install client from network share, configure server name and take defaults on everything else. Configure NIC to "wake from shutdown" using magic packets, configure NIC power management to allow it to power up from standby using management stations.

Visual/Learning:
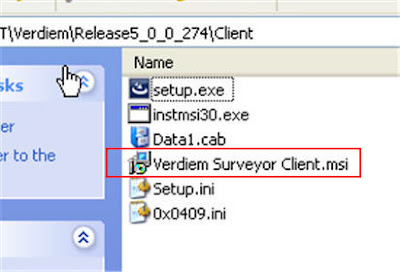
Run client install from cd or network share as I am using here.


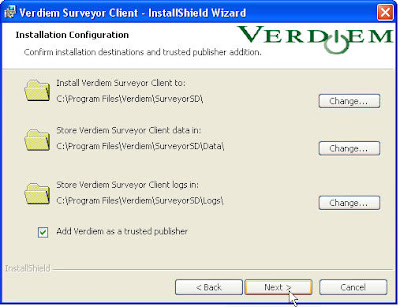
On the Welcome screen click Next, and you get this Installation Configuration screen. Keep the defaults and select Next again.


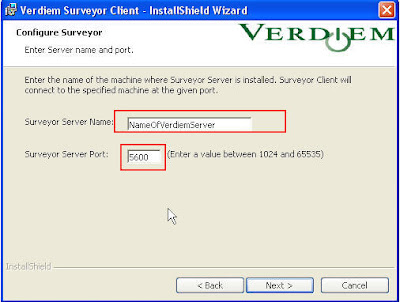
Now you see the Configure Surveyor screen. Here you will need to enter the name of the server where you installed surveyor (back in part 2). You can just keep the default port value of 5600 and click on Next


On the next screen that comes up click on Install. After the install finishes click on the Finished button and you are done with the client install. Note that there is no icon or item that gets placed in the start programs listing. This is just a client that sits quietly in the background and gets updates from the Verdiem server.

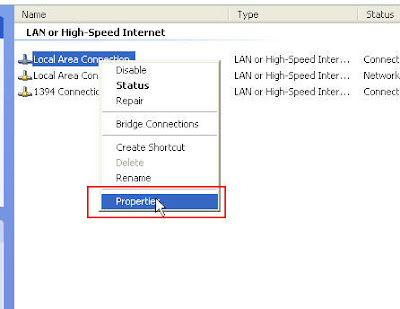
That is all for configuring the client except I want to be able to wake-up computers for nightly backups, so there is a bit more to do in that case. Next I configure the network cards to enable wake-on-wan (wow). In the control panel I select the network connection I want and right click and select properties as in the picture below.


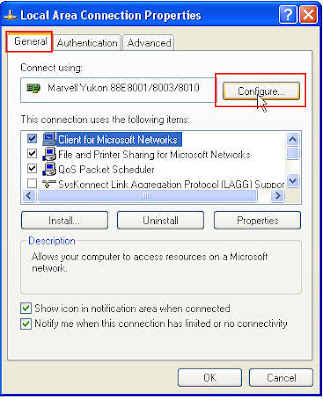
On the General tab I click on the Configure button.

Note that from here on, your setting my look somewhat different depending on which network card and BIOS you have. At any rate this should give you a good idea about how to get started but you may need to experiment with your setting a bit till it works right.

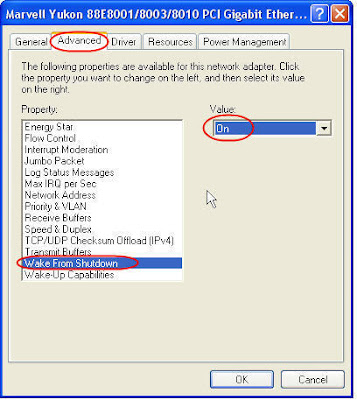
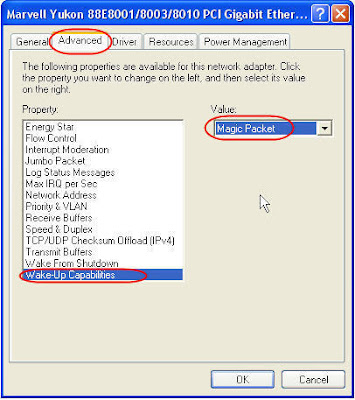
A new window comes up. Select the Advanced tab select "Wake From Shutdown" and set the Value to On.

Select "Wake-Up Capabilities" and set this to "Magic Packet". Do not select "Magic Packet and Pattern" as this setting tends to cause the computer to wake-up spontaneously every few minutes.
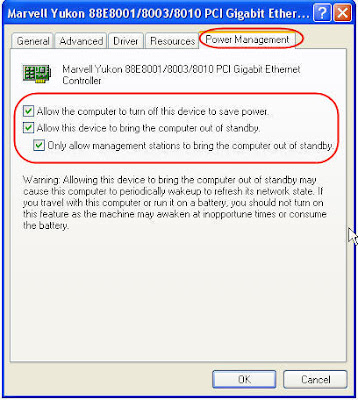
Now under the "Power Management" tab I select all the check boxes.
Now I reboot the computer and press the key that takes me into by BIOS settings.
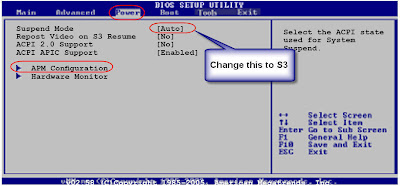
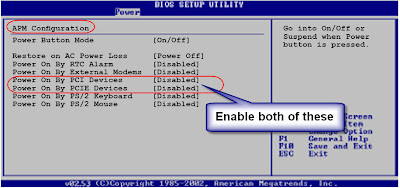

In my version of BIOS I have a Power tab where I can set the Suspend Mode. I change this from [Auto] to [S3 Only]. S3 causes the computer to shutdown fans in suspend mode, otherwise the computer may just go into S1 suspend mode which keeps fans on and does not save much power.


Now you need to enable the setting that will allow the network card to wake-up the computer from suspend or shutdown. I enabled both power on by PCI and PCIE.


Now just save the setting in BIOS and reboot the computer.


Do this on each of the workstations you want to control. Once you are done with this go back to the server.