Monday, September 29, 2008

Word Columns - Horizontal Data

Issue:
You want to organize your data horizontally but keep it separated into columns.

Quick:
Use a table and hide the border.

Visual/Learning:
When you select columns in Word you normally get Newspaper style columns. Text snakes down one column and then back up to the next column like you see below:
But what if you want horizontal columns? Perhaps you want to do an announcement that looks something like this:
You could do it with tabs but it really does not work all that well. When you have more then one line of text in the second column it is very hard to keep it all looking right. I saw this trick on the techrepublic site that works well.
---Text from link---
Use any method you like to create the table. I usually enter the first few rows and then let Word create the table based on the existing items. If you know the dimensions, you can create the table first and then enter data. It doesn’t really matter. Use the AutoFit format and let Word adjust the table as you enter the columnar data.
When you’re done, turn off the table’s borders as follows:
1. Select the entire table by clicking anywhere inside it. Then, choose Select from the Table menu and choose Table. Or click the double-arrow icon in both Word 2003 and Word 2007.
2. With the table selected, choose Borders And Shading from the Format menu and click the Borders tab. (In Word 2007, choose Borders And Shading from the Borders And Shading drop-down list in the Paragraph group on the Home tab. This list is also available in the Table Styles group on the Design tab.)
3. Click the None option under Setting.
Word will gray out the borders on screen. However, Word won’t print the borders, which you can easily confirm by viewing the document in Print Preview.
Using the table structure allows you to easily move or even delete parallel columns.
---End text from link---

Saturday, September 27, 2008

Windows Auto Logon

Issue:
In a home setting you may want to just have Windows login without prompting for a password.

Quick:
See below for OS specific procedures for Windows 2000, XP, and Vista


Visual/Learning:

Windows 2000 Auto Logon
http://support.microsoft.com/kb/234562
--------Text from link-----------

Preventing the Password Prompt in a Non-Domain System
1. In Control Panel, double-click Users and Passwords.
2. Click to clear the Users must enter a user name and password to use this computer check box.

NOTE: This option does not appear on a system that is a member of a domain.
3. Click the Advanced tab.
4. Click to clear the Require users to press Ctrl-Alt-Del before logging on check box.
Automatic logon is not supported when you are logging on to a domain. You will need to join a workgroup if you want to use the automatic logon feature.
--------End Text from link-----------


Windows XP Auto Logon
http://support.microsoft.com/kb/315231
--------Text from link-----------


You can use Registry Editor to add your log on information. To do this, follow these steps:
1. Click Start, click Run, type regedit, and then click OK.
2. Locate the following registry key:
HKEY_LOCAL_MACHINE\SOFTWARE\Microsoft\Windows NT\CurrentVersion\Winlogon
3. Using your account name and password, double-click the DefaultUserName entry, type your user name, and then click OK.
4. Double-click the DefaultPassword entry, type your password under the value data box, and then click OK.

If there is no DefaultPassword value, create the value. To do this, follow these steps:
a. In Registry Editor, click Edit, click New, and then click String Value.
b. Type DefaultPassword as the value name, and then press ENTER.
c. Double-click the newly created key, and then type your password in the Value Data box.
If no DefaultPassword string is specified, Windows XP automatically changes the value of the AutoAdminLogon registry key from 1 (true) to 0 (false) to turn off the AutoAdminLogon feature.
5. Double-click the AutoAdminLogon entry, type 1 in the Value Data box, and then click OK.

If there is no AutoAdminLogon entry, create the entry. To do this, follow these steps:
. In Registry Editor, click Edit, click New, and then click String Value.
a. Type AutoAdminLogon as the value name, and then press ENTER.
b. Double-click the newly created key, and then type 1 in the Value Data box.
6. Quit Registry Editor.
7. Click Start, click Restart, and then click OK.
After your computer restarts and Windows XP starts, you can log on automatically.

If you want to bypass the automatic logon to log on as a different user, hold down the SHIFT key after you log off or after Windows XP restarts. Note that this procedure applies only to the first logon. To enforce this setting for future logoffs, the administrator must set the following registry key:
HKEY_LOCAL_MACHINE\SOFTWARE\Microsoft\Windows NT\CurrentVersion\Winlogon

Value:ForceAutoLogon
Type: REG_SZ
Data: 1


You can also use turn on automatic logon without editing the registry in Microsoft Windows XP Home Edition and in Microsoft Windows XP Professional on a computer that is not joined to a domain. To do this, follow these steps: 1. Click Start, and then click Run.
2. In the Open box, type control userpasswords2, and then click OK.

Note When users try to display help information in the User Accounts window in Windows XP Home Edition, the help information is not displayed. Additionally, users receive the following error message:
Cannot find the Drive:\Windows\System32\users.hlp Help file. Check to see that the file exists on your hard disk drive. If it does not exist, you must reinstall it.
3. Clear the "Users must enter a user name and password to use this computer" check box, and then click Apply.
4. In the Automatically Log On window, type the password in the Password box, and then retype the password in the Confirm Password box.
5. Click OK to close the Automatically Log On window, and then click OK to close the User Accounts window.
--------End Text from link-----------

Windows Vista Auto Logon
http://www.lockergnome.com/windows/2007/02/20/configure-vista-for-automatic-logon/
--------Text from link-----------
If you do not share your computer with any other users and no one else has access to it, you can configure Vista to log you on automatically.

To do so, click Start and type netplwiz in the Search field and then press Enter. Click Continue when the User Account Control window appears. From the User Accounts window that appears, verify that your own user account is selected. Clear the Users must enter a username and password to use this computer option and click OK. Provide the password for your user account when prompted and restart your computer. Vista will automatically log on with your user account.

[tags]vista, automatic logon, automatic login, configure windows[/tags]
--------End Text from link-----------

Tuesday, September 23, 2008

Using Work Bench Computer Power Supply

Issue:
Be able to test if hard drive spins up without having to connect it to a computer

Quick:

Use an old power supply. Cut the the green wire and connect it to one of the black ground wires.
Note that some power supplies may have either a gray or brown wire to represent "power good"/"power OK". This wire should be connected to either an orange wire (+3.3V) or a red wire (+5V) for the power supply to function. When in doubt, try the lower voltage first (+3.3V).


Visual/Learning:

A computer power supply will not work if you just plug it in on the bench. You need to ground the green wire. Here is a link on how to turn your computer power supply into a bench supply for electronics projects.


http://www.wikihow.com/Convert-a-Computer-ATX-Power-Supply-to-a-Lab-Power-Supply

Monday, September 22, 2008

Remote Connection To Server 2003 Console - Session Zero

Issue:
Connect to a windows 2003 machine and see what the user at the console sees

Quick:
mstsc /v:servername /console

Visual/Learning:
In Windows Server 2003 administrators can redirect the server’s console to a remote desktop session. This session is called session zero.

You can connect using seesion zero with the following command:

mstsc /v:servername /console

The down side is that the screen is visible at only one location at a time. A person standing at the computer console will be logged out when the remote connection is made. They will need to log in again to see the screen which disconnects the remote user. Not as convenient for collaborative work as other products but possible.

Saturday, September 20, 2008

Speed Up A Slow Computer 3 - Remove Temp Files

Issue:
Remove temporary files and defragment the hard drive.

Quick:
Delete temporary files, Empty Recycle bin, Defragment the hard drive, click on my computer, right click on hard drive (c:) => Properties, Tools, Defragment Now...

Visual/Learning:
Defragmenting the hard drive can help a lot to speed up your computer. Fragmenting occurs when files are written to the hard drive. The computer looks for an empty place on the hard drive to store your data, but perhaps the first empty spot can't hold all the data. Only part of the data gets written here and the rest of the file gets written somewhere else.


Over time, as files grow and change, your word document (or whatever) can end up being broken up in small pieces all over your hard drive. To retrieve that data you computer has to pull all of those pieces together.

The defragment tool speeds things up by reorganizing all the data on your hard drive and putting all the pieces of your file in the same place. Going one place for the data saves time.


One thing that I like to do before organizing either my computer data is to get rid of the junk. Why spend time organizing stuff you plan to toss anyway?


In the last post I did a lot of cleanup but I can still delete temporary files. Temporary files get placed on your computer when you browse the Internet or install programs. You might think that temporary files would get removed all by themselves but that is not the case.


Windows comes with a cleanup tool to help you flush these out. Open the properties on you hard drive to get to the Windows clean up tool.

Click on the "Disk Cleanup" button


Select the files to delete and click on OK
There is also a good free cleaner tool that I like called ccleaner. You can get here.


When the cleaning is done click on the tools tab select Defragment Now.

Click on Analyze and you will get a color bar that represents how badly your files are fragmented. Red represents fragmented files. You also get pop up window saying if you need to defragement or not. It can take time to run, maybe hours, but if you don't need the computer right now let it run and it will save you time later. Note that you can pause and resume the tool at anytime if you need to.


When the defragment is done you should see that most if not all of the red is gone and things should run a little faster.

The tools has not quite finished yet but you can see that most of the red is gone.

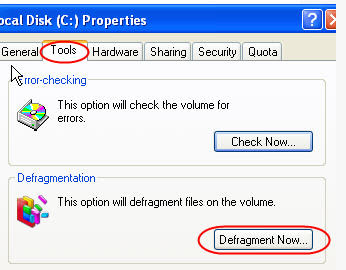
You may also want to perform a "Check Now..." (on the same window as the defragment option). This can check for and fix errors on the local hard drive.

Friday, September 19, 2008

Outlook Forms 15 - Collecting Data

Issue:
Need a good way to get data out of a group of Outlook forms.

Quick:
Install the form and create views based on the form fields. Use copy and paste to move data to a spreed sheet.

Visual/Learning:
After collecting data from users the help desk needs a way to see what each request is about.

First I need to install the form somewhere so that you can get to the fields. In previous post I have published to the Organiztions Forms folder. This time I am going to publish the form in the Personal Forms (which does not require Exchange server).

Open the form and select Tools => Forms => "Publish Form As..."

Select the "Personal Forms Library". Give the form a name and publish it.
I am going to create a seperate folder for all the help desk forms to go into.

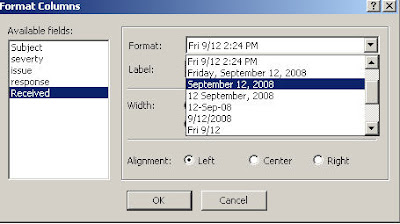
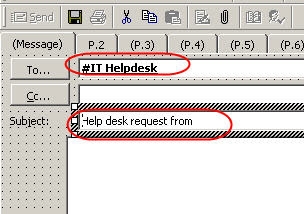
Here I have 3 forms that are in the folder. Now I want to change the columns I see in the view.


Click on View => "Current View" => "Define Views"


Copy the Current view and give it a new name.
When I click OK I get a View Summery window. I am going to remove the fields I don't want first.
Now I am going to add fields from the form I created and installed in the personal forms folders. From the drop box pick Forms...
Select "Personal Forms" and pick the HelpDesk form. Click on Add.


Now my "Available fields" shows the fields from my form. I select the ones I want to see in the new view.
I click OK and apply the view and now I see new columns in my view of the HelpDesk folder and I can sort by Severity if I want.
Note that you the radial values have to be setup correctly to see relevant data. If you have problems with this see my previous post http://qvlweb.blogspot.com/2008/08/outlook-forms-5-frames-radials-check.html regarding how to do this.

You can also do formating on the columns right in the view. Right click on the heading bar and select "Format Columns..." and you can change the way the date and time looks or rename the column headings.
What if I want to put this data into a spread sheet and take it to a meeting? No problem. Select all of the lines in the view and press cntrl-c to copy.
Open Excel and press cntrl-v to past what you see in this view into the sheet. You should now see the data and you automatically get the heading as well.

Thursday, September 18, 2008

Windows - Remap Keyboard Keys

Issue:
Tired of accidentally hitting a key on the keyboard. You can reassign where keys are by using a tool from the Windows Server 2003 resource kit that works on windows 2000, XP, and Vista.

Quick: Run remapkey.exe, Drag and drop from the top keyboard to the bottom to remap keys. Reboot computer.


Visual/Learning:

Run the remapkey.exe application from the resource kit. Drag and drop to reassign keys. This will make changes to the registry. To see the changes you need to reboot the computer. Careful with Alt-Cntl-Del or you may not be able to get back in.

Wednesday, September 17, 2008

Speed Up A Slow Computer 2 - Clean Off The Junk

Issue:
Speed up a slow computer, remove unused and junk software

Quick:
Start => Control Panel => Add/Remove Programs

Visual/Learning:
Go to the Start menu and select Control panel.
Select Add/Remove Programs.
Look through the list for any programs that you no longer need.
Uninstall these programs and write down the names of the programs as you uninstall them. When you are done reboot the computer.

Sometimes these programs leave behind folders even after they are uninstalled. After the reboot go into the c:\Program Files folder and using your list of deleted programs look for any folders associated with these programs and delete the folders as well.

I have seen some tools that can help with the cleanup of crapware. If you buy an new computer there is usually a bunch of junk on the computer that you will never use and just takes up space.

There is a free program called "PC Decrapifier", catchy name. Anyway it can help to cleanup the trialware stuff that comes on new computers. You can get it at: http://www.pcdecrapifier.com/download


Speed Up A Slow Computer 3 - Remove Temp Files

Tuesday, September 16, 2008

Speed Up A Slow Computer 1 - Free Virus Spyware Scan

Issue:
Your computer was faster and now it is running slow.

Quick:
First scan the computer for malware. Boot safe mode with networking using f8, download scanner and updates, scan for problems.

Visual/Learning:

Bad software seems to sneak onto computers if you are not very careful (sometimes even if you are careful). One of the first things I do is to check for malware. Reboot the computer. As the computer is booting up tap the f8 key. At some point you should see a screen like this one:


If you try it a few times and can't seem to hit the f8 key at the right time you can turn off the computer while it is booting Windows. Windows should see that it failed to boot the last time and offer you the choice to boot into safe mode.

I suggest selecting safe mode with networking that way you can download a scanning tool or get updates.

Lately I have been using the free scanner from here: http://download.bleepingcomputer.com/malwarebytes/mbam-setup.exe

Download, get updates, and run a scan.

For more information about using the scanner you can go to my previous post: http://qvlweb.blogspot.com/2008/06/fake-virus-scanner-cleaning.html

Once you are sure the computer is free of malicious software go to the next step.

Speed Up A Slow Computer 2 - Remove The Junk

Monday, September 15, 2008

Quick Connect to Network Printers

Issue:
Easy way to connect to a network printer.

Quick:
Get the print server name and printer name. Start, Run, file://NameOfPrintServer/, right click on the printer name, select connect.

Visual:

Learning:
So you are at work and you notice that there is a printer that you would like to use. The hard way is to click on Start and Setting, Printers, Add Printer, Look for the Printer, etc. etc.
The easy way it to first connect to the print server and right click on the printer you want to use.
The print server is the name of the computer where all of the printers for the network are configured. In a smallish company like ours there is only one.
If you don't know the name you can go to Start, Settings, Printers and look at one of your printers that is already installed. You should see your printers listed as "PrinterName on PrintServer". You want the PrintServer name.
Now to install a printer click on start, select run... and enter back slash back slash followed by the print server name (like file://PrintServer/). You will see a list of shared printers. Right click on the printer you want and select connect.
That is all there is to it. You should now see it in the list of available printers.

Saturday, September 13, 2008

Sync Exchange Mail on BlackJack Phone

Issue:
You want to syncronize your mail from your corporate Exchange server onto your BlackJack phone.

Quick:
Point BlackJack at Outlook Web Access (OWA) server if you have a commercial SSL certificate. Otherwise export your SSL certificate using Certificates Snap-in (local computer) from the OWA Exchange server and manually put it on the phone.

Visual:
Pointing BlackJack to OWA Server (Just an example please use your real OWA address)


Learning:
Seems like this is pretty stright forward on the BlackJack but a bit more work if you have a self generated Secure Sockets Layer (SSL) Certificate.

I was able to use our external name for Outlook Web Access to point the phone to the server. If you have a commercial SSL certificate this should take care of it. See the picture above.

Because our SSL certificate is self generated, not a commercial one, I had to export the public certificate from the Exchange server and send the certificate to the user. I was able to send the certificate to his phone via email since he had a webmail account that was already working on the phone. Once he got the certificate on the phone he just had to click on it and it installs. Now he can synchronize with the Exchange 2003 server.

To export the certificate get your systems administrator to do the following:
Exporting Certificate using MMC Snap-in.
Logon to the server where the OWA SSL certificates are installed. Add Certificates snap-in to the MMC. Select to manage certificates for the "Computer Account".

Under the folder in Certificates(Local Computer), Personal, Certificates; Select the certificate to export, right click, all tasks, export, "do not export the private key", DER encoded binary, give it a file name, click finished to export.

Now this exported file needs to be loaded on the phone. Again this should only be needed for self generated SSL certificates.

Friday, September 12, 2008

Outlook Forms 14 - Stand Alone Form

Issue:
How to create and use a simple Outlook from without an Exchange server.

Quick:
Create the form. Save in Personal Folders for each user.

Visual/Learning:
Here is an example of a form I created for the help desk in a previous company. There is a place for name, phone number, and some quick click radial buttons.


If you want to know how to create the radial buttons and so forth please refer back to the start of this series:
During a big laptop roll out project, the help desk group wanted to provide a quick and easy way for users to contact the help desk. We added an Outlook form .oft file to file laptop image so this form showed up on the computer desktop. Sue Mosher, who has written several wonderful books on Outlook forms, informed me that as of Outlook 2003 SP2 you can no longer launch forms from an oft file. Now you must install the form in Outlook Personal Forms Library (or on the Exchange server). Here is a link she gave me to the Microsoft page regarding the changes. Thanks, Sue!

You need to make sure that the form definition is sent along with the message, so be sure this is set on the (Properties) page of the form as you see below.

On the (Message) tab I address this form to the IT Helpdesk group. You can set this anyway you like. It could go to a particular hard coded email address, or if you have an Exchange server you can send it to a group or to a public folder.
On the subject tab I created a formula so that the subject line gets populated with the requester's name.


To see this first I right click on the subject field and go the Value tab. Here you see that I am setting the initial value for the subject field.

The text "Help desk request from " is followed by the "&" which adds on the field [InsertName]. This is the custom field on the form where the user enters his name. So for example, if the user name was Joe Brown, when the user launches the form and enters his name, the subject line will change to:
Help desk request from Joe Brown

The one element that I have not talked about on this form is the Logo. To get a logo on the form I drag and drop a picture tool onto the form.
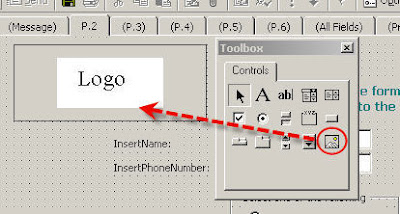
Right click on the picture box and select advance properties. Click on the picture property and point it to the location of your logo file (or any picture want to have on your form).


In the next forms post I will talk about how to collect data from these forms.

Outlook Forms 15 - Collecting Data

Go to Outlook Forms Index

Thursday, September 11, 2008

Changing The Defualt Program For Files

Issue:
Change the default program that opens when you click on a particuar file type, like photos, or music files.

Quick:
Windows Explorer, Tools menu, Folder Options..., File Types tab, Select file type, Click Change button, Select program to use.

Visual/Learning:

Wednesday, September 10, 2008

Surveyor PC Power Management 9 - Tracking Savings

Issue:
After doing the configuration you want to see some results.

Quick:
Use the Verdiem reporting tool, Track your daily power usage from bills.

Visual/Learning:
Verdiem comes with a nice reporting tool and has a number of reports that can be run. The report that I am using here is the Baseline Energy Comparison. Since we kept our workstation on 24x7 My baseline is easy to figure so we did not run Serveyor in baseline mode to gather data.


I am asking the reporting tool here to generate a report based my 60 computers that I have currently installed with the Verdiem Surveyor client. The server database knows when computers were on and off. I am asking Surveyor to look at the data between July 1 and Aug 21 and compare that data with my Pre-Surveyor power usage.

My measured power usage for a workstation was 140Watts or .14Kilowatts x 24 hours a day x 365 days = 1226 Kwh per year per computer. I plug that number in to the report tool. Our power rate seems to vary by season between 12 and 16 cents per KWh. Right now I am using 13 cents but that may be lower then our average rate. We discovered that our workstations use about 7 watts whether they are in standby mode or turned off, this is just want the power supply draws when it is plugged in. The report tool has a place to enter those numbers as well.
Now the report tool generates several charts. The one below shows that we are saving 62.5 %. Over one year that adds up to about $100 per computer or about $6000 for all 60 computers. Image what the dollar and energy savings might be for a large company year after year.


Now the reporting tool is great but I want to see the results on the actual electric bill. I went to finance and got our bill for the company site where I have deployed the software. Form the bills I learned our cost, days billed, and total bill fluctuates a fair amount, but our daily average power usage is pretty flat. I believe that daily average may be a good indicator of our savings.


My prediction is that the daily average will drop but by how much. If I take the yearly power savings from the report for all 60 machines, 45,992 KWh and divide that by the days in a year (365) I get 126 KWh. I expect that by saving 62% on our workstations, our average daily usage on our bill will drop by 120 KWhs which is 15% of the 800 KWhs that we currently use.

The next bill should come in a few weeks and I will post the results when they do.


---September 16th update ---
We got the bill and it is hard to see what we are saving because our daily usage is not as flat as I first suspected. Looking at last years average usage, the bill normally goes up in the Summer. But here is how the average is tracking compared to last years average. The dark blue line is this year. Our average usage is down considerably from last year. I also checked the average temperatures for each month this year and last year and they are about the same according to records at http://www.westerndisastercenter.org. So this drop has nothing to do with a cooler Summer. We have also been replacing our old monitors with flat screens and I suspect that has added a bit to the power savings as well. Here you can see the difference is about 200KWh per day in September.

Tuesday, September 9, 2008

Surveyor PC Power Management 8 - Wake-On-Wan

Issue:
Wake computers in order to perform nightly backup of local pst mail files.

Quick:
Gather MAC address using ping and arp via day script, Use backup script and mc-wol.exe program to wake computers at night.

Visual/Learning:
Since currently Verdiem server can't take commands via script, I have to find a way to do add wake-up code to my backup script.

At the following link http://www.matcode.com/wol.htm I found a small program that works quite well (mc-wol.exe ) to wake the computers using wake-on-lan magic packets. This program requires me to pass it the Media Access Control Address (MAC Address) for the network card of the computer I want to wake.

I do not have a list of MAC addresses for all my computers and MAC information changes as computers and network cards are replaced. I can't pull the MAC from the computers at backup run-time because they will have all suspended. So I need a script to run in the day-time that can generate and maintain an updated history list ('MacHist.txt').

I created a script to do this and I have it run on a schedule during the day when machines are be used. I ping the machine to get the IP address and then "arp -a" brings up the ARP table so I can find the MAC Address associated with that IP.


The script is pretty long so I am not going to try and post it here (plus the formating gets all messed up when I do) but these are the basic steps:

-For each computer name in Active Directory
-Try to ping computer
--If it pings get the IP address from the ping return
--Check ARP table for the IP address and get MAC Address
---If the computer name is in MacHist.txt update the IP and MAC data in that record
---else add a new record to MacHist.txt
-Check all computers from AD listing
-Save the updated MacHist.txt file

The data in my MacHist.txt file looks like this:

ComputerName:IpAddress:MacAddress
ComputerName1:192.168.1.1:00-11-f3-2f-2b-a1
ComputerName2:192.168.1.2:00-15-f2-e5-18-23
ComputerName3... AND SO ON


I run this script from a computer on the same subnet as my workstations because the ARP table only shows data for machines on the local subnet.

Then my backup script reads the MacHist.txt file at night and wakes the workstations one at a time for backup (using the mc-wol.exe program). Then the script tries to ping the workstation using the IP address from the MacHist.txt file. If the script sees pings return from the computer it starts the backup process or else moves on to the next computer. When the backup is done, the computer network and disk activity stops, and the computer goes back to sleep. They go back to sleep because my night power profile is set to suspend after 15 minutes of idle time.

So all the machines sleep till it is their turn to backup, and sleep again when done.

Some questions have come up about how to allow for Windows updates which usually happen at 3 AM on Patch Tuesday (second Tuesday of the month). This can be fixed in Verdiem by scheduling an action to Wake all clients at 2:59 AM on Tuesday. If there are any updates the disk activity will keep the machines awake until the updates are done.

Surveyer PC Power Management 9

Monday, September 8, 2008

Surveyor PC Power Management 7 - Issues

Issue:

Problems and fixes using Verdiem Surveyor software.

Quick:

Prevent shutdown during backup- SmartProfile idletime manager ", Autocad prevented shutdown - "Power State Transition Rules", profile updates did not happen on short wait periods - use longer wait times.

Visual/Learning:

There were not many issues. For the most part the software worked as expected. I knew that I might have issues with machines trying to power down part way into a nightly backup. To prevent this I discovered that the newest version of Surveyor (5.0.0.274) has an option to check for disk activity.

Under the SmartProfile Scheme on the "Sruveyor Idletime Manager" You can set a threshold for idle time. During the backup, the disk usage and network activity is high, so the workstation does not suspend. Once the backup is done and the disk usage drops, the workstation goes back into suspend.
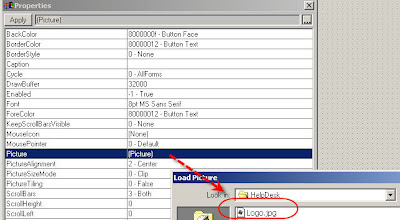
Another issue was with Autocad. Autocad puts up a warning box that prevents suspend if there is an open and unsaved drawing on a network share. Company policy is that all drawing should be saved and closed out before leaving work, but not everyone is good about doing it. Surveyor has a feature that allowed me to kill the acad application before going into suspend. Right click on Surveyor and select "Power State Transition Rules...".I created a rule called Kill AutoCAD and had it look for the acad.exe program. I set the action to "Terminate Application" and now all the systems shutdown.


Other choices for Action: on this page are:

The only other issue was that clients did not always update the new profile right away. Verdiem's seems to try to limit the network traffic as much as possible but in some cases the software did not update before it was time to shutdown.


For example, I first set the computers to suspend after 5 minutes at night. In the morning the schedule should change to always on, but people would come in, turn on their computers and after 5 minutes they would suspend again. Five minutes was apparently not enough time for the client to get the profile updates from the server. I changed the night profile to suspend after 15 minutes and everything works fine.


As I said everything seems to work pretty well though Verdiem may have gone a bit overboard on keeping network traffic low. Also someway to script commands to the server would be nice but apparently they do not exist as of September 2008.


Saturday, September 6, 2008

Surveyor PC Power Management 6 - Set Schedules

Issue:
Configuring and scheduling power profiles.

Quick:
Right click on the various groups, SmartProfile tab, create schemes, schedlue the schemes.

Visual/Learning:
First I configured the Default profile for the server.
Right click "Power Management", Select the SmartProfile tab.
Here I have already set mine up but these are the steps.
First create the Schemes. Click on New to configure a new scheme.


That will bring up a window like you see below. I give it the name "Monitor Off Day Scheme" and I set it to turn the monitor off after 20 minutes. Since this is my default I do not want this one to be very aggressive. Be careful with Battery settings as these will remain in effect whether on or off the LAN and this can result in dead batteries and perhaps upset users. Now I set the schedule for the scheme. Click on New under schedule. Set the start time for the scheme and the days of the week to run it. This scheme goes into effect at 5:30 AM Monday through Sunday. This is the only scheme I have set in the default profile so it never changes.


Now I can right click on one of my child folders, select properties, and go to the SmartProfile tab. Here I see that it is set to use the inherited profile. I unchecked this box so that I can change the settings.
Now the box is unchecked and I have created the standby scheme and scheduled 3 events for the XP machines. At 5:30 the Monitor off scheme is set just like in the default, but I have also added at 5:30 pm a wake action in addition to the 6 pm the standby scheme.
First I created the Standby scheme which looks like what you see below. Monitor goes off after 10 minutes and the systems goes into standby mode after 15 minutes of idle time. Because I have set the clients to go to S3 standby (in the BIOS) this is pretty much the equivalent of being powered off. The nice thing is that the machines come out of standby in about 15 seconds but a complete power up requires a much slower 90 seconds. Next I added an event to the schedule so that this scheme happens everyday at 6 PM.


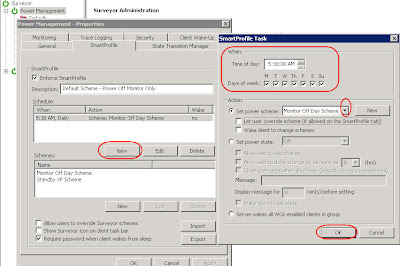
OK, what about that third event that is scheduled for 5:30 PM. Since machines wake faster from standby, I am going to wake all the machines in the group and then 30 minutes later I set the scheme so that the machines go to standby. So if someone powers off their machine before going home, I wake it and put it into standby before my backup script runs. Since I only do backups M-F, I only run the wake action on those days. This is not a scheme it is just an action so I do not have to create a scheme.


Now create SmartProfiles for each of the groups you want to control differently. For my windows 2000 machines I set the group so that they just turn off the monitors during the week but I do a full shutdown on Friday night.
I had one person who was an exception to my other groups and so I was able to create a separate group for this one person. I configured the auto-group rule to look for this persons machine name and put it in this separate group. I then configured the power setting on that group per the users requirements.