Issue: At times you need to get to the BIOS or need to be able to see the boot process remotely. Here is a review of two possible solutions.
Quick/Visual/Learning:
SecureLinx Spider from Lantronix
IOGEAR GCN1000 PCPortal
Of the two I like what I read about the Spider product. A bit more expense but more flexible in terms of connectors you can get and the setup sounds like it is more straight forward.
Thursday, October 29, 2009
Nice - Wake On Lan / Wan Tutorial.
Issue:
I discuss WOL issues in my verdiem posts but here is another page that has some detailed information.
Quick/Visual/Learning: Wake on wan post
I discuss WOL issues in my verdiem posts but here is another page that has some detailed information.
Quick/Visual/Learning: Wake on wan post
Wednesday, October 28, 2009
Outlook - Failed due to registry or installation problem
Issue:
You get the following error: The operation failed due to a registry or installation problem. Restart Outlook and try again. If the problem persists, please reinstall.
Quick:
This is usually a profile problem, you may need to kill the outlook process first.
Visual/Learning:
We got this error when doing a send/receive
This is the error message:

To solve this problem you need to create a new Outlook profile. This was not working for us at first but we needed to kill the Outlook process first.
Next go to Start / Control Panel and open the Mail configuration icon.
Select Add a new email account and click next
Select Microsoft Exchange Server and click next
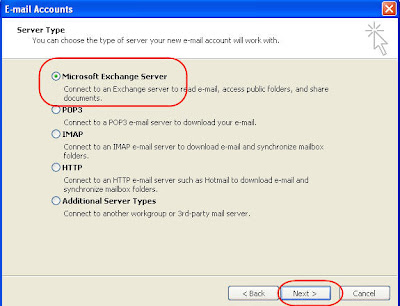
Enter your Exchange server name and you user name and click Next.

Now you see this window and you need to select the new profile as the default one form the drop down list. Click OK and you are done.

The error should be gone but you will need to configure this profile to match what you had configured in the old one.
You get the following error: The operation failed due to a registry or installation problem. Restart Outlook and try again. If the problem persists, please reinstall.
Quick:
This is usually a profile problem, you may need to kill the outlook process first.
Visual/Learning:
We got this error when doing a send/receive
This is the error message:
To solve this problem you need to create a new Outlook profile. This was not working for us at first but we needed to kill the Outlook process first.
Press ALT-CNTL-DEL keys and select Task Manager. Find Outlook and end the process if you see it in the list.

Next go to Start / Control Panel and open the Mail configuration icon.

Click on Show Profiles


Select Add a new email account and click next

Select Microsoft Exchange Server and click next
Enter your Exchange server name and you user name and click Next.

Get message that you have enter all the required information.

Now you see this window and you need to select the new profile as the default one form the drop down list. Click OK and you are done.
The error should be gone but you will need to configure this profile to match what you had configured in the old one.
Monday, October 5, 2009
XP disable simple file sharing
Issue: You want to see the access control list in an XP computer that is in a workgroup.
Quick: Click Start | My Computer | Tools | Folder Options | View
Visual/Learning:
Found good information here
Quick: Click Start | My Computer | Tools | Folder Options | View
Visual/Learning:
Found good information here
Thursday, August 27, 2009
Some Email Tricks
Issue: Convert pdf to text or get the definition of a word using just email.
Quick/Visual/Learning:
Adobe provides this tool to the impaired but you can use it to convert small pdf files to text. Just send a pdf attachment to pdf2txt@adobe.com and you will get it in your email as text.
You can also use pdf2html@adobe.com if you want it in html form.
Get any definition of a word by sending an email to wsmith@wordsmith.org with a subject, define Yourword .
Google doc will provide you a special code which will enable you to upload word, html and RTF files to your Google Doc account. This is a great way to archive your documents attachments
Tuesday, August 25, 2009
Outlook Hyperlinks
Issue: You want to add a link in Outlook to external information.
Quick\Visual\Learning:
My experience is that links in Outlook are not activated until you send the message so do not be surprised if the link does not seem to work at the start.
Here is a link to how to do this and the some text from the link below:
-------------start text from link--------------------
When you type one of the following Internet protocols in the body of a message, Microsoft Outlook creates a hyperlink from the text. If recipients of the message have Internet browsers that support the protocol, they can click the hyperlink to quickly go to the destination
If the Internet address includes spaces, or Chinese, Japanese, or Korean characters, you must enclose the entire address in angle brackets (< >). For example,.
http:// Hypertext Transfer Protocol (HTTP). The protocol most commonly used for Web pages.
https:// Hypertext Transfer Protocol, Secure. Designed to provide secure communications using HTTP on the Internet.
file:// Used to open a file on an intranet
ftp:// Used to transfer files over the internet
mailto: Used to send messages to an e-mail address. When the recipient clicks this hyperlink, a new message opens with the mailto e-mail address filled in.
gopher:// A protocol making use of the gopher utility, which finds information and presents it in the form of menus, submenus, and files that can be downloaded and displayed.
news: Used to open an Internet news group
nntp:// Network News Transfer Protocol. Used to retrieve and post specific Usenet news articles on the Internet.
telnet:// Protocol that enables a user to log on from a remote computer and enter commands as if they were using a terminal directly attached to the computer.
Outlook: or Outlook:// A protocol used to open an Outlook folder or an item. Items include e-mail messages, appointments, contacts, tasks, journal entries, notes, posted items, and documents.) or file in Outlook. This protocol is supported only in Outlook.
To add a hyperlink to a location in Outlook, or to an Outlook item, use the following in the text of your message:
Inbox Outlook:Inbox
Contacts Outlook:Contacts
Any folder in your mailbox Outlook:foldername\subfolder
Calendar Outlook:Calendar
A message in your Inbox
A contact in your Contact s folder
-------------end text from link ------------------
Quick\Visual\Learning:
My experience is that links in Outlook are not activated until you send the message so do not be surprised if the link does not seem to work at the start.
Here is a link to how to do this and the some text from the link below:
-------------start text from link--------------------
When you type one of the following Internet protocols in the body of a message, Microsoft Outlook creates a hyperlink from the text. If recipients of the message have Internet browsers that support the protocol, they can click the hyperlink to quickly go to the destination
If the Internet address includes spaces, or Chinese, Japanese, or Korean characters, you must enclose the entire address in angle brackets (< >). For example,
http:// Hypertext Transfer Protocol (HTTP). The protocol most commonly used for Web pages.
https:// Hypertext Transfer Protocol, Secure. Designed to provide secure communications using HTTP on the Internet.
file:// Used to open a file on an intranet
ftp:// Used to transfer files over the internet
mailto: Used to send messages to an e-mail address. When the recipient clicks this hyperlink, a new message opens with the mailto e-mail address filled in.
gopher:// A protocol making use of the gopher utility, which finds information and presents it in the form of menus, submenus, and files that can be downloaded and displayed.
news: Used to open an Internet news group
nntp:// Network News Transfer Protocol. Used to retrieve and post specific Usenet news articles on the Internet.
telnet:// Protocol that enables a user to log on from a remote computer and enter commands as if they were using a terminal directly attached to the computer.
Outlook: or Outlook:// A protocol used to open an Outlook folder or an item. Items include e-mail messages, appointments, contacts, tasks, journal entries, notes, posted items, and documents.) or file in Outlook. This protocol is supported only in Outlook.
To add a hyperlink to a location in Outlook, or to an Outlook item, use the following in the text of your message:
Inbox Outlook:Inbox
Contacts Outlook:Contacts
Any folder in your mailbox Outlook:foldername\subfolder
Calendar Outlook:Calendar
A message in your Inbox
A contact in your Contact s folder
-------------end text from link ------------------
Monday, August 17, 2009
Detect Computer Slow Down Due to Disk Access
Issue:
Slow computer performance
Quick/Visual/Learning:
Found good information at this link on TechRepublic about detecting if the slow down is due to a particular process that is beating on the hard drive.
--------------Begin Info from Link --------------
Disk time percentage and disk queue length
IT professionals think of hard disk corruption or inadequate disk space as the cause of most system performance problems, but disk time is an equally important performance factor. Disk time is represented as a percentage of time that the hard disk is in use. If the hard disk is running 80 percent of the time, for example, you can be sure that system performance is suffering.
Another factor to consider is the average disk queue length, which refers to the number of processes that are waiting to use the hard disk. Using the disk time percentage in conjunction with the disk queue length will tell you not only how much the hard disk is being used but also if the heavy usage is a problem. For example, if the disk time is 40 percent but the average disk queue length has a factor of two or less, then the hard disk is keeping up with the demand that’s being placed on it.
On the other hand, if the percentage of disk time and average disk queue length are both high (above 80 percent disk time and a factor of two or more for the average disk queue length), it means that processes are waiting for the hard disk to become available. Anytime a process has to wait for a component to become available, a user will experience less-than-desirable performance.
Measuring hard disk performance
To accurately diagnose a system’s hard disk, you need to measure the percentage of disk time and the average disk queue length.
Begin by performing a full defragmentation on all the system’s partitions to ensure that all files are contiguous and that the hard disk can perform file reads and writes optimally. Click on the Start menu and select All Programs Accessories System Tools Disk Defragmenter.
Once you’ve defragmented all partitions, run the Performance Monitor utility by opening the Control Panel and clicking Administrative Tools Performance.
Tip
When the Performance Monitor opens, select any counters that are previously running from the bottom of the window and press Delete. Every counter that’s running has a slight, but noticeable, impact on the system’s performance. Therefore, the fewer counters you use, the more accurate your measurements will be.
In the Performance Monitor utility, follow these steps:
Click the Plus icon to open the Add Counters dialog box.
Next, select PhysicalDisk from the Performance Object dropdown list, which will bring up a list of the physical disk counters.
Now, select the %Disk Time counter from the list and click the All Instances radio button to tell the system to measure the performance of all hard drives.
Next, click the Add button to add the counter to the Performance Monitor.
Finally, select Avg. Disk Queue Length from the counter list, select the All Instances radio button, and click the Add button followed by the Close button. When you do, the performance monitor will begin analyzing the disk usage, as shown in Figure A.
Figure A
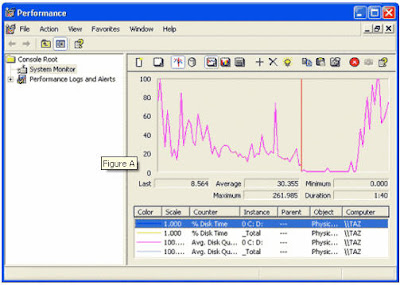
The numbers beneath the graph refer to the percent of disk time for Drive 0.
As you look at the output, you can see that the lines on the graph correspond to the counters that you’ve installed. For example, in Figure A, the pink line is predominant. You can tell by the legend that the pink line corresponds to the average disk queue length for the C: and D: partitions of Drive 0. You can also tell the exact values of any counter by selecting the counter that you want to examine. It’s best to look at the actual numbers rather than the graph, as the graph can be deceptive if the scale isn’t set correctly.
Narrowing down the suspects
Now it’s time to figure out which process is using all those disk resources. The first thing that I recommend to track down the culprit is to press [Ctrl][Alt][Delete] simultaneously to access the Windows Security dialog box. Next, click Task Manager to bring up the Task Manager utility, which reports on the resource utilization of every process running on the entire system.
While disk usage isn’t one of the factors that Task Manager normally reports, you can configure it to provide this information.
First, select the Processes tab to view the list of processes that are running on your machine.
Next, select the Select Columns command from the View menu. You’ll now see a list of all the resources that you can monitor through the Task Manager.
I recommend deselecting every resource except for I/O Read Bytes and I/O Write Bytes. When you click OK, you’ll see the number of bytes read and written by each process, as shown in
Figure B.
The trick now is to go through the list and look for rapidly changing values. It’s normal for most of the values to occasionally change, but if you see one that is constantly changing, then the process that corresponds to that value is hogging your system’s disk resources.
Figure B
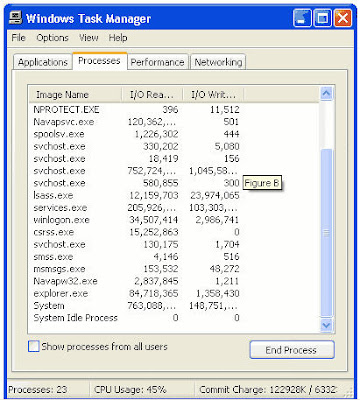
To kill a system resource hog, highlight the process and click End Process.
If the rogue system process is a part of the Windows operating system, there’s a good chance that the excessive disk usage is caused by thrashing.
Swapping vs. thrashing
The process of moving memory blocks between physical and virtual memory is called swapping. Although swapping is inefficient, it’s a perfectly normal process in a Windows environment. Virtual memory is hard disk space that is used as extra memory. Basically, any time Windows needs to read something that exists in virtual memory, it must move that memory block into the system’s physical memory. Thrashing problems are caused by excessive physical and virtual memory swapping.
However, if the disk usage is traced to a non-Windows process, then you may have problems with an individual service.
Be careful
If you eliminate a process you feel is causing excessive disk usage, processor time and memory will also be affected.
The usual suspects
We’ve focused on explaining how excessive disk time usage can degrade system performance, and you have seen some ways to track down the processes that create this problem. By using the Performance Monitor to measure both disk time and average queue length, you can get a sense of whether or not the hard disk is being taxed by the system’s processes. Analyzing the Task Manager further narrows down the possible suspects that may be causing the problem.
------------End Info from Link -----------
Slow computer performance
Quick/Visual/Learning:
Found good information at this link on TechRepublic about detecting if the slow down is due to a particular process that is beating on the hard drive.
--------------Begin Info from Link --------------
Disk time percentage and disk queue length
IT professionals think of hard disk corruption or inadequate disk space as the cause of most system performance problems, but disk time is an equally important performance factor. Disk time is represented as a percentage of time that the hard disk is in use. If the hard disk is running 80 percent of the time, for example, you can be sure that system performance is suffering.
Another factor to consider is the average disk queue length, which refers to the number of processes that are waiting to use the hard disk. Using the disk time percentage in conjunction with the disk queue length will tell you not only how much the hard disk is being used but also if the heavy usage is a problem. For example, if the disk time is 40 percent but the average disk queue length has a factor of two or less, then the hard disk is keeping up with the demand that’s being placed on it.
On the other hand, if the percentage of disk time and average disk queue length are both high (above 80 percent disk time and a factor of two or more for the average disk queue length), it means that processes are waiting for the hard disk to become available. Anytime a process has to wait for a component to become available, a user will experience less-than-desirable performance.
Measuring hard disk performance
To accurately diagnose a system’s hard disk, you need to measure the percentage of disk time and the average disk queue length.
Begin by performing a full defragmentation on all the system’s partitions to ensure that all files are contiguous and that the hard disk can perform file reads and writes optimally. Click on the Start menu and select All Programs Accessories System Tools Disk Defragmenter.
Once you’ve defragmented all partitions, run the Performance Monitor utility by opening the Control Panel and clicking Administrative Tools Performance.
Tip
When the Performance Monitor opens, select any counters that are previously running from the bottom of the window and press Delete. Every counter that’s running has a slight, but noticeable, impact on the system’s performance. Therefore, the fewer counters you use, the more accurate your measurements will be.
In the Performance Monitor utility, follow these steps:
Click the Plus icon to open the Add Counters dialog box.
Next, select PhysicalDisk from the Performance Object dropdown list, which will bring up a list of the physical disk counters.
Now, select the %Disk Time counter from the list and click the All Instances radio button to tell the system to measure the performance of all hard drives.
Next, click the Add button to add the counter to the Performance Monitor.
Finally, select Avg. Disk Queue Length from the counter list, select the All Instances radio button, and click the Add button followed by the Close button. When you do, the performance monitor will begin analyzing the disk usage, as shown in Figure A.
Figure A
The numbers beneath the graph refer to the percent of disk time for Drive 0.
As you look at the output, you can see that the lines on the graph correspond to the counters that you’ve installed. For example, in Figure A, the pink line is predominant. You can tell by the legend that the pink line corresponds to the average disk queue length for the C: and D: partitions of Drive 0. You can also tell the exact values of any counter by selecting the counter that you want to examine. It’s best to look at the actual numbers rather than the graph, as the graph can be deceptive if the scale isn’t set correctly.
Narrowing down the suspects
Now it’s time to figure out which process is using all those disk resources. The first thing that I recommend to track down the culprit is to press [Ctrl][Alt][Delete] simultaneously to access the Windows Security dialog box. Next, click Task Manager to bring up the Task Manager utility, which reports on the resource utilization of every process running on the entire system.
While disk usage isn’t one of the factors that Task Manager normally reports, you can configure it to provide this information.
First, select the Processes tab to view the list of processes that are running on your machine.
Next, select the Select Columns command from the View menu. You’ll now see a list of all the resources that you can monitor through the Task Manager.
I recommend deselecting every resource except for I/O Read Bytes and I/O Write Bytes. When you click OK, you’ll see the number of bytes read and written by each process, as shown in
Figure B.
The trick now is to go through the list and look for rapidly changing values. It’s normal for most of the values to occasionally change, but if you see one that is constantly changing, then the process that corresponds to that value is hogging your system’s disk resources.
Figure B
To kill a system resource hog, highlight the process and click End Process.
If the rogue system process is a part of the Windows operating system, there’s a good chance that the excessive disk usage is caused by thrashing.
Swapping vs. thrashing
The process of moving memory blocks between physical and virtual memory is called swapping. Although swapping is inefficient, it’s a perfectly normal process in a Windows environment. Virtual memory is hard disk space that is used as extra memory. Basically, any time Windows needs to read something that exists in virtual memory, it must move that memory block into the system’s physical memory. Thrashing problems are caused by excessive physical and virtual memory swapping.
However, if the disk usage is traced to a non-Windows process, then you may have problems with an individual service.
Be careful
If you eliminate a process you feel is causing excessive disk usage, processor time and memory will also be affected.
The usual suspects
We’ve focused on explaining how excessive disk time usage can degrade system performance, and you have seen some ways to track down the processes that create this problem. By using the Performance Monitor to measure both disk time and average queue length, you can get a sense of whether or not the hard disk is being taxed by the system’s processes. Analyzing the Task Manager further narrows down the possible suspects that may be causing the problem.
------------End Info from Link -----------
Friday, August 14, 2009
Get Directory Listing In LINUX
Issue: You want to just see the directories in the listing
Quick: ls -p PipeSymbol grep "/"
Quick: ls -p PipeSymbol grep "/"
Friday, July 10, 2009
Windows 2003 Prevent Users From Seeing Objects They Can't Access
Issue: Hide files and folders when users do not have access to open those objects.
Quick: download Windows Server 2003 Access-based Enumeration.
Visual/Learning:
Windows Server 2008 has the ability to prevent users from seeing files to which they have no access. You can also download a file to add this ability to 2003 server. This is called Access-based Enumeration. Click on the link below to download the file.
Windows Server 2003 Access-based Enumeration
Monday, June 22, 2009
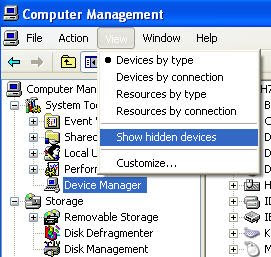
Show Hidden Windows Drivers
Issue: Old hidden drivers can cause a problem. Here is how to expose them in XP and Vista
Quick/Visual/Learning:
Add an environment variable:
Start/MyComputer/RightClick/Properties/Advanced/Environment Variables button
Add a system variable called:
devmgr_show_nonpresent_devices
Set the value to 1
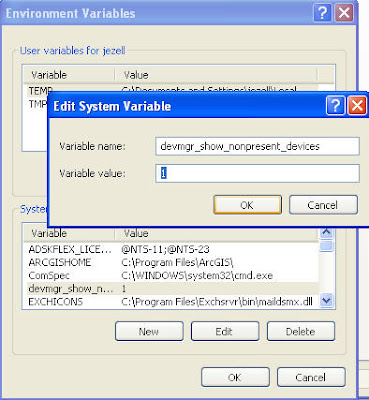
Go to the Device Manager
Start/MyComputer/RightClick/Manage/Device Manager
Select the View menu/Show Hidden Devices
You can now see and delete hidden device drivers.
Quick/Visual/Learning:
Add an environment variable:
Start/MyComputer/RightClick/Properties/Advanced/Environment Variables button
Add a system variable called:
devmgr_show_nonpresent_devices
Set the value to 1
Go to the Device Manager
Start/MyComputer/RightClick/Manage/Device Manager
Select the View menu/Show Hidden Devices
You can now see and delete hidden device drivers.
Saturday, June 20, 2009
Hard Disk Recovery
Issue: Your hard drive has crashed and you are looking for some help.
Quick/Visual/Learning:
Here is a link to shareware at Zero Assumption Recovery ZAR and a HowTo.
Quick/Visual/Learning:
Here is a link to shareware at Zero Assumption Recovery ZAR and a HowTo.
Wednesday, June 17, 2009
MS Word - Links to Document Sections
Issue:
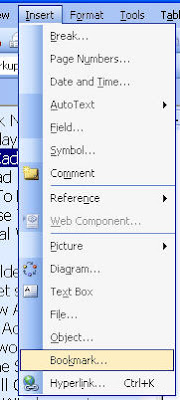
You want to create a link in a Microsoft Word document to other areas of the document.
Quick:
Put cursor in area you want to link to, Insert Menu / Bookmark (give bookmark a name) /Add ----Save the document ------ Select text to link to bookmark Insert Menu / Hyperlink / Bookmark button / Select your named bookmark.
Visual/Learning:
In Word put the cursor where you want to jump to.
Select the Insert menu
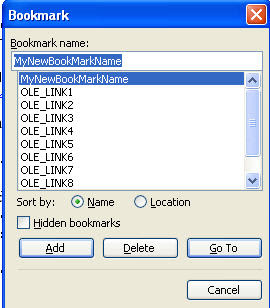
Select Bookmark
 Name the Bookmark
Click on Add Button
 Select the text you want to link to your bookmark
Right Click and select Hyperlink

Select the Bookmark... button
You want to create a link in a Microsoft Word document to other areas of the document.
Quick:
Put cursor in area you want to link to, Insert Menu / Bookmark (give bookmark a name) /Add ----Save the document ------ Select text to link to bookmark Insert Menu / Hyperlink / Bookmark button / Select your named bookmark.
Visual/Learning:
In Word put the cursor where you want to jump to.
Select the Insert menu
Select Bookmark
 Name the Bookmark
Click on Add Button
 Select the text you want to link to your bookmark
Right Click and select Hyperlink

Select the Bookmark... button


Thursday, June 11, 2009
Asus error "System Failed CPU Test"
Issue:
On boot get voice error through speakers that says "System Failed CPU Test", repeated over and over.
Quick/Visual/Larning:
Turns out that this error was related to the power supply. Replaced the power supply and a dead system fan that may have been pulling extra juice from the power supply as well.
On boot get voice error through speakers that says "System Failed CPU Test", repeated over and over.
Quick/Visual/Larning:
Turns out that this error was related to the power supply. Replaced the power supply and a dead system fan that may have been pulling extra juice from the power supply as well.
Friday, June 5, 2009
Google Gadget Map Display
Issue: You want to add a map to a Google site.
Quick: Use Google Docs spreadsheet to enter data and display map in Google Site gadget.
Visual/Learning:
Getting a Google map to display on a Google site is not as easy as you would think. When you open a Google map there is an option to get code in embed in a web page but these have iframe code that Google sites does not allow. Also just putting in the URL in the Google Gadget does not seem to work.
I found the solution that works quite well for what I needed.
Here are the steps to make it work.
Go to Google Docs and create a new spreadsheet.
Enter the addresses in one column and description in the column to the right of the addresses.
Copy the URL of the spreadsheet.

Go to you Google Sites account and open your site.
Edit the page where you want to put the map.
Click Insert
Under Gadgets select More...
Click on the map gadget
Past in the URL of the Google Docs spreadsheet. You should see a preview in the map config window.
Change size setting and whatever else you want.
Click OK
Now you are done and should see a map on the Google site that has all of your locations marked and you can Pan and Zoom around as well.
Other Links
Other Examples
Another
Asterisk PBX System Install - 12 Install H323
Issue:
I need to connect Asterisk to my Cisco CallManager 3.51 server to allow for phone migration from one system to the other. Since CCM 3.51 does not support SIP I need to get H323 working on Asterisk.
Quick/Visual/Learning:
I found a good link to get me started: Asterisk Cisco CallManager Integration
Talks about integration using either H323 or SIP. CCM 3.51 only supports h323 so I need to get h323 working on Asterisk.
For H323 I found another link: Compiling Asterisk 1.4 with TDM400 and H323 .
Following along using this guide-
The gcc-g++ was already downloaded in Asterisk PBX System Install - 03 Software, as was the kernel-devel module, but not gnutls-devel so I install that one:
#yum install –y gnutls-devel
It is not talked about here but I got an error later on that pwlib needed the fast lexical analyzer generator. After doing some poking around I discovered that I could load this using yum so I will do that now too:
#yum install –y flex
I am not interested in Google Talk so I skip the iksemel download and I already have the correct version of make that is above version 3.80, so on to the section: “Download and install OpenH323 libraries”
Need to download some source files. I will put these in the same place as my other files.
#cd /usr/src
#wget http://downloads.sourceforge.net/openh323/pwlib-v1_10_3-src-tar.gz
#tar zxvf pwlib-v1_10_3-src-tar.gz
#cd pwlib_v1_10_3/
#./configure
#make
#export PWLIBDIR=/usr/src/pwlib_v1_10_3
My path in the export command is different then those in the astrecipes link because I downloaded my files to a different directory then he did. The export command creates a shell variable that is also recognized by the kernel. In this case the variable contains the path to our pwlib directory. This is an important step as openh323 needs this path variable.
#cp $PWLIBDIR/lib/libpt_linux_x86_r.so.1.10.3 /usr/lib
Manual copy of the shared library to the system folder. Notice here that we are using the path variable that we created with the export command above.
The full path is:
/usr/src/pwlib_v1_10_3/lib/libpt_linux_x86_r.so.1.10.3 /usr/lib
By using the $PWLIBDIR variable we save a few keystrokes.
Go back one directory to the src directory
#cd ..
Next we do pretty much the same thing to install openh323:
#wget http://downloads.sourceforge.net/openh323/openh323-v1_18_0-src-tar.gz
#tar zxvf openh323-v1_18_0-src-tar.gz
#cd openh323_v1_18_0/
#./configure
This next command took several minutes on my machine so be patient.
#make opt
#export OPENH323DIR=/usr/src/openh323_v1_18_0
#cp $OPENH323DIR/lib/libh323_linux_x86_r.so.1.18.0 /usr/lib
#cd ..
The next section is about installing Asterisk which I have already done, but I need to recompile Asterisk to see the h323 stuff.
#cd /usr/src/asterisk-1.4.23.1
#make clean
#./configure
#make menuselect
I see that asterisk now has the chan_h323 option selected. That was a happy little moment.
Press x to exit out of menuselect
You need to run make twice now. The first time you get an error that you need to run it again, so just do it.
#make
#make
#make install
I am not going to "make samples" because that would overwrite the work I have done in my .conf files.
Note - If you run "make samples" by mistake the existing .conf files get written to .conf.old files but just to be safe you should probably save all the work you have done in the .conf files somewhere else once in a while.
#cd ..
To start asterisk type:
#asterisk
Attach to the console with:
#asterisk -vvvvr
It should be running now with H323.
Next time more work to connect to CallManager.
Asterisk PBX Install - Index
Tuesday, June 2, 2009
Exchange 2003 Non-Delivery Reports
Issue:
About a year ago (2008) we were getting NDRs because our reverse DNS (RDNS) PTR was not set correctly but we fixed that. Recently our users started getting NDRs of various types again but it is not the reverse pointer this time.
Quick:
Fix FQDN on the SMTP Virtual Server.
Visual:
About a year ago (2008) we were getting NDRs because our reverse DNS (RDNS) PTR was not set correctly but we fixed that. Recently our users started getting NDRs of various types again but it is not the reverse pointer this time.
Quick:
Fix FQDN on the SMTP Virtual Server.
Visual:

Learning:
We starting getting a number of different NDR errors and I assume this is because of companies tightening up on thier SPAM filtering.
Errors included:
The following recipient(s) could not be reached:
FOLLOWED BY EMAIL ADDRESS THAT IT FAILED TO SEND TO AND ONE OF THE FOLLOWING REASONS:
You do not have permission to send to this recipient. For assistance, contact your system administrator.
FOLLOWED BY DIFFERENT MESSAGES LIKE:
-Helo command rejected: Host not found
-Client host rejected: cannot find your reverse hostname
-Requested action not taken: message refused
-ETC.
We send email out as:
userName at OurExternalDnsName.com
Our mail server connects as:
InternalDomainName.com
The thought was that perhaps the receiving servers were trying to validate the Internal Domain Name and failing. I changed the name that the SMTP Virtual server connects with and that solved the problem.
See visual above:
In Exchange System Manager
Select the Default SMTP Virtual Server and right click for properties
Select the Delivery Tab and the Advanced button
Change the Fully Qualified Domain Name to the External DNS name for your mail server.
Monday, June 1, 2009
Asterisk PBX System Install - 11 Overhead Paging
Issue: Access to Valcom paging system
Quick/Visual/Learning:
Overhead paging system
Valcom V-2003A
Quick/Visual/Learning:
Overhead paging system
Valcom V-2003A

Our current system requires us to dial *60, at that point you hear a tone, then dial 1 to access the over head speakers and talk into the phone to make the announcement.
Looking at our Cisco routers I see that one of the ports is dedicated to this function.
You can see below that voice port 2/0 is configured as the paging port on the 1760 router.
Cisco 1760 Configuration
voice-port 2/0
trunk-group Outbound 2
input gain 2
output attenuation 2
echo-cancel coverage 32
echo-cancel erl worst-case 0
no vad
no comfort-noise
connection plar 401
impedance complex2
description paging port
To access the port a dial-peer is configured to look for the dial pattern of *60
!
dial-peer voice 86 pots
destination-pattern *60
port 2/0
forward-digits 0
!
Now all I need to do is get Asterisk to connected to the Cisco router and pass the dialed numbers (*60) to the router. I read on page 140 of the Asterisk book that Asterisk saves the dialed extension in a variable ${EXTEN}. So let’s edit extensions.conf file.
I added a context called [overhead-paging]
[overhead-paging]
exten => *60,1,Dial(${OUTBOUNDTRUNK}/${EXTEN})
exten => *60,n,Congestion()
exten => *60,n,Hangup()
As you remember OUTBOUNDTRUNK is my variable for the Cisco router (Post 8). So this connects to the router and passes the dialed number of *60.
If there is a problem Congestion gives a fast busy sound, and the line hangs up.
Under the [internal] context I add overhead-paging to the list of included contexts.
[internal]
include => outbound-local
include => parkedcalls
include => overhead-paging
That’s it. I reload the dialplan and press *60 on one of the phones. This gets passed to the Cisco router. The router matches the *60 to the port for the paging system. I hear the tone, dial 1, and now I can talk over the overhead speakers.
Next problem to work on is Cisco CallManager Intergration
Wednesday, May 27, 2009
Asterisk PBX System Install - 10 Conference And Parked Calls
Issue: Asterisk configuration for call parking and conference rooms.
Quick: features.conf file and meetme.conf file
Visual/Learning:
Lesson learned here was that if you do not have zaptel ztdummy configured correctly then conference rooms are not going to work.
Call Parking - Allows you to send a call to a holding area and then pick that call up from another phone. We use this feature a lot in our company. We sometimes park calls when an urgent call comes in and the person is not at their desk. We just park the call and page the person using our intercom system. They can then take the call from the nearest available phone.
Setup for this feature happens in the features.conf file.
[general] section
parkext => 700 (This is the number where you transfer the call to park it, the system tell you what position the call is in)
parkpos => 701-720 (this provides 20 parking positions 701 to 722)
context => parkedcalls (sets the context for parked calls)
parkingtime => 45 (Set seconds to park, if the call is not picked up before the time limit it is transferred back to the extension that sent the call to parking)
In my extensions.conf file I need to include the parkedcalls context
[internal]
include => parkedcalls
To get this to work you need to restart Asterisk. A simple reload will not get the changes in the features.conf file.
After restarting Asterisk this is how it works.
You get a call and answer it.
Now I use the 'more' softkey to get to the 'trnsfer' softkey and press it.
I dial 700 and I hear the system speaks the numbers 7 0 1 and I press the 'trnsfer' softkey again.
Now using any phone I can dial 701 and I am connected back to the caller.
MeetMe Conferencing
Allows callers to conference by calling a meeting conference number. Conference calls can be protected by passwords as well.
edit meetme.conf
[rooms]
conf => 350,54321
Save this file
350 is the conference room extension, and 54321 is the password for the conference room. You can leave this off if you want like this:
conf => 350
Edit the extensions.conf file.
Under our internal context:
[internal]
exten => 350,1,MeetMe(350)
You can add so function by adding some line before connecting to the conference call. I learned the hard way not to add these lines after connecting the conference all. It did not work and I got an error message in the console that:
" No Zap channel available for conference, user introduction disabled"
So please put the call to the MeetMe conference room last.
exten => 350,1,Playback(conf-thereare)
exten => 350,n,MeetMeCount(350)
exten => 350,n,Playback(conf-peopleinconf)
exten => 350,n,MeetMe(350)
Line one plays a message that "There are currently..."
Line two plays the number of people in the conference call
Line three plays a message "...people in this conference"
Line for connects the call to the conference.
So the first caller dials 35o and hears:
"There are currently zero people in this conference"
The next person to call will here that there is one person, and so on.
Next time connecting to our intercom system.
Asterisk PBX System Install - 11 Overhead Paging
Asterisk PBX Install - Index
XP - Troubleshoot Boot Problems
Issue: Need a good one stop diagnostic tool for fixing boot problems.
Quick: MSCONFIG
Visual/Learning:
The link below has a lot of good information about this tool.
TechRepulic Link
------ Overview of Info from Link -------------
Start - Run - msconfig to start the tool.
GENERAL TAB
- Diagnostic Startup (Loads only what it needs to run Windows)
- Selective Startup (Deselect startup items to isolate problem)
- Launch System Restore (To go back to restore point)
- Expand file (get a new copy of windows file from cab files)
SYSTEMS.INI AND WIN.INI TABS
Enable and disable sections of code using a check box.
Rearange code sections with 'Move Up' and 'Move Down'
BOOT.INI TAB
Can select boot modes (Safe Mode, Safe Mode with Networking, AlternateShell for cmd prompt)
-Noguiboot (no VGA video driver for boot display)
-Bootlog (enable boot logging)
-Basevideo (forces standard VGA driver)
-Sos (shows driver names as they are loaded)
-Advanced Options Button
--Maxmem (limit memory XP can use to check for bad memory module)
--Numproc (limit number of processors)
--Pcilock (stop XP form assigning sys resources to PCI devices)
--Debug (debugging mode)
---Debugport (port for debuging)
---Baudrate (baud rate for debuging)
---Channel (1394 channel for debug)
SERVICES TAB
-Enable and disable services with check box
-Hide all Windows services with check box (So you just see software added services)
STARTUP TAB
- Prevent items in startup folder from starting with a check box.
------ End Overview of Info from Link -------------
Friday, May 8, 2009
Opening Outlook 2003 Forms In OFT Files
Issue: Revert back to old behavior to allow .oft files to open.
Quick: Make changes to the registry
Visual/Learning:
In the old days you could open outlook forms as .oft files from Outlook without installing them. Due to security issues Microsoft changed the behavior so that you now have to install the form before you can open it. There are times that it may be helpful to revert back to the old behavior. For one thing it can save a lot of mouse clicks if you work with oft files a lot.
Here is a link on how to revert Outlook 2003 to old behavior.
TEXT FROM LINK
Not recommended: Re-enable the ability to create properties
Three registry keys can be deployed to client computers to disable the blocking of custom properties and revert Outlook to its previous behavior. These registry keys are supported by group policies. The following registry keys can revert Outlook 2003 to its previous behavior:
Note The following registry keys do not revert Outlook 2007 to its previous behavior.
AllowTNEFtoCreateProps (HKEY_CURRENT_USER\Software\Microsoft\Office\11.0\Outlook\Options\Mail] "AllowTNEFtoCreateProps"=dword:00000000): If the value is 0, TNEF/MIME cannot create new non-Outlook custom properties. This value is the default value. If the value is 1, TNEF/MIME can create new non-Outlook custom properties.
AllowMSGFilestoCreateProps: If the value is 0, .msg files and .oft files cannot create new non-Outlook custom properties. This value is the default value. If the value is 1, .msg files and .oft files can create new non-Outlook custom properties.
DisallowTNEFPreservation: To ease migration to this new behavior, Outlook preserves the original TNEF when custom properties are not created. The original TNEF is saved in a binary stream on the item that is saved. Outlook uses the following property tag to save the stream:
PR_TNEF_UNPROCESSED_PROPS PROG_TAG(PT_BINARY, 0x0e9C).
The HKEY_CURRENT_USER\Software\Microsoft\Office\11.0\Outlook\Options\Mail] "DisallowTNEFPreservation "=dword:00000000 registry setting controls whether Outlook creates the PR_TNEF_UNPROCESSED_PROPS property.
Note The PR_TNEF_UNPROCESSED_PROPS property is removed from a message when you embed a message into another message as an attachment. The PR_TNEF_UNPROCESSED_PROPS property is also removed when you forward a message or reply to a message.
END TEXT FROM LINK
Copy this text (between dashed lines) to a file called OFT.reg
------------------------------------------
Windows Registry Editor Version 5.00
[HKEY_CURRENT_USER\Software\Microsoft\Office\11.0\Outlook\Options\Mail]
"AllowTNEFtoCreateProps"=dword:00000001
"AllowMSGFilestoCreateProps"=dword:00000001
"DisallowTNEFPreservation"=dword:00000000
----------------------------------------
Save it and then double click on it to upload the registry changes.
Asterisk PBX System Install - 09 Voicemail Macros
Issue:
Configuring Voicemail in Asterisk
Quick/Visual/Learning:
Voicemail is an important part of any phone system and it seems to work amazingly well in Asterisk with very little configuration.
First you need to define the mailboxes in the voicemail.conf file.
The sample configuration file has a lot of stuff in it but want we need to configure is towards the bottom of the file.
In the sample file there is an example under the context of [default] that looks like:
[default]
1234 => 4242,Example Mailbox,root@localhost
The 1234 part is the extension of the phone
4242 is the password (this can be updated by the user from his phone)
“Example Mailbox” is the name of the mailbox owner and is used in dial by name directory lookups (see page 156 of the book)
root@localhost is the email address where you want to send a copy of any voicemail messages.
Note for more information about sending to a pager etc. look at the book on page 155.
For my use I need to add voicemail for myself. I will do this under the context of [default] and not [internal] (I orignally thought that my voicemail context should match my phone extension context but not true apparently.) I discovered, if I changed the context here, the message waiting light on my phone did not work. (I think the fix for that is to change the mailbox=207 in the sip.conf file to mailbox=207@internal, more on that below)
I add the following line to the voicemail.conf file.
207 => 1234,Jimmy Ezell,jezell@company.com
Pretty simple.
For each additional mailbox I just need to add another line under the [default] context.
Note - The ability to forward voice mail messages to a email account is great but if you need to look for a voicemail message they are stored in: /var/spool/asterisk/voicemail/ContextName/Extension/INBOX
Now we need to make some changes to the extension.conf dialplan file to make use of the voicemail.
To do this we use the voicemail() application like this:
Voicemail(207@default,u)
This will send callers to my voicemail and play the unavailable message. That is what the u means. But what if I want to play the busy message? Use a b instead of the u.
What I really want is for Asterisk to play correct message depending on if I am busy (on the phone) or unavailable (away from my desk). That requires a little programming and that is what we are going to look at now.
First I will show you what gets added and then explain it. Then we will look at a way of creating a macro so that we do not have to type this for each one of our phone extensions.
[internal]
exten => 207,1,Dial(SIP/207,10)
exten => 207,n,GotoIf($["${DIALSTATUS}" = "BUSY"]?busy:unavail)
exten => 207,n(unavail),Voicemail(207@default,u)
exten => 207,n,Hangup()
exten => 207,n(busy),Voicemail(207@default,b)
exten => 207,n,Hangup()
The first part you should know. There is the context of [internal] and the command to dial the phone.
You need to know that if Asterisk fails to connect to my phone it saves the reason in a variable called DIALSTATUS. This happens automatically.
Now if the phone does not pickup we go to the next line with the GotoIf command. The GotoIf command is going to allow us to control what happens next.
GotoIf(Expression?TrueDestination,FalseDestination)
Expression is going to be a comparison test follow by a question mark.
TrueDestinaiton and FalseDestination is going to be a lable that points to another line of the dialplan.
Expressions look like this $[expression], where the expression might be comparing two things like, is DIALSTATUS equal to BUSY? Or something like:
$[DIALSTATUS = “BUSY”]. The BUSY in quotes is what I am checking for.
This expression is not quite right yet. Remember that DIALSTATUS is a variable and we have to write it like this to get the contents of a variable - ${DIALSTATUS}.
So now after replacing DIALSTATUS with $[DIALSTATUS]we have:
$[${DIALSTATUS} = “BUSY”]
This is the expression that will compare the contents of the variable DIALSTATUS with the value of BUSY.
Here is the whole of line 2 for you to look at again.
exten => 207,n,GotoIf($["${DIALSTATUS}" = "BUSY"]?busy:unavail)
If DIALSTATUS is equal to BUSY we are going to go to the TrueDestination (busy) but is it is not equal to BUSY we are going to go to the FalseDestination (unavail).
You can see that (busy) is on the 5th line of our exten 207 dialplan.
exten => 207,n(busy),Voicemail(207@default,b)
So if line 2 is true we jump down to line 5 and we call the Voicemail application and request the busy greeting message.
On the other hand if line 2 is false we jump down to line 3.
exten => 207,n(unavail),Voicemail(207@default,u)
This is where you see the label (unavail) and call the Voicemail application and request the unavailable message.
Great so now Asterisk is able to decide which Voicemail message to play based on whether or not we are on the phone. That is great but I don’t want to have to type all those lines for each extension. That is where macros come in.
Macros are special contexts sections of the extensions.conf file. You start a macro context with the word macro followed by a dash (-) and the name of the macro. So our voicemail macro might start like this:
[macro-voicemail]
The s extension is the only one you can have in the a macro section.
To call a macro you use the Macro() application like this:
[internal]
exten => 207,1,Macro(voicemail,207)
So I replaced 6 lines with one single line that is calling my Macro named “voicemail” and passing it a variable which is my phone extension number “207”.
The Macro will look almost the same as the 6 lines I replaced.
[macro-voicemail]
exten => s,1,Dial(SIP/${ARG1},10)
exten => s,n,GotoIf($["${DIALSTATUS}" = "BUSY"]?busy:unavail)
exten => s,n(unavail),VoiceMail(${MACRO_EXTEN}@default,u)
exten => s,n,Hangup()
exten => s,n(busy),VoiceMail(${MACRO_EXTEN}@default,b)
exten => s,n,Hangup()
Here:
exten=>207 was replaced with the exten=>s (only s is allowed in a macro)
SIP/207 was replaced with SIP/${ARG1}, (ARG1 is the extension number passed to the macro)
207@default was replaced with ${MACRO_EXTEN}@default (Extension the macro was called from)
ARG1 and MACRO_EXTEN hold the same data so I really don't need both, but you can see that there are two ways to get the extension. One way is to pass it into the macro or else use the MACRO_EXTEN. MACRO_EXTEN is automatically loaded by Asterisk with the value of the extension that called the macro.
So with this macro I only need to add one line to the extensions.conf file. So I might add 3 phones under context [internal] like this:
exten => 207,1,Macro(voicemail,207)
exten=> 208,1,Macro(voicemail,208)
exten=> 209,1,Macro(voicemail,209)
To get the messsage waiting light to work you need to add a line to the sip.conf file.
Mailbox=207
If I had used a different voicmail.conf context, other then default, I would have to specify the context like:
mailbox=207@WhatEverTheContextName
Now we need to go to the asterisk console and run the command:
> reload (that will load the voicemail.conf changes as well as the other changes we made)
Should be able to call the extension and leave a voicemail message now.
Back in post 5 we configured the cisco sip dialplan to dial 500. We also configured the SIPDefault.cnf file to assign this number to the message button on the cisco phones.
This is what I am going to setup as now as the number to check voicemail.
In the extensions.conf file:
exten => 500,1,VoiceMailMain(${CALLERID(num)}@default)
500 will now dial voicemail. The CALLERID(num) will match the number I am calling from so that I do not manually have to enter the mailbox number. I will just be prompted for the password.
Next time call parking and MeetMe conference Calls
Asterisk PBX System Install - 10 Conference And Parked Calls
Asterisk PBX Install - Index
Tuesday, May 5, 2009
Outlook Forms 16 - Update Existing Forms
Issue:
You want to modify existing Outlook forms to use an updated or different form.
Quick/Visual/Learning:
At times I have had a need to update old Outlook forms to a newer one. I once had a helpdesk form that got changed along the way. The updated form was being stored in the same public folder as the old helpdesk form. The problem was that the people who refered to the data wanted the old forms to have the same look as the new forms. The form message class controls this and is stored in each item, so each item needed to be updated to use the new form instead of the old one. The solution at the time was to write a script that would update the form message class for each message.
I may still have the script I used somewhere but I saw this one and it is much nicer then my old one. I will put the link to it here: Helen Feddema's VB Script method followed by instructions on how to use it below.
Download the file code28.zip and extract the zipped files.
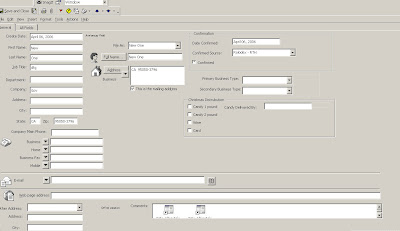
For this example I am going to change a contact form. Here is the standard one:
Here is the updated one with some extra fields for christmas gift list and so on:
Of the downloaded files in the zip, the file that really matters is "Reset Message Class.oft". You can install this in your personal forms library if you want or you can open it in design mode and run it from there. Either way should w0rk.
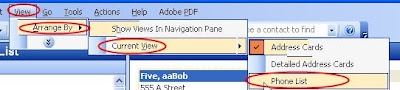
Next you need to know the names of the old and new message classes. You probably already know this but if you don't you can get it by changing the folder view.
Current View
Go to view/ Arrange By / Current View / Phone List
With the list view up Right Click in the list headings area and a menu will appear. Select Field Chooser
You want to modify existing Outlook forms to use an updated or different form.
Quick/Visual/Learning:
At times I have had a need to update old Outlook forms to a newer one. I once had a helpdesk form that got changed along the way. The updated form was being stored in the same public folder as the old helpdesk form. The problem was that the people who refered to the data wanted the old forms to have the same look as the new forms. The form message class controls this and is stored in each item, so each item needed to be updated to use the new form instead of the old one. The solution at the time was to write a script that would update the form message class for each message.
I may still have the script I used somewhere but I saw this one and it is much nicer then my old one. I will put the link to it here: Helen Feddema's VB Script method followed by instructions on how to use it below.
Download the file code28.zip and extract the zipped files.
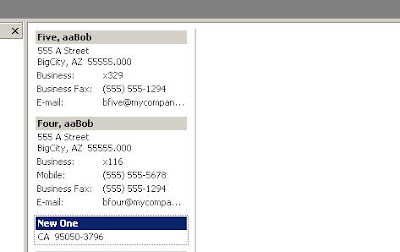
For this example I am going to change a contact form. Here is the standard one:
Here is the updated one with some extra fields for christmas gift list and so on:
Of the downloaded files in the zip, the file that really matters is "Reset Message Class.oft". You can install this in your personal forms library if you want or you can open it in design mode and run it from there. Either way should w0rk.
Next you need to know the names of the old and new message classes. You probably already know this but if you don't you can get it by changing the folder view.
Current View
Go to view/ Arrange By / Current View / Phone List
With the list view up Right Click in the list headings area and a menu will appear. Select Field Chooser

In the Field Chooser Box Select "All Contact Fields" in the drop down.
Select Message Class from the list
Drag the Message Class field to the headings bar.
Now you can see the names of the message classes in the list view.
Now it is time to run the "Reset Message Class.oft" form .
Click the Select Folder button and Select the folder that has the forms you want to change.
Click the Change button and enter the old and new Message Class Names.
Click on Proceed.
It may take a couple of minutes depending on the number of records you have to update so be patient. When done you should see indication of how many items were processed and an OK Button.
Back on the list view of our contacts folder you will see that the Message class has been changed on all of our existing forms.
Go to Outlook Forms Index
Sunday, May 3, 2009
Windows Command Line History - Doskey
Issue: You have typed a lot of command at the command / dos prompt and want to run one of them again without retyping it.
Quick:
F7 - history list
Alt+F7 - Clear History
[characters]F8 - searches for command beginning with the characters you typed
Visual/Learning:
Doskey is the program in Windows that maintains history of dos commands. You can scroll through the list with the up and down arrow key, but you can also get a list of commands by pressing the F7 key.

You can clear the history with ALT-F7 or search for a command that starts with dir by typing dir followed by the F8 key.
Here is a link that has some good information about DosKey.
Friday, May 1, 2009
Asterisk PBX System Install - 08 Outbound Calls
Issue: Last time we got inbound calls working and it is time to enable outbound calls.
Quick/Visual/Learning:
In our last post we already configured the Cisco 1760 router outbound calls. It was the section of the configuration that looked like:
dial-peer voice 100 pots destination-pattern .T port 0/0 forward-digits all
Where .T is a wildcard that matches all numbers, so Cisco should pass along whatever numbers we send it to our external phone line. Now we just need to tell Asterisk what to send it.
For this I am working again off of Chapter 5 of the book, which is “Dialplan Basics” to learn about pattern matching and variables.
Because we do not know what external number is going to be dialed, we have to get Asterisk to recognize a pattern of numbers that will signal that this is an outside call. We also have to capture what number was dialed and pass that along to the Cisco switch, which is stored in a variable.
Variables are just buckets that hold a piece of information, such as a name or a number. Among other things variables simplify changes. For example if you need to change a sip device and you have called it in several locations of a dialplan then you have to change it in each location. For starters I am going to create a global (seen by the whole dialplan) variable that points to my outbound sip device. The [globals] context is a special context name were you can put these types of variables. Also note that variables are case sensitive.
[globals]
OUTBOUNDTRUNK=SIP/Cisco1760
This sets the contents of our OUTBOUNDTRUNK bucket (variable) to be the name of the Cisco router that I configured in the sip.conf file last time.
To get the contents out of a variable you have to write it like this ${VaribleName}. So per our example, we can use ${OUTBOUNDTRUNK} anywhere in our dialplan where we would normally put the text SIP/Cisco1760.
Now I will look at pattern matching. A typical way of calling an outside number is to dial 9 to get an outside line and then to dial the 7-digit local phone number. I would like Asterisk to match any number that starts with 9 and is followed by 7 digits, like 9XXXXXXX.
To do this you start your pattern with an underscore, and enter your pattern. X matches any number, Z matches 1-9, and N matches 2-9.
So to match a local number the pattern would look like:
_9NXXXXXX
After the 9 we are just going to match numbers 2-9 as a 1 after then 9 would be the pattern for a long-distance call.
One last bit is that we need to pass the number that was dialed to the Cisco 1760 so that the call can be processed. Asterisk has a built in variable that stores this information for us which is ${EXTEN}. We want to pass alone the phone number but not the leading 9, so to strip that off we use ${EXTEN:1}. The 1 says to start with the second number that was dialed. This is position one of the variable. That is a bit confusing but the positions of the variable start with zero like this: 012345678 so position 0 would be the leading 9 and position 1 is the first digit of our local phone number.
Now we should have enough information to update our dialplan.
[outbound-local]
exten => _9NXXXXXX,1,Dial(${OUTBOUNDTRUNK}/${EXTEN:1})
exten => _9NXXXXXX,n,Congestion()
exten => _9NXXXXXX,n,Hangup()
exten => 911,1,Dial(${OUTBOUNDTRUNK}/911)
exten => 9911,1,Dial(${OUTBOUNDTRUNK}/911)
Here we are going to match any local phone number and dial out using our outbound device (Cisco 1760). If this fails for some reason the next step is Congestion(), which play a fast busy tone, and the last step is to hang up the line.
Also we have the options for dialing 911 configured. This is set to work with or without dialing 9 first for an outside line (someone in an emergency might for get to dial 9 first).
Remember that ignorepat is this section of the book does not work with our Cisco phones and you have to use the DIALTEMPLATE file to keep dial tone after pressing 9 (see Asterisk PBX System Install - 05 Cisco SIP Phone)
Our outbound dialing has it’s own context [outbound-local]. Remember contexts are separate from each other. We want our internal users to be able to use this [outbound-loca] context so we need to include it in our [internal] context.
[internal]
include => outbound-local
Time to reload the dialplan.
#asterisk –r
>dialplan reload
Now with these changes we should be able to make an outbound call.
You can also add long distance and 800 number dialing by adding a context like:
[outbound-long-distance]
exten => _91NXXNXXXXXX,1,Dial(${OUTBOUNDTRUNK}/${EXTEN:1})
exten => _91NXXNXXXXXX,n,Congestion()
exten => _91NXXNXXXXXX,n,Hangup()
Remember to include it in the internal context as well.
Next time Voicemail
Asterisk PBX System Install - 09 Voicemail Macros
Asterisk PBX Install - Index
Tuesday, April 28, 2009
Asterisk PBX System Install - 07 External Line
Issue:
Configure our Cisco 1760 router to connect inbond phone calls.
Quick/Visual/Learning:
Now to configure the Call router
Using a Cisco 1760 with 2 - 2 port FXO cards (For up to 4 analog phone lines)
Note there are 4 slots on the router and we have some 4 port cards. I assume that we could have up to 16 total phone lines connected to the router in that configuration.
For now I am just going to see if I can get one line working.
Router ip address in this case 172.17.2.1
One of the first problems I had was that as I was looking for help I saw some posts that I needed to configure the router like this:
voice service voip
allow-connections sip to sip
The Problem is allow-connections sip to sip was not an option on my router. It turns out I needed to update my router ios to something above version 12.4.15.T
I got 12.4.15.T.8 which requires 128 RAM and 32 Flash
You should be able to see all this informaiton about your router using command:
> show version
See January 23 post on loading IOS
Below are the bits of my router configuration associated with the voice connection.
An easy way to get these on your router is to enter config t mode on the router and copy the commands right into the command window. You may want to copy them a bit at a time instead of all at once so you can see if any errors show up.
I do not claim to be an expert on routing calls over the Cisco 1760 router. Below is what I came up with and it seems to work. If anyone has insight into what is or is not needed please feel free to submit a comment to this post. I put a few comments below to explain some of what I think is going one with this configuration.
This link was very useful in my testing.
-------------------------------------------------
voice call carrier capacity active
voice rtp send-recv
!
(I had to upgrade my IOS to get the sip to sip options you see below)
voice service voip
allow-connections h323 to sip
allow-connections sip to h323
allow-connections sip to sip
sip
bind control source-interface FastEthernet0/0
bind media source-interface FastEthernet0/0
no call service stop
!
!
voice statistics type csr
!
!
dial-control-mib retain-timer 180
dial-control-mib max-size 250
archive
log config
hidekeys
!
!
(below is the ip address of my Ethernet port on the 172.17.x.x subnet going over to the Cisco switch)
interface FastEthernet0/0
description Voice
ip address 172.17.2.1 255.255.0.0
speed 100
full-duplex
!
!
(connection plar 401 is the extension on the Asterisk server where the router will connect. The description is not needed but is here to remind us that 555.765.2211 is the number of the outside line that we are going to connect to the router. )
voice-port 0/0
input gain 6
output attenuation 0
echo-cancel erl worst-case 0
no vad
no comfort-noise
timing hookflash-out 50
connection plar 401
impedance complex2
description 555.765.2211
station-id name External Caller
station-id number 2211
!
!
dial-peer cor custom
!
!
!
(400 seem to be just an assigned number and I don’t think it matters which you use. Pattern 4.. means that I will be connection to a 3 digit extension starting with a 4. Target ip is the ip of my Asterisk server 172.17.1.31 and 5060 is the standard SIP port. Codec g711ulaw is the same ulaw protocol that we well be setting on Asterisk.)
dial-peer voice 400 voip
destination-pattern 4..
session protocol sipv2
session target ipv4:172.17.1.31:5060
session transport udp
incoming called-number .
dtmf-relay sip-notify rtp-nte
codec g711ulaw
no vad
!
(Distnation .T matches all numbers and is used for outbound calls)
dial-peer voice 100 pots
destination-pattern .T
port 0/0
forward-digits all
!
gateway
timer receive-rtp 1200
!
(sip-server below points to our Asterisk pbx)
sip-ua
retry invite 3
retry response 3
retry bye 3
retry cancel 3
timers trying 1000
sip-server ipv4:172.17.1.31
!
!
telephony-service
fxo hook-flash
max-conferences 4 gain -6
transfer-system full-blind
transfer-pattern ....
!
----------------------------------------------
On the Asterisk server we have to configure the sip.conf file to allow the 1760 router to connect over sip.
#vi sip.conf
i
[general]
[Cisco1760]
context=incoming_calls
type=friend
host=172.17.2.1
dtmfmode=rfc2833
disallow=all
allow=ulaw
insecure=very
[207]
context=internal
type=friend
disallow=all
allow=ulaw
host=dynamic
Esc-Key
:wq
You see above the new section added to the sip.conf file for the Cisco router. The section name "cisco1760" was just a name I picked. The context is different (incoming_calls not the context of internal we used on the phones) so that will need to be configured in the extensions.conf file. This keeps incoming calls separate from our internal phones. There are security reasons for doing it this way. Friend says we can send and receive calls, dtmfmode=rfc2833 allows key tones to get through, Host points to the ip address of the router and it is configured for ulaw which is the same as the router. The line insecure=very is important and needs to be there from what I read.
disallow all does not allow any codecs except for the one we specifically allow which is ulaw.
In extensions.conf we need to configure the incoming_calls context.
[globals]
[general]
[default]
[incoming_calls]
exten => 401,1,Answer
exten => 401,n,Background(main-menu)
exten => 401,n,WaitExten(15)
exten => 1,1,Dial(SIP/207,15)
exten => i,1,Playback(pbx-invalid)
exten => i,n,Goto(incoming_calls,401,1)
exten => t,1,Playback(vm-goodby)
exten => t,n,Hangup()
[internal]
exten => 401,1,Answer
exten => 401,n,Playback(tt-weasels)
exten => 401,n,Hangup()
[phones]
include => internal
Under incoming_calls I added extension 401 and it looks a lot like the 401 under the internal context but they are not the same. Incoming_call and internal contexts are completely separate areas of the dial plan. The calling plan defined under incoming_calls does not communicate with the plan under the internal context. So what does this do?
When the router connects to the Asterisk server as a sip device it is assigned to the incoming_calls context. The router then connects on extension 401 because that is what we configured it to do on the router configuration. The 401 extension program under the incoming_ calls context runs and answers the line. It will play back a message that says “Main Menu” and then it waits 15 seconds for someone to enter a number. It does not tell them what number to press because we have not set that part up yet. This is the bare beginnings of setting up a phone tree for routing calls. Looking at the dial plan you can see that extension 1 has been configured. If 1 is dialed during the waiting period the sip device 207 will be called and connected.
The other 2 extensions in the section are there to help in testing. The i extension is for invalid entries. This message gets played if someone enters a number for an undefined or invalid extension. The t extension is the time out action and just hangs up if no numbers are entered in the allotted time.
So we can use this to test by calling in from somewhere (cell phone maybe) on our outside line 555-765-2211 (of course this is not the real number I am using). I hear the “Main Menu” message. I dial 1 and the 207 phone on my desk rings and I can pick it up and talk pretty cool when you get that working for the first time.
Next time we will get outbound calls working
Asterisk PBX System Install - 08 Outbound Calls
Asterisk PBX Install - Index
Friday, April 24, 2009
Asterisk PBX System Install - 06 Two SIP Phones
Issue:
The goal for today is to be able to call another extension on the Asterisk server and talk to someone.
Quick/Visual/Learning:
The goal to have a phone connect to Asterisk and have Asterisk respond should have been accomplished last time.
The new goal is to have two ip phones talking to each other.
We well need a second IP phone configured for SIP.
This should be pretty easy since we got everything in place already in the last post.
Plug in the phone and get the MAC Address of the phone
Copy the MAC Address specific file we created last time (my example SIP000d28f35928.cnf)
Edit the copy to configure the names of the phone to be the new extension name (example replace 207 with 222)
Rename the copy to match the MAC Address of the new phone SIPXXXXXXXXXXXX.cnf (Replace Xs with MAC Address)
Now the phone should come up with SIP loaded and the correct extension name (example 222).
Just to test you may want to look at the ip address on the phone and verify that the Asterisk server can ping that address as we did last time.
Now the task is to configure Asterisk so the phones can call each other.
We need to change the sip.conf file to allow the new phone 222 to connect to Asterisk. These files are in the /etc/asterisk directory. Using vi to edit sip.conf we see the contents of the file on the screen. Get into the insert mode and add the same text for 222 as we have for 207
#vi sip.conf
i
[general]
[207]
context=internal
type=friend
disallow=all
allow=ulaw
host=dynamic
[222]
context=internal
type=friend
disallow=all
allow=ulaw
host=dynamic
Esc-Key
:wq
Connect to the Asterisk console and run the command
#asterisk -r
>sip reload
This loads our changes to the sip file. I am now able to dial extension 401 on the extension 222 phone and here the weasels message played but I still cannot dial the other phone extension because it has not been added to the extensions.conf file yet.
This is a good time to talk a bit more about the Dialplan (extensions.conf) file.
When you create an extension for a phone in the extensions.conf file you are creating a program that runs when the extension is called. Each step for our 207 example extension is defined like this:
exten => 207
The first step is always number 1 (must be labeled this way). You could number the next step 2 but instead you can use n for all the steps after 1 and Asterisk will just do them in order. That way you can move things around without having to renumber everything.
exten=>207,1
Next comes the action or program to be performed (Answer the call in this case) :
exten=>207,1,Answer()
Answer does not require any extra information to work. When we dial the extension in this case we do not want Asterisk to Answer we want it to connect us to another phone we are dialing. You do this with the Dial() application and that does require more information.
Inside the parenthasis be can put up to 4 arguments.
Dial(Destination, timeout, option, URL)
All we are going to use is a destination and a timeout.
exten=>207,1,Dial(SIP/207,15)
This tells asterisk to ring the sip phone 207 that is defined in our sip.conf file for 15 seconds. If no one answers the phone the next step will be to hangup the line. (Later we will look at things like voicemail.)
Now lets update our extensions.conf file.
Get out of Asterisk console
>exit
Edit the extensions.conf file and add the phone extensions as you see below in the internal context (section) of the file.
#vi extensions.conf
[globals]
[general]
[default]
[incoming_calls]
[internal]
exten => 207,1,Dial(SIP/207,10)
exten => 207,n,Hangup()
exten => 222,1,Dial(SIP/222,10)
exten => 222,n,Hangup()
exten => 401,1,Answer()
exten => 401,n,Playback(tt-weasels)
exten=> 401,n,Hangup()
[phones]
include => internal
Esc-Key
:wq
Now reload this configuration in Asterisk. Go to the Asterisk console prompt and issue the command dialplan reload.
>dialplan reload
Since we have verbose turned on you should see the plan load with no error messages. These changes tell Asterisk what to do when the phone extension is dialed. When you pick up the phone on 222 and dial 207 Asterisk will connect or dial the SIP device 207 we created in the sip.conf file and complete the call connection. The same thing will happen if we pick up the 207 phone and call 222.
Next time we will look at connecting to an external phone line.
Asterisk PBX System Install - 07 External Line
Asterisk PBX Install - Index
Tuesday, April 21, 2009
Asterisk PBX System Install - 05 Cisco SIP Phone
Issue:
We have Cisco phones and need to load the SIP protocol on them and test Asterisk.
Quick/Visual/Learning:
The Cisco phones come loaded with the Cisco proprietary SKINNY protocol loaded. Asterisk apparently does support SKINNY but has better support for SIP. To load SIP on the phone we need to get the SIP files and use a TFTP server to load them.
Here is a link to information that may be helpful if you have problems.
Another good link. And antoher.
If you have access to Cisco support you can get the sip files from them. I got my files from a phone vendor when we were looking at converting our phones over to another sip based phone system.
Once SIP is loaded you are not required to have the TFTP server as you can manually configure the phone but TFTP and DHCP can help to automate the process where there are a lot of changes going on.
For the TFTP server I am going to use TFTPD32, which is an open source TFTP server that runs on windows. It is very easy to use and includes a DHCP server, which allow you to automatically configure the TFTP server settings. You can download it here
Note - If you want to run it all on the Linux CentOS box you can look in the book in chapter 4. There is a section on configuring Cisco 7960 Telephone that tells you how to install and configure a tftp-server. Remember to put the MAC addresses in ALL CAPS.cnf
I will load my downloaded TFTP server on a laptop and plug both the phone and the laptop running TFTP server into my test switch that is not on the network.
OK after you have downloaded the TFTP and put it on a windows machine it is time to configure it. Run the install program. Click Next
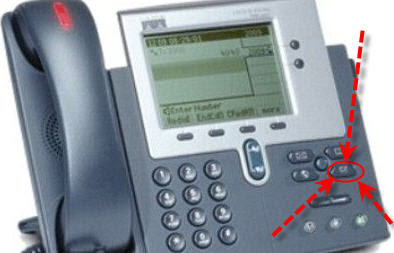
This will bring up a setting screen.
Select the Network Configuration option and scroll down to see the MAC Address of the phone and write it down. It will be a 12 digit hexadecimal number that looks like this example here – 000d:28f3:5928
Now we need to configure a configuration file for the Phone:
Using Notepad create a file in this format: SIPMacAddress.cnf
For my example the file will be called SIP000d28f35928.cnf (SIP and address without the colons)
Note here that windows thinks that files that end in .cnf are SpeedDial files and you can not open them by browsing to them in Windows Explorer and opening them. You need to open notepad first and select to see all files and pick the .cnf file that way. Very annoying.
When you save these files in Notepad the first time put the name in "" otherwise it may save as a .txt file which is not what we want. I know, what a pain, if you have a better editor handy feel free to use that one instead.
Here is the contents of my SIP000d228f35928.cnf file:
###############
# Line 1 Setting
line1_name:207
line1_shortname:207
line1_displayname:207
line1_authname:207
#line1_password:takeaguess
################
The name 207 has to be the same name that is in my sip.conf file on the Asterisk server (see previous post). I have made all these names the same as the extension of phone 207.
Note that # indicates when a line is just a comment field and right now I have the password commented out for now.
Another text file for the tftp root directory is SIPDefault.cnf and here is what is contains:
###########################
#Image Version
image_version:POS3-07-5-00 ;
#Proxy Server (this is the ip address of our Asterisk server)
proxy1_address: 172.17.1.31
#Message button assignment to extension 500
messagees_uri: “500”
#Time server ip and time zone settings
sntp_server: 172.22.1.30
time_zone: PST
#Template for phone dialing plan
dial_template: DIALPLAN
###################################
Here is a link to information about what you can put in the SIPDefault.cnf file
While we are at it, another text file to be configured is the DIALPLAN.xml file. This is the file that you see in the dial_template entry above. I still have problems putting code in the blog sometimes so here is a picture of the text in the DIALPLAN.xml file:
We have Cisco phones and need to load the SIP protocol on them and test Asterisk.
Quick/Visual/Learning:
The Cisco phones come loaded with the Cisco proprietary SKINNY protocol loaded. Asterisk apparently does support SKINNY but has better support for SIP. To load SIP on the phone we need to get the SIP files and use a TFTP server to load them.
Here is a link to information that may be helpful if you have problems.
Another good link. And antoher.
If you have access to Cisco support you can get the sip files from them. I got my files from a phone vendor when we were looking at converting our phones over to another sip based phone system.
Once SIP is loaded you are not required to have the TFTP server as you can manually configure the phone but TFTP and DHCP can help to automate the process where there are a lot of changes going on.
For the TFTP server I am going to use TFTPD32, which is an open source TFTP server that runs on windows. It is very easy to use and includes a DHCP server, which allow you to automatically configure the TFTP server settings. You can download it here
Note - If you want to run it all on the Linux CentOS box you can look in the book in chapter 4. There is a section on configuring Cisco 7960 Telephone that tells you how to install and configure a tftp-server. Remember to put the MAC addresses in ALL CAPS.cnf
I will load my downloaded TFTP server on a laptop and plug both the phone and the laptop running TFTP server into my test switch that is not on the network.
OK after you have downloaded the TFTP and put it on a windows machine it is time to configure it. Run the install program. Click Next
 Except the default TFTP directory location (or change it if you like). Click Install
 When it completes click close.
Put SIP configuration files from Cisco in the TFTP server directory (c:\program files\tftpd32 in my case).
The files I am putting in there from Cisco are (not sure if they are all needed):
P003-07-5-00.bin
P003-07-5-00.sbn
P0S3-07-5-00.bin
P0S3-07-5-00.loads
P0S3-07-5-00.sb2
Start the TFTP server.
In my case I go the start menu and start the TFTPD32 application.
On the TFTP Server Tab I can see the interface and it should be on the same subnet as your Asterisk Server (my example 172.17.X.X).
On the DHCP tab I give it a starting address to hand out to the phones and a pool size. I set it to 10 in this case.
Another important thing to notice here is in the Additional Option settings. Option 66 is the DHCP option that assigns a default tftp server. Here I set the default tftp server to be this one that I am configuring. The window is not big enough to show the whole IP address but it is the same as what is above in the server interface window. This is what tells the phone where to go to find the new configuration files so this is quite important.
At the bottom of the screen click on the setting button. Uncheck the DHCP box to “Ping Address before assignment”. This seems to cause a strange issue where DHCP fills up with requests from the MAC address 46-46-3A-46-46-3A (46:46:3A:46:46:3A 46463A46463A). I think this may be a bug with TFTPD32.
Click on the save button and leave the server up and running.
There are a couple of files that I need to create as well with a text editor (I will use notepad). These text files go into the root of the TFTP server directory as well.
First I need to get the hard coded address of the phone I will be configuring.
Plug an Ethernet cable into the 10/100 sw port on the back of the phone (if you use the wrong port it will not power up). Plug the phone into the Cisco switch. The switch provides power over Ethernet (POE) to power up the phone. Once the screen comes on you will see it trying to configure itself (never ending loop). Press the button with a check mark inside a square on it. See the picture below which points out the button.

This will bring up a setting screen.
Select the Network Configuration option and scroll down to see the MAC Address of the phone and write it down. It will be a 12 digit hexadecimal number that looks like this example here – 000d:28f3:5928
Now we need to configure a configuration file for the Phone:
Using Notepad create a file in this format: SIPMacAddress.cnf
For my example the file will be called SIP000d28f35928.cnf (SIP and address without the colons)
Note here that windows thinks that files that end in .cnf are SpeedDial files and you can not open them by browsing to them in Windows Explorer and opening them. You need to open notepad first and select to see all files and pick the .cnf file that way. Very annoying.
When you save these files in Notepad the first time put the name in "" otherwise it may save as a .txt file which is not what we want. I know, what a pain, if you have a better editor handy feel free to use that one instead.
Here is the contents of my SIP000d228f35928.cnf file:
###############
# Line 1 Setting
line1_name:207
line1_shortname:207
line1_displayname:207
line1_authname:207
#line1_password:takeaguess
################
The name 207 has to be the same name that is in my sip.conf file on the Asterisk server (see previous post). I have made all these names the same as the extension of phone 207.
Note that # indicates when a line is just a comment field and right now I have the password commented out for now.
Another text file for the tftp root directory is SIPDefault.cnf and here is what is contains:
###########################
#Image Version
image_version:POS3-07-5-00 ;
#Proxy Server (this is the ip address of our Asterisk server)
proxy1_address: 172.17.1.31
#Message button assignment to extension 500
messagees_uri: “500”
#Time server ip and time zone settings
sntp_server: 172.22.1.30
time_zone: PST
#Template for phone dialing plan
dial_template: DIALPLAN
###################################
Here is a link to information about what you can put in the SIPDefault.cnf file
While we are at it, another text file to be configured is the DIALPLAN.xml file. This is the file that you see in the dial_template entry above. I still have problems putting code in the blog sometimes so here is a picture of the text in the DIALPLAN.xml file:

Update:
I found out that dial tone is provided by the SIP phone and n0t by Asterisk so you can not use ignorpat => 9 (as mentioned in the book) to keep the dial tone after pressing 9. To get dial tone to continue after pressing 9 you need to add a coma after the nine in this DIALPLAN.xml file:
"9,1.........."TIMEOUT="0" /
"9,......."TIMEOUT="0" /
Without this file the phone will wait a long time before trying to dial the numbers you enter.
This xml file tells the phone to not wait before dialing a 3-digit extension starting with a 2.
Also does not wait on 500, which will be our voicemail number, and numbers that we will later use for dialing outside numbers.
This gets saved into the root of our TFTP server as well.
One last file that needs to be there is a very small text file called "OS79XX.txt". The name should be just as you see it. OS79 followed by 2 Xs .txt.
In that file is a single line:
P003-07-5-00
This tells the phone what version of the .bin and .sbn files to load.
With the TFTP server running and plugged into my Cisco switch, I again plug my phone into the Cisco switch.
Now the phone configures itself. It takes a couple minutes so be patient but it should now load SIP.
When it is done the screen will display the name of the phone and SIP in the upper right corner (example 207SIP)
You can press the CheckMark button you used above and check that it is configured correctly.
Under Network Setup:
DHCP server should point to the one running on our tftp server (example 172.17.1.40)
IP Address should be in the range we assigned to the DHCP server pool above. (example 172.17.1.50)
Mask should be what was set on the DHCP server (example 255.255.0.0)
And the TFTP server should point to the one we configured. (example 172.17.1.40)
On phone as well we can get out of network configuration and look at SIP Configuration and should see under Line 1 Settings:
Names are all set to be the extension (example 207)
Proxy Address is pointing to our Asterisk server (example 172.17.1.31)
Note if you need or want to change any of the settings on the phone manually you will first need to unlock it. Press the check button, and scroll down to the bottom and select "Unlock Config". Use the phone keys to enter the password which is the word cisco.
With skinny loaded on the phone the proceedure is:
Enter the Settings Menu
Select Network Configuration
Enter **# to unlock configuration
Make changes
Enter **# to lock
With all the parts running and plugged into the switch:
-Asterisk server
-Phone
-TFTP Server
Make sure that the devices can see each other.
On the Asterisk server ping the phone using the ip address you saw in the configuration (from the DHCP server)
Using my example
#ping 172.17.1.50
You should see reply messages start to scroll up the screen.
If you see Destination unreachable messages scroll up the screen then asterisk cannot see the phone yet. Verify that Asterisk is on the switch and maybe restart the network services on the server as was discussed in the previous post.
Use CNTRL-C keys to break out of the ping
If the pings worked you should now be able to call extension 401 from the phone. 401 will not dial right away because we did not set that one up in the DIALPLAN.xml file above. If you wait long enough it will dial or you can press the DIAL soft button (third one from the left at the bottom of the phone display).
If all is working Asterisk should playback a message that “weasels have eaten the phone system”. If you got that then congratulations everything is working so far.
Next time we will work on the Asterisk configuration some more.
Asterisk PBX System Install - 06 Two SIP Phones
Asterisk PBX Install - Index
Subscribe to:
Posts (Atom)