Showing posts with label Exchange. Show all posts

Tuesday, June 2, 2009

Exchange 2003 Non-Delivery Reports

Issue:
About a year ago (2008) we were getting NDRs because our reverse DNS (RDNS) PTR was not set correctly but we fixed that. Recently our users started getting NDRs of various types again but it is not the reverse pointer this time.


Quick:
Fix FQDN on the SMTP Virtual Server.

Visual:


Learning:
We starting getting a number of different NDR errors and I assume this is because of companies tightening up on thier SPAM filtering.

Errors included:

The following recipient(s) could not be reached:
FOLLOWED BY EMAIL ADDRESS THAT IT FAILED TO SEND TO AND ONE OF THE FOLLOWING REASONS:

You do not have permission to send to this recipient. For assistance, contact your system administrator.
FOLLOWED BY DIFFERENT MESSAGES LIKE:
-Helo command rejected: Host not found
-Client host rejected: cannot find your reverse hostname
-Requested action not taken: message refused
-ETC.

We send email out as:
userName at OurExternalDnsName.com
Our mail server connects as:
InternalDomainName.com

The thought was that perhaps the receiving servers were trying to validate the Internal Domain Name and failing. I changed the name that the SMTP Virtual server connects with and that solved the problem.

See visual above:
In Exchange System Manager
Select the Default SMTP Virtual Server and right click for properties
Select the Delivery Tab and the Advanced button
Change the Fully Qualified Domain Name to the External DNS name for your mail server.

Friday, March 13, 2009

Organizational Forms Library Setup

Issue: You have an Outlook form and you want to publish it on the Exchange server. Before you can do this for the first time, you must setup the Organizational Forms Library on the server.

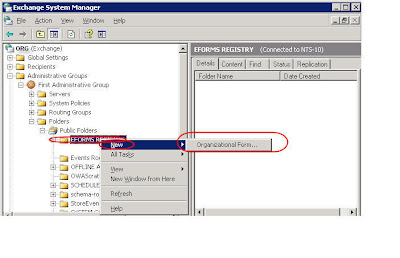
Quick: In ESM / Public /Folders (view system folders); Eforms Registry / New / Create Folder

Visual:


Learning:
In order to install forms you need to setup an Orgainzational Form Library in the Exchange server. This is something that you only need to do once. In fact you can only create one library for each language. After it is created the library you can add as many forms as you like.

You also need to give permissons to people who need to add forms to the library.

This Microsoft link explains how to Create the Folders. Somtimes links change so I have also pasted in the text down below. (Skip Down To See How To Add Permissions)
-----------Text form link -----------------
To create an Organizational Forms Library in Exchange Server 2003, follow these steps:
1. Click Start, point to All Programs, click Microsoft Exchange, and then click System Manager.

2. Expand Folders, and then click Public Folders.

3. On the System Manager toolbar, click the Action menu, and then click View System Folders.

4. In the left pane, right-click EForms Registry, point to New, and then click organization form.

5. In the Name box, type the name of the folder.

6.Under E-forms language, click to select the appropriate language.

To create copies of the Organizational Forms Library on other servers, click the Replication tab, and then type the name of server that you want to contain the copy of the Organizational Forms Library.

Note An Organizational Forms Library is a special type of public folder that is listed only with system folders. You can have only one Organizational Forms Library for each language per organization.

To set storage limits for an Organizational Forms Library, click the Limits tab. To create a description of an Organizational Forms Library, click the Details tab. To set permissions for each user, click the Permissions tab.
-------------End Text form link ---------------------

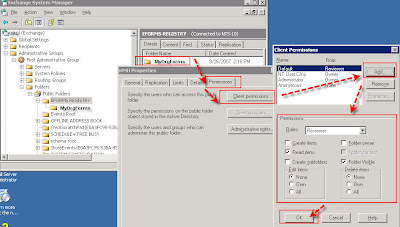
For permissions you will want everyone to be able to open the forms but only certian people should be able to install new forms.


Right click on the new Forms folder.
Click on the permissions tab.
Click Client permissions button
Set the default to Reviewer
Add users who need to add forms with rights that allow them to Create items. You can pick a preconfigured role from the drop down list or add individual rights using the check boxes and radial buttons.

Note if you get the error:
"The token supplied to the function is invalid" when trying to get to the folders then you need to turn off "Require secure channel (SSL)" in IIS for Exchadmin folder"

Wednesday, January 14, 2009

Removing the first Exchange Server 2003

Issue:
Avoiding problems when removing an Exchange server.

Quick:
Move system folders like (calendar free/busy information)
Rehome the Organizational Forms Folder
Move Public Folders
Move Offline Address list function
Re-Home RUS
Move Routing Group Master function
Move any other connectors
Move Mailboxes
Wait for some time to verify all is well
Uninstall Exchange using Installation Wizard

Visual/Learning:
Links to detailed information
Microsoft KB
MsExchange.Org Tutorial

Friday, December 26, 2008

Outlook Contacts Vcard SMTP Address

Issue:
You want to create a Vcard from your personal information contact entry to send in your signature but your Exchange server keeps validating and replacing your email address with your name underlined. Clicking the name shows your active directory Information.


Quick:
Type a bogus email address, click off the field, edit the field.

Visual/Learning:
Here is the problem.
You open a contact entry for yourself in outlook so you can create a Vcard.
You type your valid email address in the email field.

Because you have a Microsoft Exchange server your name get authenticated by active directory and your email address changes to your user account name. If you click on it you see you active directory information and the email information is in the exchange format EX. If you send this out as a Vcard the email address will be invalid.
To fix this edit the email field and put some non-existing bogas email address in that field.
Now click off of the field and that bogas address will get underlined. See below.


If you double click on this bogus address you get a properties box and you can edit it with the correct address.

Now with the correct information click on OK


Your contact email field now has the correct information that you can now use to create a Vcard.


Link on How To Use The Vcard Feature In Outlook
---Text from Link---
How to create a vCard
Use the following steps to create a vCard:
-In a Contact folder, click to select the contact for which you want a vCard.
-On the File menu, click Save As.
-In the Save file as type box, click to select VCARD Files (*.vcf).
-In the Save In box, select the folder where you want to save the vCard file, and then click Save.
-This creates a vCard file with the same name as that of the Contact.

How to distribute a vCard
You can distribute a vCard file as you distribute any other computer file.
To do this:
-Open a new message and address it to the recipient.
-On the Insert menu, click File.
-Click to select a vCard (.vcf) file, and then click OK.
NOTE: If you want to include Notes with your vCard, you must insert the .vcf file. If the .vcf is attached to your signature, the Notes field (and other fields) are removed prior from the vCard.

How to automatically process a vCard
With Outlook, you can automatically convert a vCard that was received from an external source to an Outlook Contact record. If the vCard arrives as an e-mail attachment, you can double-click the vCard attachment and then click Save And Close to add it to your default Contact folder. Alternatively, you can create a Contact from a vCard by dragging it to the Contacts folder.

NOTE: If the vCard icon appears as a generic Windows icon, it does not open when you double-click the icon, or you may receive an Open With prompt because the vCard File program is not associated with the .vcf file type.

If you receive the vCard in the form of a file on a disk, you can import it into your default Contact folder by using the Outlook "Import and Export Wizard." To do this, follow these steps:
-On the File menu, click Import And Export.
-Click to select the Import a vCard file (*.vcf) check box, and then click Next.
-Click to select the vCard file, and then click Open.
The vCard data is used to create a Contact record in your default Contacts folder.

How to store a vCard in a secondary contacts folder
If you import a vCard file, or if you open and then save a vCard file, it is placed directly into your default Contacts folder in the default message store.

To store the vCard in a Contacts folder other than the default, you can drag the vCard file to the secondary folder or first import it into the default Contacts folder, and copy it to the secondary folder.

How to include a vCard with your automatic signature
To do this, follow these steps:
-On the Tools menu, click Options.
-On the Mail Format tab, click Signatures.
-Click New to add a new signature.
-Enter a name for your signature, and then click Next.
-Type the desired signature information in the text window.
-In Microsoft Office Outlook 2003 and in earlier versions of Outlook, click New vCard from Contact.

In Microsoft Office Outlook 2007, click Business Card, select the contact that you want to add, and then click OK three times.
In the Show Names from the box, select Contacts or another address list.
Click to select the entry for which you want to create a vCard, click OK, click Finish, and then click OK to complete the signature entry.
Note If your vCard contains Notes, UserDefined fields, or Outlook-specific fields, these values are stripped from the vCard that is included with the signature. The Signature Picker specifically includes only those fields in a Contact that are essential to the definition of a vCard.
---End Text From Link

Monday, November 24, 2008

Exchange - Delete Mailbox

Issue:

Deleting an Exchange mailbox but keeping the network account.

Quick:

Open AD Users and Computers, Select User, Exchange Tasks, Delete Mailbox

Visual/Learning:

Right click on the users and select Exchange Tasks

Wizard opens, click next

Select Delete Mailbox and click Next

Click Next

Click finsihed and your done.

Monday, November 17, 2008

Import Exchange GAL To Contacts - 3

Issue:
Import contact data into Outlook from Excel.

Open Outlook to import the data. Select the contacts folder, File menu, select “Import and Export”.

Select “import from another program” and click Next

Select Microsoft Excel

Select the Excel file to import and click next

Select the target contact folder


Click on the button to “Map Custom Fields”

Below is a short movie on how to map your fields from the spreadsheet. You just need to drag and drop them over.


Click OK and Finished and the data get imported.


Now if you have a mobile device that synchronizes with your contacts list it will show up on your phone.

Friday, November 14, 2008

Import Exchange GAL To Contact - 2

Issue:
Need to cleanup the Global Address List data for import to Outlook contacts.


Quick/Visual/Learning:
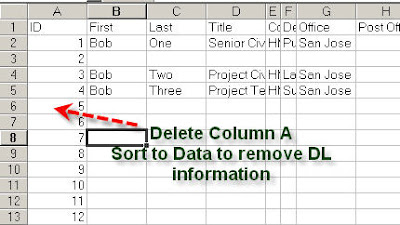
Open the Excel sheet and delete the unneeded column A with the database ID fields. Sort and clean up the data so you have only the entries you are interested in.


Here I have 5 example users after doing the sorting and deleting


Now I need to fix the email address field. The addresses here are in the format that Exchange server understands, but for my contact list I want the SMTP addresses in the format of User@CompanyName.com. I use a formula in Excel to fix these. I know that all my users email addresses are equal to their alias (first initial and last name) at MyCompanyName.com. I over write the address field with the formula =w2 & “@mycompany.com”. W2 is the field that has the alias and & tacks on the text for the “at company name” part of the address.


Like magic the formula builds my email address for me. Now I can copy this field down the sheet and it will generate the addresses for all my users.


Paste into the cells below


More magic, there they all are.


Delete any unneeded fields like E-Mail type.


Save changes to the spreadsheet.

Next posting will show how to import the data to Outlook

Import Exchange GAL To Contacts - 3


Monday, November 10, 2008

Import Exchange GAL To Contacts - 1

Issue:
Blackberry import of GAL Contacts. While you can do a lookup on the Exchange server global address list, some users wanted to have GAL directly on a Blackberry phone contact list for convenience.

Quick:
Export using Access, Export to Excel, Fix Fields, Import to Outlook


Visual/Learning:
Open Microsoft Access and create a blank database.
Under File select “Get External Data”Select Import

Select the file Type of Exchange()

In the wizard select “Global Address List”


Select to create a New Table and click Finished

Now you see the Global Address List as a new table.

Click on it to open

Here you see users along with distribution lists. Our distribution lists do not have First and Last names or Titles so you see that these fields are blank This is handy because we can later do a sort to remove these if we want.

On the file menu select Export

Select one of the Excel formats in the drop down file type box and save the file to a Excel sheet.


Posting 2 will show how to clean up the address list in Excel

Wednesday, October 29, 2008

Add Mail Domain 2 - Telnet Testing

Issue:
Verifying that mail is working on your new email domain using telnet to port 25

Quick/Visual/Learning:
You probably do not have mx records pointed at your mail server for the new domain so use the telnet command to test connectivity with the mail server.

At a command prompt type:
telnet
set local_echo
open ServerNameOrIpAddress 25 (response 220 site.company.com....)

This puts you in a telnet session. Turning on local echo allows you to see what you are typing. If you have never had the experience; you can get connected to a telnet session and have all your typed text be invisible (not displayed on the screen). Everything still works but it makes the job more difficult. After the open command you are connected to your mail server and sending mail commands just as if it were coming from an outside mail server. If you make a mistake typing just hit enter and start over on that command, as backspaces are not understood.
FYI- if you need to break out of the telnet session with the mail server use the control right bracket key sequence to get out. "CNTL-]" this will dump you back to the telnet window where you can use the "open or o" command to try again.

Continue on with the following commands (you should see responses from the server):

ehlo test.com (response 250 OK)
mail from:YourValidMailAccount@Company.com (response 250 OK - MAIL FROM ...)
rcpt to:YourAccount@NewMailDomainName.com (response 250 OK - Recipient ...)

Use ehlo or helo to tell the server what server is trying to connect. Use a valid address for the "mail from" part so that if it does not work you should get a bounce message back to your mailbox. The rcpt to: part is where you put the address of your mailbox using the new email domain name you are trying to test.
The next command is the word "data" on a line by itself:

data (response 354 Send data...)

No responses will come for the following commands
From: "Bob Example" <bob@example.org>
To: Alice Example <alice@example.com>
Cc: theboss@example.com
Date: Tue, 15 Jan 2008 16:02:43 -0500
Subject: Test message
Body of test message
. (period and enter key on blank line - response 250 OK)
Quit (response 221 closing connection)


OK, you do not need the lines From:, To:, Cc:, and Date:
For a quick test message I usually just put the line -> Subject:test
Next you have to put a period on a line all by itself (this signals the end of the message)
Type quit on the next line to end the session and the message should get sent.

If this all works you should be OK as long as outside mail server can connect to your smtp mail server. You just need to have you MX records for the mail domain pointed at your server so that mail can come in from outside.

Here is a link to some information about MX records.

Thursday, October 23, 2008

Add Mail Domain 1 - Update Mailboxes

Issue:
Company re-branding requires change to MS Exchange email addresses.

Quick:
Add domain name to users with recipient Policy.

Visual/Learning:
In Exchange System Manager, Select Recipient Policies, right click on "Default Policy" and select properties. Click New... button to add a new address. In this case I added an SMTP address "@a-test.com". Check the box next to the new address and click OK to apply the change.
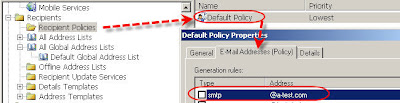


After changing the policy right click it and select "Apply this Policy Now"
You can force the changes by doing an update. Navigate to the "Recipient Update Service", right click on Recipient Update Service for your domain. Select "Update Now"


You may need to wait 20 minutes or so before you will be able to send mail using the new domain name.

Go To - Add Mail Domain 2

Thursday, October 9, 2008

Can Not Save To Contact Public Folder

Issue:
You have created a public folder for company contact information but are unable to create a distribution list in the folder. (or perhaps drag contact to the folder).
Error messages:
"The item could not be saved to this folder. The folder has been deleted or moved, or you do not have permission"
or
"Can't move the items. The item could not be moved. It was either already moved or deleted, or access was denied"
Quick: Right click folder => properties => Forms tab => Select "Any Form"

Visual:

Learning:
The error comes about because the folder is set to use "Only Forms listed above". If the folder is set this way you will be unable to create distribution lists in the folder because distribution lists use a form that is different form the custom form specified. Also if you drag a contact from a folder that uses the default contact form to this public folder you will get an error.

Wednesday, October 1, 2008

Exchange Add Hidden Mailbox

Issue:

After hidding an account of a terminated user, I needed to add the account to the managers mailbox for monitoring of business related mail.

Quick:

Use the Legacy Exchange DN from acitive directory.

Visual/Learning:

Normally this would be just a matter of adding rights to the mailbox under AD Users and Computers => Properties => Exchange Advanced Tab => Mailbox Rights... button, and then adding the mailbox to the managers Outlook account under Tools => Email Accounts => "View or change existing email accounts" => Change Button => More Setting button => Advanced Tab => Add button to add the mailbox from the Global Address List (GAL). But when the account is hidden you do not see it in the GAL listing.

You can still add the maibox by using the Legacy Exchange DN from acitive directory. Now how to find out what it is. The sure fire way is to export the information from Active Directory (see below), but you may be able to guess what it is without doing the export.

Guessing method:

First open Exchange Manager and look at the Org name and the Administrative Group name.

Now you should be able to create a text string like you see below. Replace ORG with the name of you Exchange organization. If the administrative group name is different replace that as well. Also put the users alias at the end as shown. You can find the alias in Active Directory Users and Computers on the Exchange General tab.

Now just type of copy that string into the add mailbox window and the account should get added.

If that did not work you can export Active Directory information using the following command on the Exchange Server, where exportfile.ldf is the file you are exporting to and DomainServer is the name of a domain controller on your network.

You may get a lot of stuff in the file depending on the size of your Active Directory, but you should be able to find a legacyExchangeDN for the hidden account that looks like this:

Friday, September 19, 2008

Outlook Forms 15 - Collecting Data

Issue:
Need a good way to get data out of a group of Outlook forms.

Quick:
Install the form and create views based on the form fields. Use copy and paste to move data to a spreed sheet.

Visual/Learning:
After collecting data from users the help desk needs a way to see what each request is about.

First I need to install the form somewhere so that you can get to the fields. In previous post I have published to the Organiztions Forms folder. This time I am going to publish the form in the Personal Forms (which does not require Exchange server).

Open the form and select Tools => Forms => "Publish Form As..."

Select the "Personal Forms Library". Give the form a name and publish it.
I am going to create a seperate folder for all the help desk forms to go into.

Here I have 3 forms that are in the folder. Now I want to change the columns I see in the view.


Click on View => "Current View" => "Define Views"


Copy the Current view and give it a new name.
When I click OK I get a View Summery window. I am going to remove the fields I don't want first.
Now I am going to add fields from the form I created and installed in the personal forms folders. From the drop box pick Forms...
Select "Personal Forms" and pick the HelpDesk form. Click on Add.


Now my "Available fields" shows the fields from my form. I select the ones I want to see in the new view.
I click OK and apply the view and now I see new columns in my view of the HelpDesk folder and I can sort by Severity if I want.
Note that you the radial values have to be setup correctly to see relevant data. If you have problems with this see my previous post http://qvlweb.blogspot.com/2008/08/outlook-forms-5-frames-radials-check.html regarding how to do this.

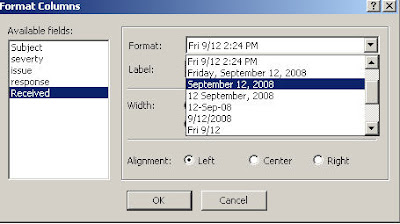
You can also do formating on the columns right in the view. Right click on the heading bar and select "Format Columns..." and you can change the way the date and time looks or rename the column headings.
What if I want to put this data into a spread sheet and take it to a meeting? No problem. Select all of the lines in the view and press cntrl-c to copy.
Open Excel and press cntrl-v to past what you see in this view into the sheet. You should now see the data and you automatically get the heading as well.