Monday, June 22, 2009
Show Hidden Windows Drivers
Quick/Visual/Learning:
Add an environment variable:
Start/MyComputer/RightClick/Properties/Advanced/Environment Variables button
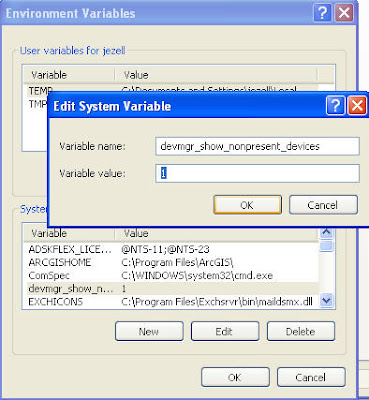
Add a system variable called:
devmgr_show_nonpresent_devices
Set the value to 1
Go to the Device Manager
Start/MyComputer/RightClick/Manage/Device Manager
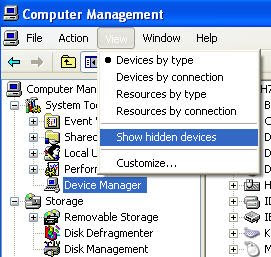
Select the View menu/Show Hidden Devices
You can now see and delete hidden device drivers.
Saturday, June 20, 2009
Hard Disk Recovery
Quick/Visual/Learning:
Here is a link to shareware at Zero Assumption Recovery ZAR and a HowTo.
Wednesday, June 17, 2009
MS Word - Links to Document Sections
You want to create a link in a Microsoft Word document to other areas of the document.
Quick:
Put cursor in area you want to link to, Insert Menu / Bookmark (give bookmark a name) /Add ----Save the document ------ Select text to link to bookmark Insert Menu / Hyperlink / Bookmark button / Select your named bookmark.
Visual/Learning:
In Word put the cursor where you want to jump to.
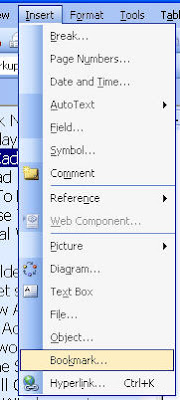
Select the Insert menu
Select Bookmark
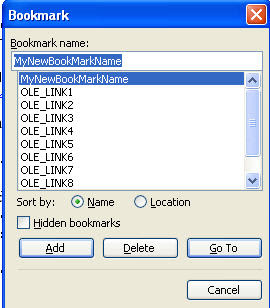
Name the Bookmark
Click on Add Button
Select the text you want to link to your bookmark
Right Click and select Hyperlink
Thursday, June 11, 2009
Asus error "System Failed CPU Test"
On boot get voice error through speakers that says "System Failed CPU Test", repeated over and over.
Quick/Visual/Larning:
Turns out that this error was related to the power supply. Replaced the power supply and a dead system fan that may have been pulling extra juice from the power supply as well.
Friday, June 5, 2009
Google Gadget Map Display
Quick: Use Google Docs spreadsheet to enter data and display map in Google Site gadget.
Visual/Learning:
Getting a Google map to display on a Google site is not as easy as you would think. When you open a Google map there is an option to get code in embed in a web page but these have iframe code that Google sites does not allow. Also just putting in the URL in the Google Gadget does not seem to work.
I found the solution that works quite well for what I needed.
Here are the steps to make it work.
Go to Google Docs and create a new spreadsheet.
Enter the addresses in one column and description in the column to the right of the addresses.
Copy the URL of the spreadsheet.
Go to you Google Sites account and open your site.
Edit the page where you want to put the map.
Click Insert
Under Gadgets select More...
Click on the map gadget
Past in the URL of the Google Docs spreadsheet. You should see a preview in the map config window.
Change size setting and whatever else you want.
Click OK
Now you are done and should see a map on the Google site that has all of your locations marked and you can Pan and Zoom around as well.
Other Links
Other Examples
Another
Asterisk PBX System Install - 12 Install H323
I need to connect Asterisk to my Cisco CallManager 3.51 server to allow for phone migration from one system to the other. Since CCM 3.51 does not support SIP I need to get H323 working on Asterisk.
Quick/Visual/Learning:
I found a good link to get me started: Asterisk Cisco CallManager Integration
Talks about integration using either H323 or SIP. CCM 3.51 only supports h323 so I need to get h323 working on Asterisk.
For H323 I found another link: Compiling Asterisk 1.4 with TDM400 and H323 .
Following along using this guide-
The gcc-g++ was already downloaded in Asterisk PBX System Install - 03 Software, as was the kernel-devel module, but not gnutls-devel so I install that one:
#yum install –y gnutls-devel
It is not talked about here but I got an error later on that pwlib needed the fast lexical analyzer generator. After doing some poking around I discovered that I could load this using yum so I will do that now too:
#yum install –y flex
I am not interested in Google Talk so I skip the iksemel download and I already have the correct version of make that is above version 3.80, so on to the section: “Download and install OpenH323 libraries”
Need to download some source files. I will put these in the same place as my other files.
#cd /usr/src
#wget http://downloads.sourceforge.net/openh323/pwlib-v1_10_3-src-tar.gz
#tar zxvf pwlib-v1_10_3-src-tar.gz
#cd pwlib_v1_10_3/
#./configure
#make
#export PWLIBDIR=/usr/src/pwlib_v1_10_3
My path in the export command is different then those in the astrecipes link because I downloaded my files to a different directory then he did. The export command creates a shell variable that is also recognized by the kernel. In this case the variable contains the path to our pwlib directory. This is an important step as openh323 needs this path variable.
#cp $PWLIBDIR/lib/libpt_linux_x86_r.so.1.10.3 /usr/lib
Manual copy of the shared library to the system folder. Notice here that we are using the path variable that we created with the export command above.
The full path is:
/usr/src/pwlib_v1_10_3/lib/libpt_linux_x86_r.so.1.10.3 /usr/lib
By using the $PWLIBDIR variable we save a few keystrokes.
Go back one directory to the src directory
#cd ..
Next we do pretty much the same thing to install openh323:
#wget http://downloads.sourceforge.net/openh323/openh323-v1_18_0-src-tar.gz
#tar zxvf openh323-v1_18_0-src-tar.gz
#cd openh323_v1_18_0/
#./configure
This next command took several minutes on my machine so be patient.
#make opt
#export OPENH323DIR=/usr/src/openh323_v1_18_0
#cp $OPENH323DIR/lib/libh323_linux_x86_r.so.1.18.0 /usr/lib
#cd ..
The next section is about installing Asterisk which I have already done, but I need to recompile Asterisk to see the h323 stuff.
#cd /usr/src/asterisk-1.4.23.1
#make clean
#./configure
#make menuselect
I see that asterisk now has the chan_h323 option selected. That was a happy little moment.
Press x to exit out of menuselect
You need to run make twice now. The first time you get an error that you need to run it again, so just do it.
#make
#make
#make install
I am not going to "make samples" because that would overwrite the work I have done in my .conf files.
Note - If you run "make samples" by mistake the existing .conf files get written to .conf.old files but just to be safe you should probably save all the work you have done in the .conf files somewhere else once in a while.
#cd ..
To start asterisk type:
#asterisk
Attach to the console with:
#asterisk -vvvvr
It should be running now with H323.
Next time more work to connect to CallManager.
Asterisk PBX Install - Index
Tuesday, June 2, 2009
Exchange 2003 Non-Delivery Reports
About a year ago (2008) we were getting NDRs because our reverse DNS (RDNS) PTR was not set correctly but we fixed that. Recently our users started getting NDRs of various types again but it is not the reverse pointer this time.
Quick:
Fix FQDN on the SMTP Virtual Server.
Visual:
Learning:
We starting getting a number of different NDR errors and I assume this is because of companies tightening up on thier SPAM filtering.
Errors included:
The following recipient(s) could not be reached:
FOLLOWED BY EMAIL ADDRESS THAT IT FAILED TO SEND TO AND ONE OF THE FOLLOWING REASONS:
You do not have permission to send to this recipient. For assistance, contact your system administrator.
FOLLOWED BY DIFFERENT MESSAGES LIKE:
-Helo command rejected: Host not found
-Client host rejected: cannot find your reverse hostname
-Requested action not taken: message refused
-ETC.
We send email out as:
userName at OurExternalDnsName.com
Our mail server connects as:
InternalDomainName.com
The thought was that perhaps the receiving servers were trying to validate the Internal Domain Name and failing. I changed the name that the SMTP Virtual server connects with and that solved the problem.
See visual above:
In Exchange System Manager
Select the Default SMTP Virtual Server and right click for properties
Select the Delivery Tab and the Advanced button
Change the Fully Qualified Domain Name to the External DNS name for your mail server.
Monday, June 1, 2009
Asterisk PBX System Install - 11 Overhead Paging
Quick/Visual/Learning:
Overhead paging system
Valcom V-2003A
Our current system requires us to dial *60, at that point you hear a tone, then dial 1 to access the over head speakers and talk into the phone to make the announcement.
Looking at our Cisco routers I see that one of the ports is dedicated to this function.
You can see below that voice port 2/0 is configured as the paging port on the 1760 router.
Cisco 1760 Configuration
voice-port 2/0
trunk-group Outbound 2
input gain 2
output attenuation 2
echo-cancel coverage 32
echo-cancel erl worst-case 0
no vad
no comfort-noise
connection plar 401
impedance complex2
description paging port
To access the port a dial-peer is configured to look for the dial pattern of *60
!
dial-peer voice 86 pots
destination-pattern *60
port 2/0
forward-digits 0
!
Now all I need to do is get Asterisk to connected to the Cisco router and pass the dialed numbers (*60) to the router. I read on page 140 of the Asterisk book that Asterisk saves the dialed extension in a variable ${EXTEN}. So let’s edit extensions.conf file.
I added a context called [overhead-paging]
[overhead-paging]
exten => *60,1,Dial(${OUTBOUNDTRUNK}/${EXTEN})
exten => *60,n,Congestion()
exten => *60,n,Hangup()
As you remember OUTBOUNDTRUNK is my variable for the Cisco router (Post 8). So this connects to the router and passes the dialed number of *60.
If there is a problem Congestion gives a fast busy sound, and the line hangs up.
Under the [internal] context I add overhead-paging to the list of included contexts.
[internal]
include => outbound-local
include => parkedcalls
include => overhead-paging
That’s it. I reload the dialplan and press *60 on one of the phones. This gets passed to the Cisco router. The router matches the *60 to the port for the paging system. I hear the tone, dial 1, and now I can talk over the overhead speakers.
Next problem to work on is Cisco CallManager Intergration