Monday, June 30, 2008

Problems mapping a drive as a different user

I got the following error while trying to map to an administrative share from a users computers. "Network folder specified is currently mapped using a different user name and password"

No such mapping was showing under "My Computer"

A fellow blogger had a post that helped.
http://travisepperson.blogspot.com/2007/01/windows-network-folder-specified-is.html

In a nut shell, at a command prompt (start menu, run, cmd ). Ran command "net use" and saw that there was a connection that was not showing up in "My Computer" window.
Command "net use file://servername/ShareName /delete" fixed the problem and now I can map the drive.

Enable Automatic Logon Win2k

At times you may want a computer to boot without a logon prompt. This may be handy for areas such as confrence rooms or guest computers.


How to Enable Automatic Logon in Windows 2000 (Q234562)This is an article from Microsofts website, located here. http://support.microsoft.com/default.aspx?scid=kb;EN-US;q234562

---- TEXT from link pasted below-----

Preventing the Password Prompt in a Non-Domain System
loadTOCNode(2, 'summary');
1.
In Control Panel, double-click Users and Passwords.
2.
Click to clear the Users must enter a user name and password to use this computer check box.NOTE: This option does not appear on a system that is a member of a domain.
3.
Click the Advanced tab.
4.
Click to clear the Require users to press Ctrl-Alt-Del before logging on check box.Automatic logon is not supported when you are logging on to a domain. You will need to join a workgroup if you want to use the automatic logon feature. You can also turn on the automatic logon feature in all versions of the Windows 2000 product family by editing the registry.WARNING: This procedure will allow the user to log on automatically to the domain. This could cause a serious security problem. Anyone booting this system with this registry modification will be logged on to the system with the user's security credentials.
1.
Start Regedt32.exe and locate the following registry key:
HKEY_LOCAL_MACHINE\SOFTWARE\Microsoft\Windows NT\CurrentVersion\Winlogon
2.
Establish your domain name, account name, and password, using the values you would normally type when logging on. You should assign the following values: DefaultDomainName, DefaultUserName, and DefaultPassword.NOTE: The DefaultDomainName and DefaultUserName values may already exist. The DefaultPassword value may not. If it does not, create it. To do so:
a.
On the Edit menu, click Add Value.
b.
In the Value Name box, type DefaultPassword.
c.
In the Data Type box, click REG_SZ.
d.
Click OK.
e.
In the String Editor box, type your password. Click OK and save your changes. NOTE: If no DefaultPassword string is specified, Windows automatically changes the value of the AutoAdminLogon key from 1 (true) to 0 (false). This disables the AutoAdminLogon feature. This behavior also occurs if the DefaultPassword string is specified but the password is left blank or null.
3.
On the Edit menu, click Add Value. Type AutoAdminLogon in the Value Name box. Click REG_SZ in the Data Type box. Enter 1 in the String box. Save your changes.
4.
Quit Regedt32.exe.
5.
Shut down Windows and turn off the computer.
6.
Restart your computer and Windows 2000. You should be able to log on automatically now. Note that this setting only applies to the first logon. To enforce this setting for subsequent logoffs, the administrator must configure the following setting:
HKEY_LOCAL_MACHINE\SOFTWARE\Microsoft\WindowsNT\CurrentVersion\WinlogonValue: ForceAutoLogonType: REG_SZData: 1This is a by-design security feature. The resolution involves editing the registry. Editing the registry is not supported.
Back to the top
MORE INFORMATION
loadTOCNode(2, 'summary');
Windows 2000 Only
loadTOCNode(2, 'summary');
The process that is described in this article only applies to the first logon. To enforce this setting for subsequent logons, the administrator must set the following registry key:
HKEY_LOCAL_MACHINE\SOFTWARE\Microsoft\WindowsNT\CurrentVersion\Winlogon Value: ForceAutoLogon Type: REG_SZ Data: 1

Thursday, June 26, 2008

Execute a command on a remote computer

Sysinternals Suite has a lot of great free utilities.

Find them here: http://technet.microsoft.com/en-us/sysinternals/0e18b180-9b7a-4c49-8120-c47c5a693683.aspx

I had a need to execute a command on a different networked computer with a script and I found just the tool I needed here.

PsExec file://MachineName/ -c MyFile.exe

This command will copy the MyFile.exe program to the remote computer and execute it on the remote computer.

Pretty cool!

Make for Windows Perl Scripts

Perl is a great scripting language for automating tasks. But unlike Linux, Windows lacks a make utility for compiling PERL modules.

You can download Nmake15.exe from http://support.microsoft.com/default.aspx?scid=kb;en-us;Q132084

I found help on compling perl modules using nmake at http://johnbokma.com/perl/make-for-windows.html

Copy both the NMAKE.EXE and the NMAKE.ERR file to your Perl bin directory, normally C:\Perl\bin.

The uncompiled perl module should come with a file called Makefile.pl
Just open a command prompt in the directory where you have the uncompiled module and the Makefile.pl file and run the following commands:

1. run the command: perl Makefile.pl
2. run the command: nmake
3. run the command: nmake test
4. run the command: nmake install

If you get an error like "nmake is not recognized as an internal or external command", make sure you have the C:\perl\bin directory in your path.

Tuesday, June 24, 2008

Machines in remote site not showing in browser

Issue: Our remote machines are not showing up in Windows Explorer under:

My Network Places/Entire Network/Microsoft Windows Network/Domain Name


Needed to do some learning here because I have not ever had to fix this in the past. Note that we are on a Windows 2003 Network and have DCs not PDCs and BDCs. One DC on every Windows domain is given the PDC emulation role so when I say PDC this is the server I am talking about. If you are not familiar with this you can google search “windows.schema.roles”. Normally the acting PDC will always be a master browser as well.


Overview: Browser Service uses network basic input/output system (NetBIOS) to resolve names and works off of the “Computer Browser” Service, which runs on each server and workstation. Any computer running this service has the potential of being elected to be the “Master Browser”. The master browser and backup browsers maintain the list of computer names. There is one master browser on each network segment and this will be a domain controller if there is one on the network segment. Master browsers on each segment maintain their own computer list because they use broadcast packs, which are block by routers. In order to get a complete list the DC with the PDC role gathers information from all the master browsers and then the master browsers pull the complete list back from the DC so that each master browser now has a complete list of computers.Look at this link for more detailed information on how this works: “Description of the Microsoft Computer Browser Service” http://support.microsoft.com/kb/188001


To resolve the issue these links came in handy:


Troubleshooting the Microsoft Computer Browser Servicehttp://support.microsoft.com/kb/188305


How To Diagnose and Test TCP/IP or NetBIOS Network Connections in Windows 2000

http://support.microsoft.com/kb/300986


It can take up to 48 minutes for computers to show up in the master browser list but our missing machines have been on for weeks so this is not the issue.

Steps I used to solve our problem:

1. Get browstat utility. This utility was part of the Windows 2000 resource kit. I was able to download it here: http://www.petri.co.il/download_free_reskit_tools.htm


2. Identify master browser that is on same remote network segment as missing machines:

a. Connect to a machine on the remote network segment. Run the command:

b. Browstat status

c. Should see a line returned like: “Master browser name is: MasterBrowser”.

d. Also see a line like “Status for domain DomainName on transport \Device\NetBT_Tcpip_{CD3E51C9-E5A2-4ACD-B6F5-AA457A688721}”.


e. Copy the device ID portion: ”\Device\NetBT_Tcpip_{CD3E51C9-E5A2-4ACD-B6F5-AA457A688721}” (This is the network card that is being used for NetBIOS and you need this for the next commands).


f. If you see more then one card listed this can be a problem. PDC and Master browsers should not be multihomed (more then one network card connected to the network). Our PDC and the masters did have more then one active network card but only one was connected to the network.


g. Disabled the unused network card to be sure it was not causing problems.


3. Next determine if the remote master browser has the name of the missing machines in its’ own list.


a. browstat view CopiedDeviceSeeStep2 file://MasterBrowserFromStep2/ findstr /i OneOfMissingComputerNames. The view command will list all the machines but the findstr portion finds and lists just the machine we are interested in. This is helpful if the list is large. In my case it was there so the remote master browser is getting the names OK. In our Case it was fine but: If it is not there do the following:

1. on remote network run: bowstat forceannounce CopiedDeviceSeeStep2 domainname

2. Or, you can run the following command from the missing server's console: browstat announce CopiedDeviceSeeStep2 domainname


3. It may be useful to verify that the missing server can map a network drive to the master browser to verify network connectivity.

4. Also, you can reboot the server to force a Host Announcement frame. str /i missingserver


4. Our remote master browser was OK and the next step is to see if the remote master browser information is getting to the PDC.

a. browstat view \ CopiedDeviceSeeStep2 file://PdcName/ findstr /i missingserver. This command will look at the PDC and see if the missing machine is in the PDC list. For us this is where it was missing. Guide indicates that this is probably a name resolution issue, which needs to work in both directions. Steps to Fix this issue:

b. Tried command: - browstat getpdc \device\netbt_el59x1 domainname (this worked OK)

c. Next tried looking at some helps on NetBIOS. Found link “How To Diagnose and Test TCP/IP or NetBIOS Network Connections in Windows 2000” http://support.microsoft.com/kb/300986 Found that I could run nbtstat command to test:


d. Nbtstat –a RemoteMasterBrowser (ran from PDC and this worked)

e. Nbtstat –a PdcName (ran from remote master browser and this failed)

Failed with “Host Not Found” error. Found this link which is not quite the same but gave me a few things to look for: “NBTSTAT -A May Return Host not Found Error Message” http://support.microsoft.com/kb/q175935/ The thing I found was that the Messenger service on our PCD was disabled.


f. Enabled and started the Messenger service and the Nbtstat command started working.

After giving it some time the missing machines are now showing up in the browse list.


PROBLEM SOLVED (apparently by enabling Messenger service on PDC emulator).


Other links:

Understanding Browsing http://www.windowsitlibrary.com/Content/155/05/3.html

Saturday, June 21, 2008

Restore Deleted Items from an Outlook PST file

Found this link that may come in handy on restoring deleted items from a .pst file (Personal STorage file). Not a quick fix but if you are desperate it may help.
http://www.howto-outlook.com/howto/restoredeleteditemsfromanoutlookpst.htm


Here is the text with some notes from me.
---------------
This guide will instruct you how to recover all your deleted messages since the last time you ran “Compact Now” on a PST-file. (I will post a tip on compacting PST files)
When you haven’t closed and opened Outlook in between you’ll have the best results. If you have restarted Outlook in between the results are unpredictable.
If the items aren’t restored at the first attempt you could try again and delete more or other characters at the beginning but I don’t think it will work.
The best way is always to restore from backup; preventing is better then curing.
Locate the *.pst file (see my note below on how to locate) and create a copy of it to work with (never mess around with original files!)
Open the *.pst file in a hexadecimal editor. (I use UltraEdit for this) (I found a free one at www.physics.ohio-state.edu/~prewett/hexedit)
In the column on the right side overwrite character 7 to 13 with spaces. In the hexadecimal column (left column) block 7 to 13 will display 20 (hexadecimal value for a space)
Save the *.pst file
As you have now corrupted your pst file you need to run scanpst.exe (located in c:\program files\common files\system\mapi\1033\nt or just search your hard drive for scanpst.exe - note that this can take a couple of hours to run) to repair it
When scanpst has repaired your pst file open in it Outlook and look in the Deleted Items folder or in the original folder to locate your deleted items
-----------------------


  1. How to locate the PST file.
  2. Right click the folder set
  3. Select Properties
  4. Select Advanced
  5. Look at path in File Name Field.


Friday, June 20, 2008

Outlook shortcuts use currently open IE window

Issue: When you click on a link in Outlook 2000 it opens in a currently open Internet Explorer window instead of opening a new Internet Explorer window. If you were not done reading that webpage you have to navigate back.

Fix:
Make sure Outlook is closed.
In Internet Explorer choose;Tools-> Internet Options-> tab Advanced-> section Browsing-> untick option “Reuse windows for launching shortcuts”
Found this solution at http://www.howto-outlook.com/howto/reuseiewindow.htm

FTP and Internet Explorer 7

Many of our users in the past used Internet Explorer 6 browser for connecting to an FTP site to upload/download files. The problem is that with IE7 the process is not as simple.
After you put in the site ftp://whateverftpserver/ and log on, you can see all the files but you can not copy or save anything from the ftp folders.

There is a message in the window that says:
"To view this FTP site in Windows Explorer, click Page, and then click Open FTP Site in Windows Explorer."

If you do this you are prompted to log on again and after doing so you can now copy files to and from the directory (assuming you have rights in the folder).

An easier way is to just open windows explorer from the start and enter the path to the ftp site from there. Doing it this way you only have to log on once and you can start working with files right away.

Wednesday, June 18, 2008

Outlook "Cannot turn off the reminder" error

Had a user with the following error in Outlook: "Cannot turn off the reminder. You may be reminded again. Could not complete the operation"

Also if you try to open the appointment you get an error as well.

The reminder for the meeting keeps poping up over and over again.
Tried closing Outlook and typing on the run line (in windows go to Start menu and select Run):
outlook /cleanfreebusy
(The above command opens Outlook and cleans the free/busy information)
closed Outlook and opened Outlook again from the run line:
outlook /cleanreminders
(The above command opens Outlook and cleans the reminders)
This has worked for me in the past but not this time.

I was finally able to fix the problem by deleting the corrupted meeting with the following procedure:
When the reminder pops up make note of the meeting date and time .
Select the Calender folder
Change the view to "By Category" see below for Outlook 2003.


This is how you change to "By Category" view in Outolook 2000

Sort Category view by start date and locate the problem meeting and delete it.

You may get an error saying that the meeting was not deleted properly but at least it is gone.

Monday, June 16, 2008

Zooming and Text size in Internet Explorer and Microsoft Office

You may at times need to zoom in on a web page or on an office document. You can quickly change the font size appearance by doing the following:

While holding down the control (Ctrl) key use your scroll wheel on your mouse to zoom in or out. (If there is a keyboard key you can use instead of a scroll wheel I am not aware of it)

Remember that the changes you make using the ctrl-scroll wheel remain in effect till you change them back. If you are seeing tiny text or very large text on all your browser web pages or Office documents then this setting has probably gotten changed somehow and you can adjust it back using the above method.

Wednesday, June 11, 2008

UPS - How to get APC Smart-UPS (Uninterruptible Power Source) to manage all the attached computers

We have a 5 or 6 servers being powered by each of our Smart-UPS devices. We wanted the UPS to gracefully shutdown each of the servers in case of a long power outage. Seems reasonable but the PowerChute program that comes with the UPS will only shutdown the one system that is attached to either the serial or USB connector of the UPS. How do you shutdown the rest?

First we made the mistake of buying Powerchute Business Addition. This will let you manage multiple USP devices but not multiple machines connected to each device.

Next after talking to APC support we found out that you can buy a APC device that is a kind of USB hub which will allow you to shutdown up to 8 machines. This solution seems a bit kludgy and you have to buy their hub and special USB cables for each connection, which gets a bit expensive.

The best option we found was to buy the APC Management Card. This card fits into the UPS expansion slot and gives you an Ethernet connection that you can use to manage as many machines as you want by IP address. Just plug an Ethernet cable from the UPS to your switch and install the client application on each of the machines you want to control.

The process and things we learned:

Don’t expect much from the documentation that comes with the management card.

You have to power off the UPS to install the card in a SMART-UPS.

Connecting a laptop to the UPS serial connection is the most reliable way of configuring the management card. Settings are 2400 bps, 8 data bits, no parity, 1 stop bit, and no flow control.

If you have ever used the USB port on the UPS you have to do the following procedure to get the serial connection to work:
1. Turn off the UPS
2. Unplug the UPS
3. Press and hold the off button for 10 seconds
4. Make sure the usb cable is unplugged.
5. Plug in and power it back up.

Default user is apc and the password is apc as well.
Once you are logged in you get a text menu:
Select 2 for Network and then configure the IP address under TCP/IP option.
I set ours to manual and gave it a static IP address.
Exit and logout to save your settings.

You can now setup the Management Card remotely with a browser.
Put the IP address of the UPS in the browser and use apc for both the username and password.
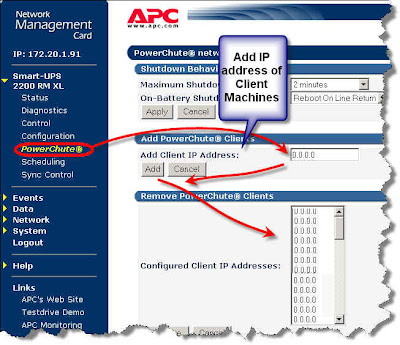
Next add the client machines you want to be able to power down.


Next you need to set the Authentication Phrase. You may be able to just use the default but I did not try this.

Download the client software to install on each client machine.
http://www.apc.com/

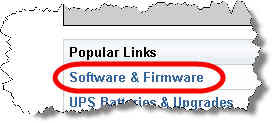
Select Software & Firmware on the home page.


Pick "Software Upgrades - PowerChute Network Shutdown" form the list


Click on Continue


Find your client operating system and click the continue button next to it
.

To do the download you need to login using apc123 with password apcapc (If this does not work call APC Support 800-555-2725 for new login)

Finish downloading clients for each of the needed operating systems.
When you install the client on each machine you will need to have the IP address of the management card so that you can point the client to it and the Authentication Phrase


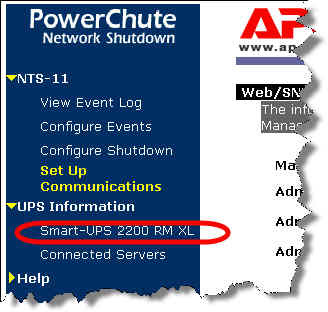
Install the client on each client machine and point them at the UPS' IP address. You will know it is working when you open up the client machine software and you can see the UPS listed like in this picture.


Thumbnails Fix

Had an issue with thumbnails not showing on Windows 2000 machine and fixed it using this link:
http://www.dewassoc.com/support/useful/registry/repairthumb.htm

If the link goes bad you can probably track down the answer qucikly by just doing a google search for this string 7376D660-C583-11d0-A3A5-00C04FD706EC

Tuesday, June 10, 2008

Fake Virus Scanner Cleaning - Antivirus 2008

Issue:
Fake virus scanner called Antivirus 2008 trys to scare users into buying software.

Quick:
Download Anti-Malware, Reboot into Safe Mode with Networking, Install Anti-Malware, Run quick scan, remove malware and reboot to normal Windows.

Visual:
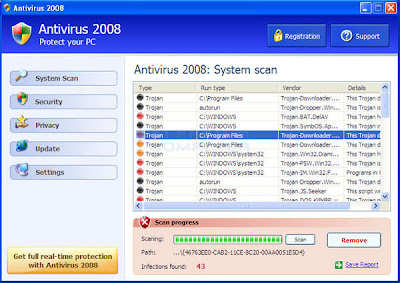
This is what the fake scanner looks like


Learning:
Had a user that somehow got a fake virus scanner on his computer. "Antivirus 2008" (fake scanner) kept poping up warning messages that he had lots of virus when he tried to go to websites and that he needed to purchase software to remove them. This is all a scam to try and trick (extort) unsuspecting users into buying fake software.

I was able to remove it using information from the following site:
http://www.bleepingcomputer.com/malware-removal/antivirus-2008
and Anti-Malware software from download: http://download.bleepingcomputer.com/malwarebytes/mbam-setup.exe

Restarted the machine in safe mode (with network connection enabled) and downloaded and installed Malwarebytes' Anti-Malware. Doing a "Quick Scan" detected and removed the fake scanner.

-------- Partial Text from link ---------
1. Print out these instructions as we will need to close every window that is open later in the fix.

2. Download Malwarebytes' Anti-Malware, or MBAM, from the following location and save it to your desktop: http://download.bleepingcomputer.com/malwarebytes/mbam-setup.exe

3. Once downloaded, close all programs and Windows on your computer, including this one.

4. Double-click on the icon on your desktop named Download_mbam-setup.exe. This will start the installation of MBAM onto your computer.

5.When the installation begins, keep following the prompts in order to continue with the installation process. Do not make any changes to default settings and when the program has finished installing, make sure you leave both the Update Malwarebytes' Anti-Malware and Launch Malwarebytes' Anti-Malware checked. Then click on the Finish button.

6.MBAM will now automatically start and you will see a message stating that you should update the program before performing a scan. As MBAM will automatically update itself after the install, you can press the OK button to close that box and you will now be at the main program ...

7. On the Scanner tab, make sure the the Perform quick scan option is selected and then click on the Scan button to start scanning your computer for Antivirus 2008 related files.

8. MBAM will now start scanning your computer for malware. This process can take quite a while, so we suggest you go and do something else and periodically check on the status of the scan.

9. When the scan is finished a message box will appear... click OK.

10.You will now be back at the main Scanner screen. At this point you should click on the Show Results button.

11.A screen displaying all the malware that the program found will be shown... You should now click on the Remove Selected button to remove all the listed malware. MBAM will now delete all of the files and registry keys and add them to the programs quarantine.
--------End Text from link------

Monday, June 9, 2008

GUI - Missing "Show Desktop" icon fix

Fix missing icon that automatically minimizes all windows so you can see your desktop.
http://support.microsoft.com/kb/190355
===text from link===
Manual steps to re-create the Show Desktop icon on the Quick Launch toolbar
The Show Desktop icon is not an ordinary program shortcut. If the icon is deleted, the procedure for re-creating the icon is not obvious. To manually re-create the Show Desktop icon, follow these steps: 1. Click Start , click Run, type notepad, and then click OK.
2. In Notepad, type the following text on individual lines:
[Shell]
Command=2
IconFile=explorer.exe,3
[Taskbar]
Command=ToggleDesktop
3. On the File menu, click Save As, and then save the file to your desktop as Show Desktop.scf.

Note Notepad might automatically append a .txt extension to the file name. Remove this extension if present. The file name should be Show Desktop.scf.
The file must now be moved to the correct folder in the user profile to appear in the Quick Launch toolbar. To manually do this, use one of the following methods.
Method 1
1. Use the mouse to drag the Show Desktop.scf icon to the Quick Launch toolbar or another location where you want the shortcut to appear.
2. Click Move Here.

Method 2
1. Use Windows Explorer to locate the following folders:

Microsoft Windows 95 and Microsoft Windows 98
Windows\Application Data\Microsoft\Internet Explorer\Quick Launch

Microsoft Windows NT, Microsoft Windows 2000, and Microsoft Windows XP
C:\Documents and Settings\Username\Application Data\Microsoft\Internet Explorer\Quick Launch

Note Username refers to the account name where you want to put the icon.
2. Use the mouse to drag the Show Desktop.scf file to the Quick Launch folder.
3. Click Move Here.
Note By default, the Application Data folder for Windows NT, Windows 2000, and Windows XP is a hidden folder. You may have to unhide this folder by using the Advanced Settings in Internet Explorer. Click the Show hidden files and folders option.
===end text from link===

TCP/IP - Get a MAC address using ARP -a

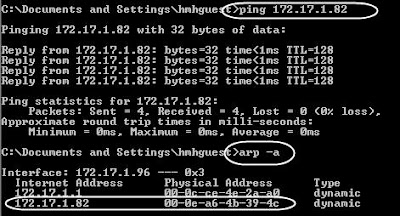
If you need the MAC (Media Access Control) address of a device that is online here is an easy way to get it:

1. Open a command prompt
2. ping the ip address.
3. run the command arp -a to display the ARP (address resolution protocol) table

Here you should see the MAC address next to the IP address.

The ARP table keeps the this information for 2 minutes after the ping.
Here is an example:


Routing Word Document for Approval

Found posting on how to route Word documents for approval. The link is included here and the text form the link is below as well.
http://blogs.techrepublic.com.com/msoffice/?p=549&tag=nl.e056
=====text from link=====
Use Word 2002/2003’s Routing Slip feature to send a document as an e-mail attachment to each reviewer in the order designated by you. Word will then return the document to you with everyone’s proposed changes. Follow these steps:
Go to File Send To Routing Recipient.
Click Allow.
Select the default text in the Subject box and enter Routing: Training document approval. (You can also enter your own Message text; if not, Word will add text for you.)
Click the Address button.
Click Allow.
Click the name of the first reviewer in your list of addresses.
Click the To button.
Click the name of next reviewer in your list of addresses.
Click the To button.
Repeat steps 7 and 8 for each person on your list.
Click the Add Slip button.
====end text from link===

Prevent crapware from slowing down your computer

Fix your slow boot issues.

Below is a link to a PDF. This is a great How To for disabling and removing system crippling junk software from your computer. If you have some weird behavior going on, this is a good place to start troubleshooting. Uses a free software tool (autoruns) to identify and disable add-on software that may be the problem. You can also re-enable it with these tool so you do not need to go through the hassle of uninstalling and reinstalling software that you want.

Another free tool CCleaner is used to clean off the junk.
http://i.i.com.com/cnwk.1d/i/tr/downloads/home/degunk_crapwarev2.pdf

Friday, June 6, 2008

Outlook Calender Meetings vs Appointments

Outlook appointments do not include other people. Outlook meetings on the other hand have invited guests. Just by inviting people you can change an appointment to a meeting. See image.

Outlook 2000 rule import and export

Good visual explination of how to import and export rules in Outlook
http://www.depts.ttu.edu/helpcentral/directions/Import-Export_Rules_O2k.php

Non Delivery Report - NDR Spammer filter

Some spammers have been using a built-in feature of email to get around spam filters. This Outlook rule can help to filter them out.

Normally if you send mail to a person and it does not reach them you get a return notification message that your email did not get delivered. This type of email notification is called a Non Delivery Report or NDR for short. It is important that users get these NDR messages or else they assume that they have communicated information when in fact it never reached the intended person.

The problem now is that some spammers spoof the return mail address. You are probably being spoofed if you find that you are getting NDRs for messages that you never sent.

The spammer trick is to send the message to a known bad address on purpose so that it will bounce back to the spoofed return address (which is your address). Now you open the email to figure out what got return and... Congratulations you have just become the recipient of spam mail.

The problem is how to filter out fake NDRs and not the valid ones.

I found the following post that has helped to filter these out at least at the client:
http://forums.msexchange.org/m_1800471565/mpage_1/key_/tm.htm#1800471565
Here is the text from the post:
===start copied text===
After some additional research and experimentation we think we've found an acceptable solution that relies on the following 3 premises,

1. Most NDRs can be filtered using a small set of subject phrases.
2. Most legitimate NDRs will reference the IP address or Postmaster account of our mailserver somewhere in the message header or body.
3. Spoof generated NDRs will reference the FQDN of our mailserver (as configured in the advanced Virtual SMTP properties) in the message header as the final recipient, but never the IP address or Postmaster account.

Using these premises we crafted a simple Outlook rule, exported it to a file and distributed it to our affected users along with import instructions. The rule runs server-side so once it's entered there's no further reliance on the Outlook client. We would have preferred a centralized solution but none of our current products gave us the level of filtering control found in the Outlook client rules. Here's an example of what we're using,

Apply this rule after the message arrives with 'undeliverable' or 'undelivered mail' or 'delivery failed' or 'delivery failure' or 'failure notice' or 'returned mail' or 'notification (failure)' in the subject move it to the Junk E-mail folder except if the body contains 'our mailserver IP address' or except if the message header contains 'our mailserver IP address' or 'postmaster@ourdomain'
===end copied text===

Thursday, June 5, 2008

Searching Outlook Part 1

Tips for locating email messages in Outlook for times when you can't quite remember where you filed that old email.

Finding Information in Outlook 2000 (Outlook 2003 is similar)

Looking for a particular message but not sure where it is? Read on.

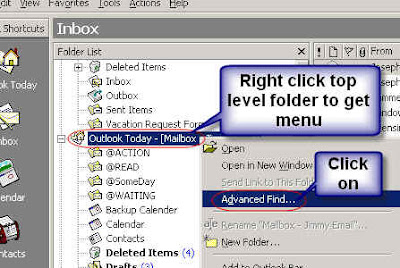
Right Click on the top level folder and select Advanced Find…You can only select one set of top level folders at a time.


.


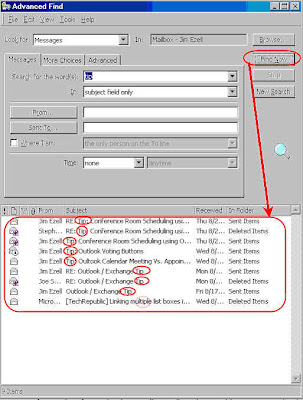
This will bring up a search window
You can search for words in the subject field (pretty quick) or use the drop down box to include message contents in the search (can be slow if you have a lot of mail).


Click the Find Now button with “subject field only selected” and you get a list of messages with your search word in the subject line. Notice that the last mail item is found because the word multiple has the letters tip in the word mul-tip-le.


Selecting “subject field and message body” finds 94 messages instead of the 9 in the previous search (searching subject only)

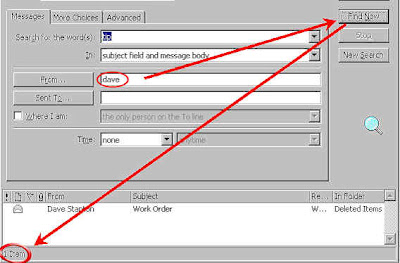
I type in dave in the from fielded and I narrow it down to just one message


If I clear the search words and just put Dav in the from field I find all the messages from people with dav in their name or their email address.


You could also put part of the email address such as the name of the company to find all messages from a particular company email address like att.com or whatever.
Other options on this page allow you to search if the message was sent directly to you or not.
You can also select a time window (received or sent time) to search.

Searching Outlook Part 2

Finding Information in Outlook 2000 (Outlook 2003 is similar)PART 2

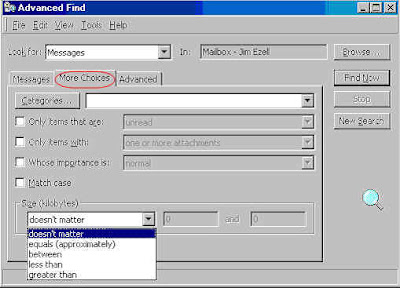
On to the next tab we have More Choices
On this tab you can specify more things to narrow down a message search:


-Find things by Category
-Specify if what you are looking for is marked Read / Unread
-Specify if it has an Attachment
-Specify the importance level of the message Normal / High / Low
-Specify that text case matches what you typed in (on the Messages tab)
-Specify a message size to look for

The thing I use the most on this tab is the size search limit. This is very handy when you want to clean up your mailbox.


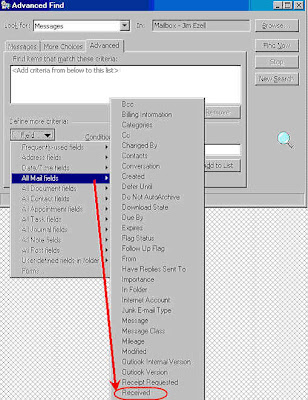
The Advanced Tab is where you can create custom options.
What I use most here is to search for a message date. The date options on the “Messages” tab are limited so I sometimes use the Advanced tab to search for a message date.
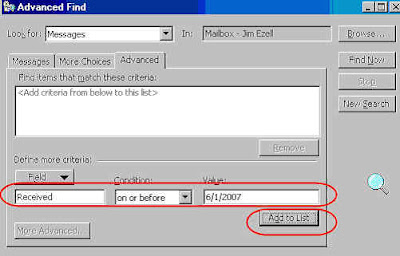
Here I am going to search for messages on or before June 1, 2007.
Click on the “Add to List”.Note: You can add more then one item to the list.


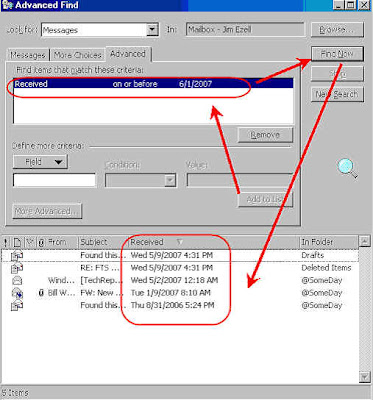
When you add it to the list you see it in the upper window

Click on “Find Now”You see the results for messages older then 6/1/2007

Advanced find is a powerful tool that can help you locate messages very quickly.

Turn off beeping alarm on Dell server

One of the Dell servers is alarming. Looks like an issue with the raid 5 drives. To turn off the alarm:

Open Dell OpenManage Array Manager

Right click on the controller card

Select Quiet Alarm.

Now with relative quite restored what is the issue?

Looking on the Events tab of OpenManage I see that the array thinks the drive was removed but the drive is physically in there and no one here removed it. OpenManage does in fact see the drive as ready.


After call to Dell Support they say the the version of firmware we have is known to drop drives at times. They suggest:
1. Updating the firmware
2. Running diaganostic checks on the drives
3. Enabling drive zero as the new hotspare